Modern Rodding Tech

InTheGarageMedia.com

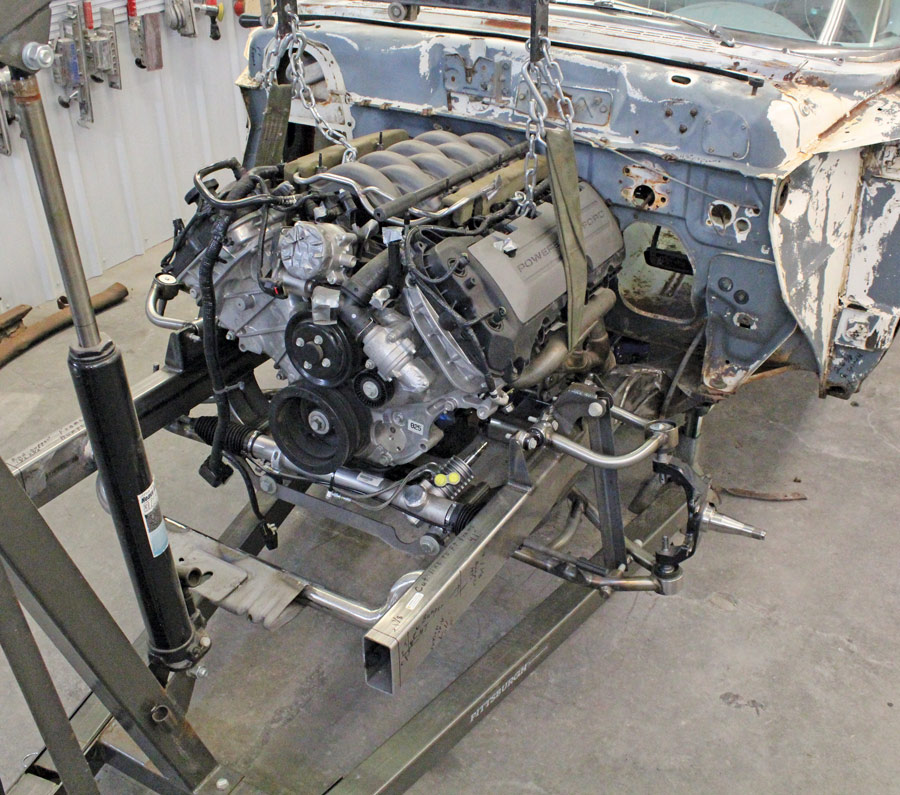
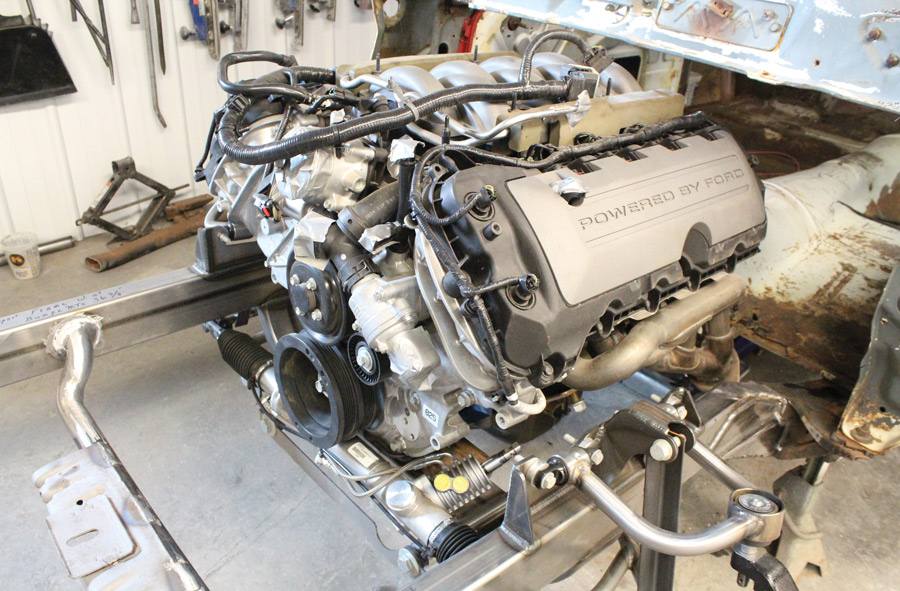
1. A family affair, Tate Radford (left), Caden Radford (right), and Colin Radford (kneeling) are situating a Ford Performance Coyote V-8 in a rare ’57 Ford two-door Del Rio Ranch Wagon.

1. A family affair, Tate Radford (left), Caden Radford (right), and Colin Radford (kneeling) are situating a Ford Performance Coyote V-8 in a rare ’57 Ford two-door Del Rio Ranch Wagon.

Ranch Wagon Redo Title Typography
Ranch Wagon Redo
Putting a Ford in a Ford: Cramming in a Coyote V-8
By Ron Ceridono Photography by Brian Brennan & Tate Radford
I

n the Nov. ’21 issue of Modern Rodding we introduced Colin and Sue Radford’s ’57 Ford Del Rio Ranch Wagon as he installed an Art Morrison Enterprises (AME) Bikini Clip. Over the years we watched the Radford Automotive crew as they have turned out a number of top-notch street rods, trucks, and their own record-holding Bonneville car, doing everything from chassis construction to body- and paintwork. This time around we followed Colin and grandsons Tate and Caden as they installed a Vintage Air Front Runner onto a Ford Performance Coyote V-8 in a Ford wagon where there was once a much-smaller Y-block.

The Radford crew has a number of tips and tricks that have come from experience, not the least of which are to plan ahead and take lots of measurements. Before the Ford’s front suspension was replaced with the AME clip the car was placed on jackstands and all the critical points (chassis centerline, wheelbase, and so on) were recorded on the shop floor (see the first installment). Not only was that important to position the front suspension properly, prior measurements would also be used to position the core support bracket now that the new subframe is in place.

When swapping engines there are always a variety of problems that may appear, many of them are self-inflicted; radiator and fan clearance are probably the most common example. Again, measurements and planning are critical and in this case to provide the necessary room for the radiator and fan the Coyote would have to be moved further to the rear than the original Y-block, which meant the firewall had to be modified. Certainly, something better done now than later when it’s discovered there’s no room for a fan.

Additional considerations are the space for the steering and exhaust. In this case exhaust clearance on the passenger side wasn’t a problem, but it did take some creativity to fashion engine mount brackets on the left side that provided an unobstructed path for a shaft from the steering column, past the lefthand header, and onto the rack-and-pinion. Another issue that often pops up is oil pan to crossmember/steering component clearance. In this case in addition to the vastly improved handling, the AME clip with its front-mounted rack-and-pinion and contoured front crossmember provided much more room than the stock chassis configuration, so oil pan clearance wasn’t an issue.

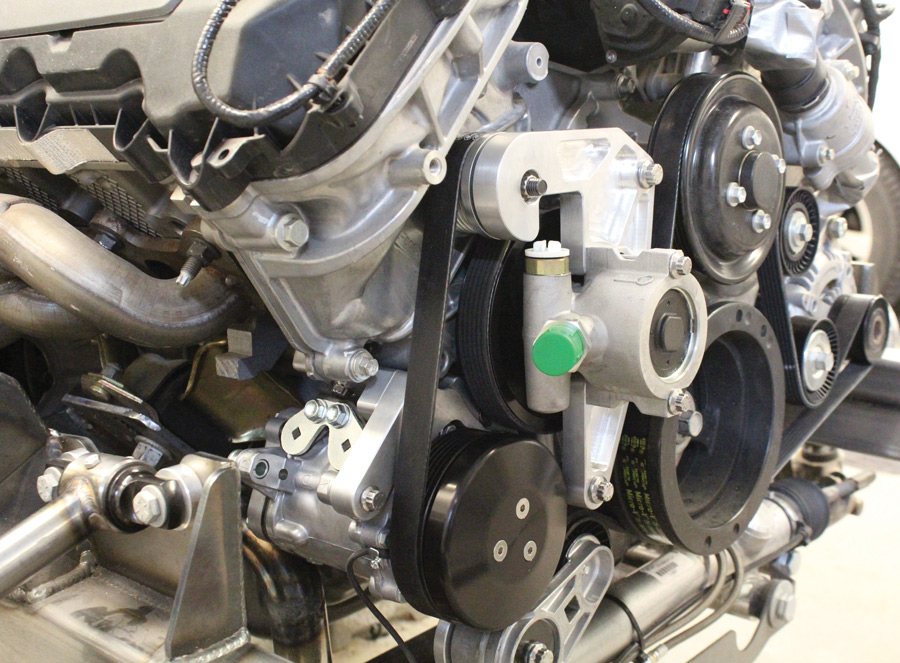
While the Coyote V-8 is a big engine, like most cars of the era the Radfords’ wagon engine bay could accommodate its width, and setting the firewall back the required 2 inches wasn’t a problem. The real issue with this installation was the engine itself. Coyotes don’t have a provision to mount the power steering pump that would be needed for the Flaming River rack-and-pinion as these engines came in vehicles equipped with electric power steering. The cure for that dilemma was a Vintage Air Front Runner kit. Well-engineered and beautifully executed, Vintage Air’s Front Runner is a compact drive system that is not only clean and simple but solid and strong. There are two versions of the Coyote Front Runner, one with a power steering pump and one without.

For this application a power steering pump was required, so a Vintage Air Front Runner (PN 174020) was ordered. The kit includes detailed installation instructions, along with the following items:

  • Sanden SD-7B10 natural finish compressor
  • Black-anodized compressor clutch cover
  • Detroit Speed aluminum power steering pump
  • Precision-machined power steering pump bracket
  • Power steering pulley
  • Dayco Performance serpentine drivebelt
  • Dayco OEM tensioner
  • Idler pulley
  • ARP stainless 12-point hardware kit
It should be noted that Vintage Air has identified three different Coyote timing cover configurations. The differences are the cast bosses in the cover, some are blank and must be drilled and tapped, others are drilled and tapped with 8mm threads (these holes are drilled and tapped to 10mm x 1.5 threads). The third is similar to the second example with the addition of stiffening ribs that must be carefully cut down to achieve adequate clearance (1/16 inch) for the tensioner assembly. As is typical with an OEM engine, there are other timing cover versions in the field and some may not be compatible with the system. Fortunately, the die-cast cover is available separately from Ford.

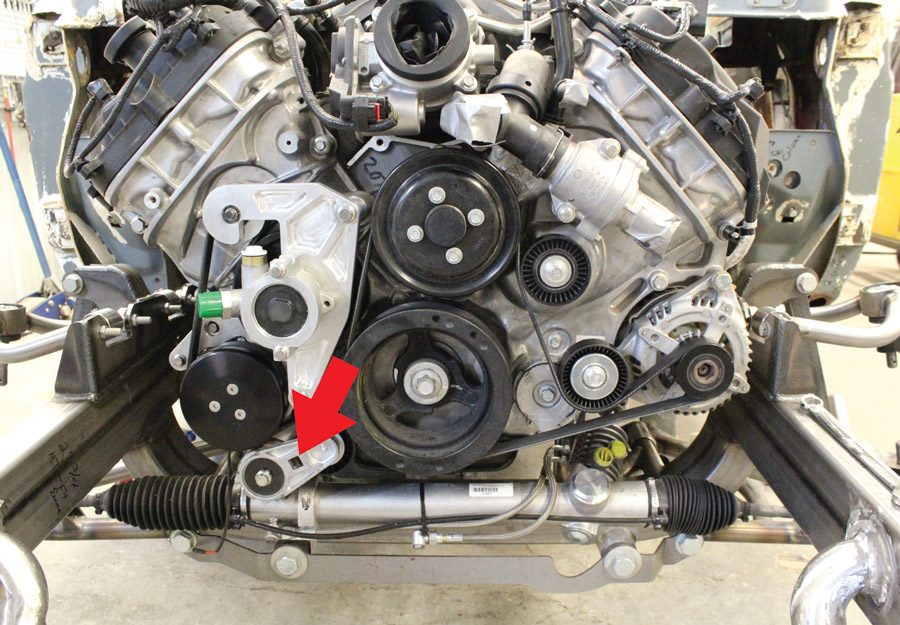
With the Front Runner installed the only concern was clearance for the A/C and power steering pump belt tensioner. Again, planning paid off as the engine was positioned so the tensioner cleared the Flaming River rack-and-pinion, the pan cleared the crossmember, there was enough room to route the exhaust, and there was a straight shot for the steering shaft from the column to the rack-and-pinion steering. With all those issues involved the engine and transmission mounts were fabricated and installed.

Building a hot rod often comes with challenges, and never think it’s unusual to have to tear out something that’s been built and installed because it didn’t work as planned. But learn to plan ahead and it won’t happen as often.
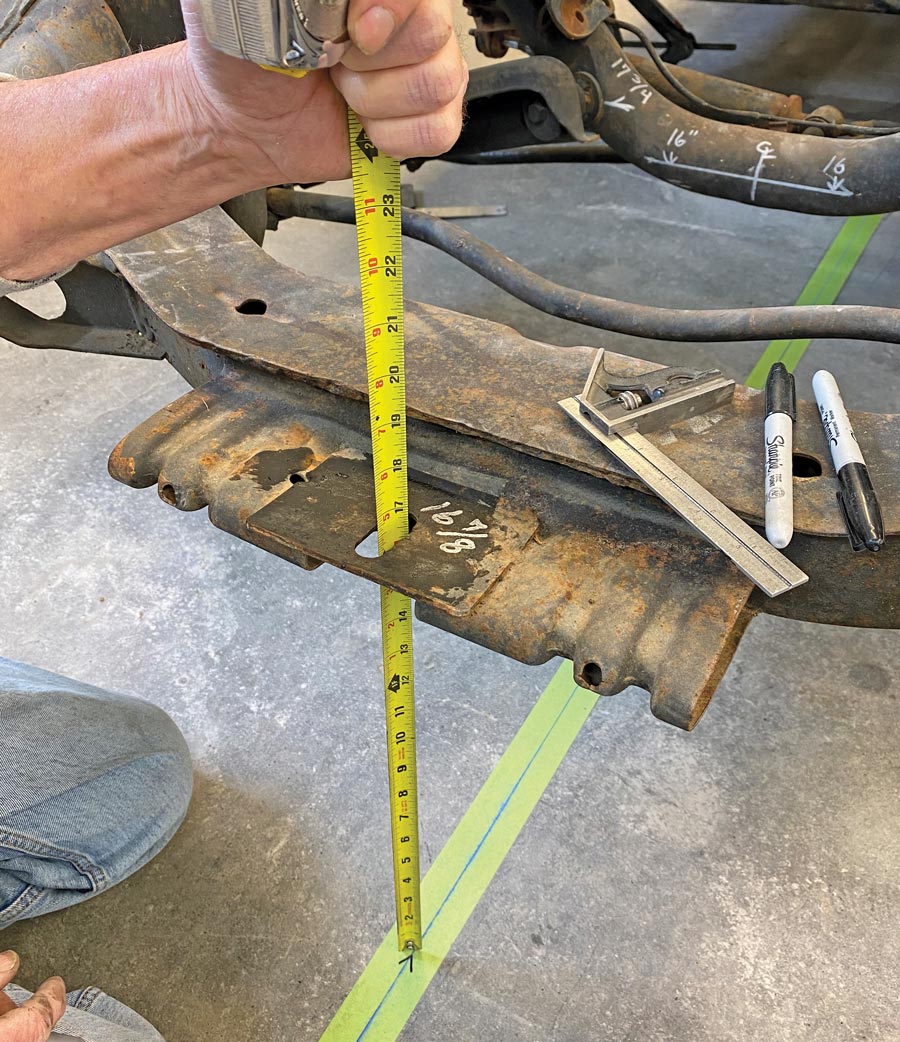
Before any modifications were made to the frame, a variety of measurements were taken and positions of components, including the core support bracket, were marked on the floor with a plumb bob.
2. Before any modifications were made to the frame, a variety of measurements were taken and positions of components, including the core support bracket, were marked on the floor with a plumb bob.
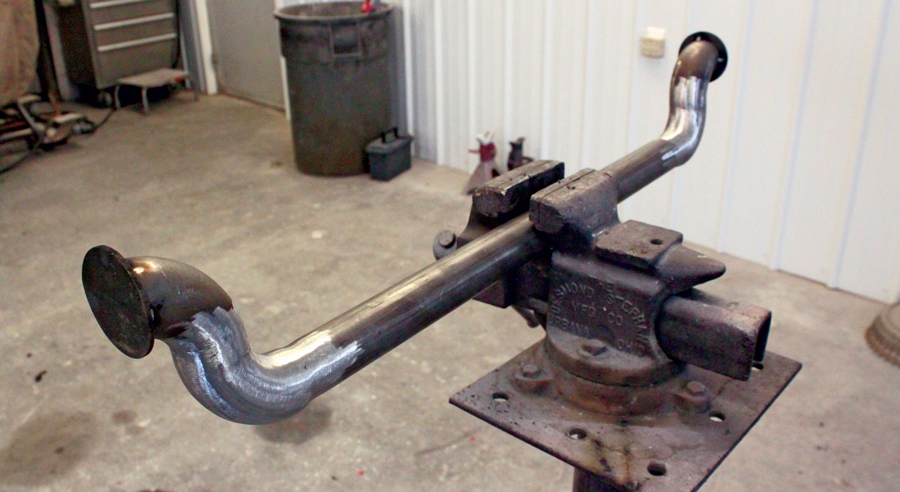
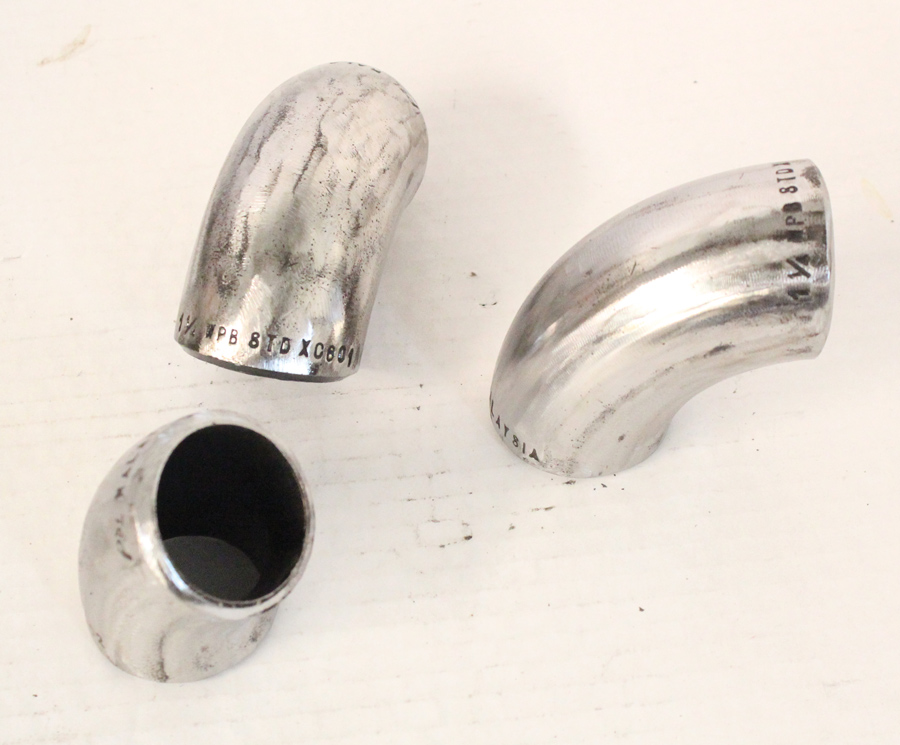
A cool trick from the Radford’s: To make tight bends Colin uses structural steel elbows. Available in a variety of sizes, these are 1-1/4-inch id (the way pipe is measured) and 1-5/8 od.
3. A cool trick from the Radford’s: To make tight bends Colin uses structural steel elbows. Available in a variety of sizes, these are 1-1/4-inch id (the way pipe is measured) and 1-5/8 od.
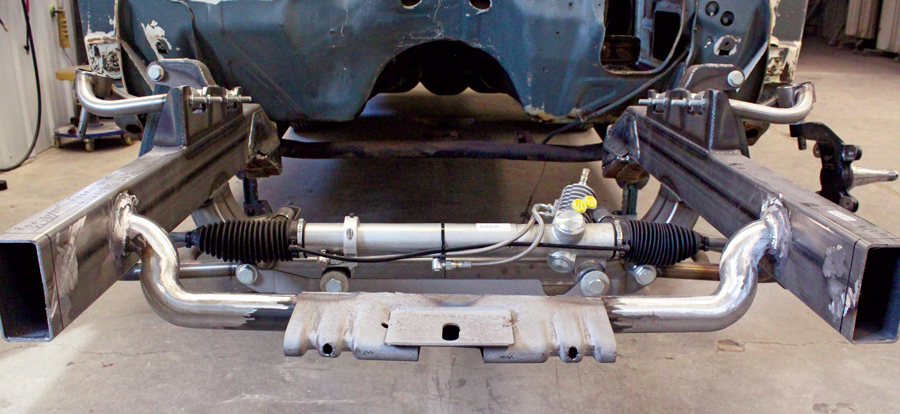
This crossmember was made from a length of tubing, four tight radius elbows, and a pair of flanges. It will mount the core support bracket and tie the fronts of the framerails together.
4. This crossmember was made from a length of tubing, four tight radius elbows, and a pair of flanges. It will mount the core support bracket and tie the fronts of the framerails together.
During the chassis modifications and engine installation the wagon has stayed in exactly the same spot. This made it possible to use the measurements taken earlier to position the original radiator core support cut off the factory crossmember in the proper position.
5. During the chassis modifications and engine installation the wagon has stayed in exactly the same spot. This made it possible to use the measurements taken earlier to position the original radiator core support cut off the factory crossmember in the proper position.
A test-fit of the engine revealed there were some clearance issues to contend with. To accommodate the size and position of the engine the firewall would have to be modified.
6. A test-fit of the engine revealed there were some clearance issues to contend with. To accommodate the size and position of the engine the firewall would have to be modified.
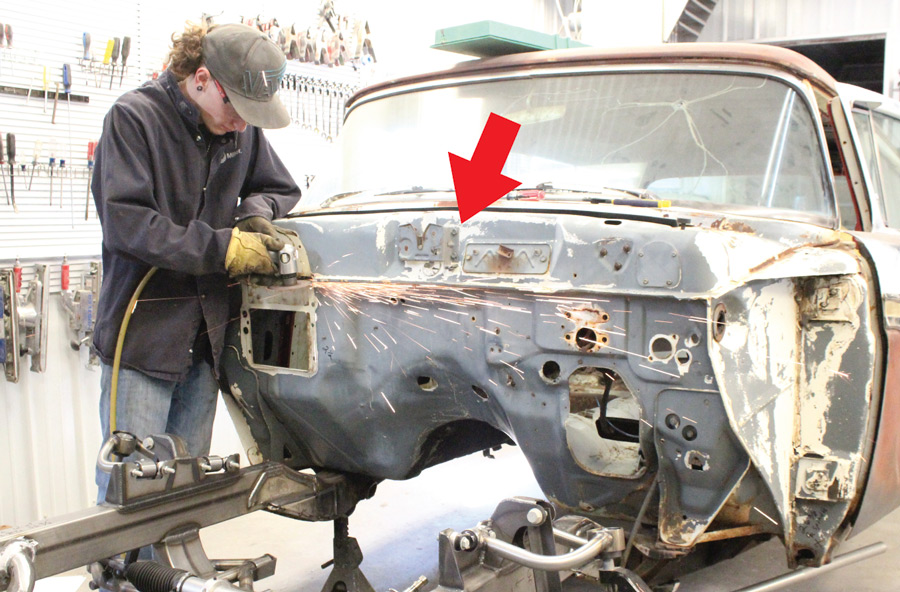
Caden cut the firewall below the factory pinch weld that joined the upper and lower halves together. Note the stock hood latch (arrow) for the front opening hood was retained.
7. Caden cut the firewall below the factory pinch weld that joined the upper and lower halves together. Note the stock hood latch (arrow) for the front opening hood was retained.
With the engine moved back it will be necessary to build a 2-inch recessed firewall. Header clearance on both sides is more than adequate.
8. With the engine moved back it will be necessary to build a 2-inch recessed firewall. Header clearance on both sides is more than adequate.
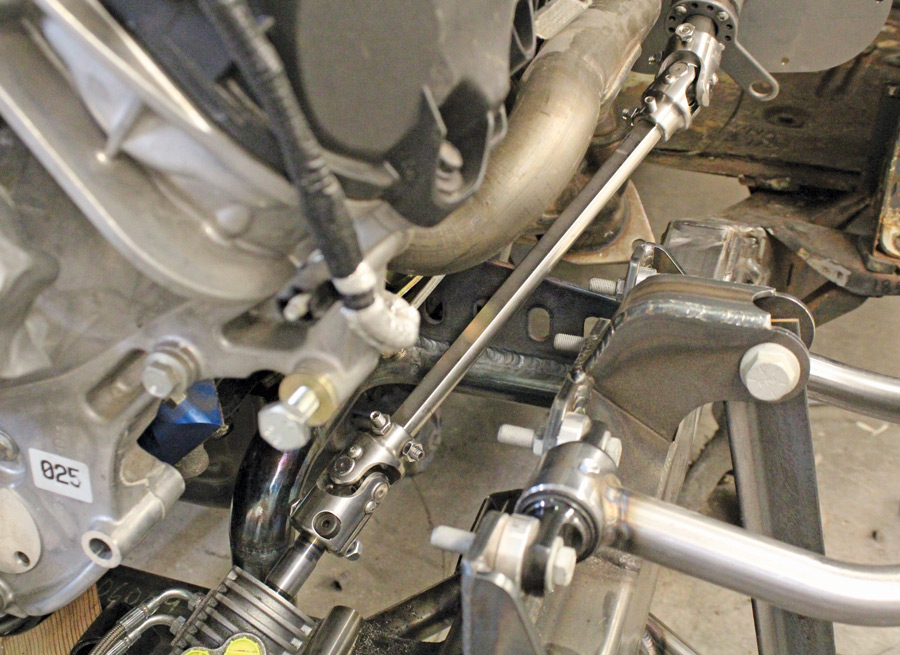
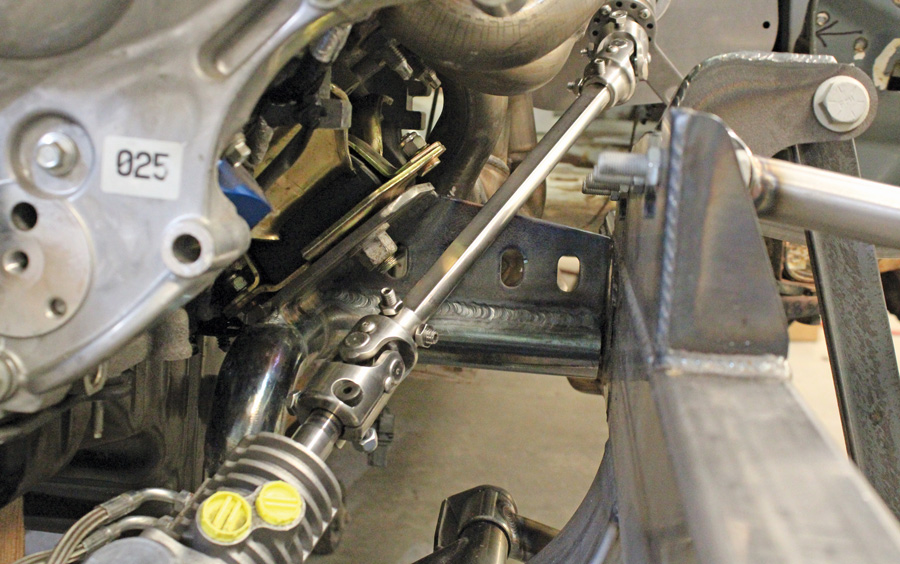
A mockup steering shaft was installed to determine header clearance and where the engine mounts will have to be located. The permanent steering shaft will have a slip joint made from Flaming River U-joints, a 3/4-inch solid shaft, and a 1-inch double-D hollow shaft.
9. A mockup steering shaft was installed to determine header clearance and where the engine mounts will have to be located. The permanent steering shaft will have a slip joint made from Flaming River U-joints, a 3/4-inch solid shaft, and a 1-inch double-D hollow shaft.
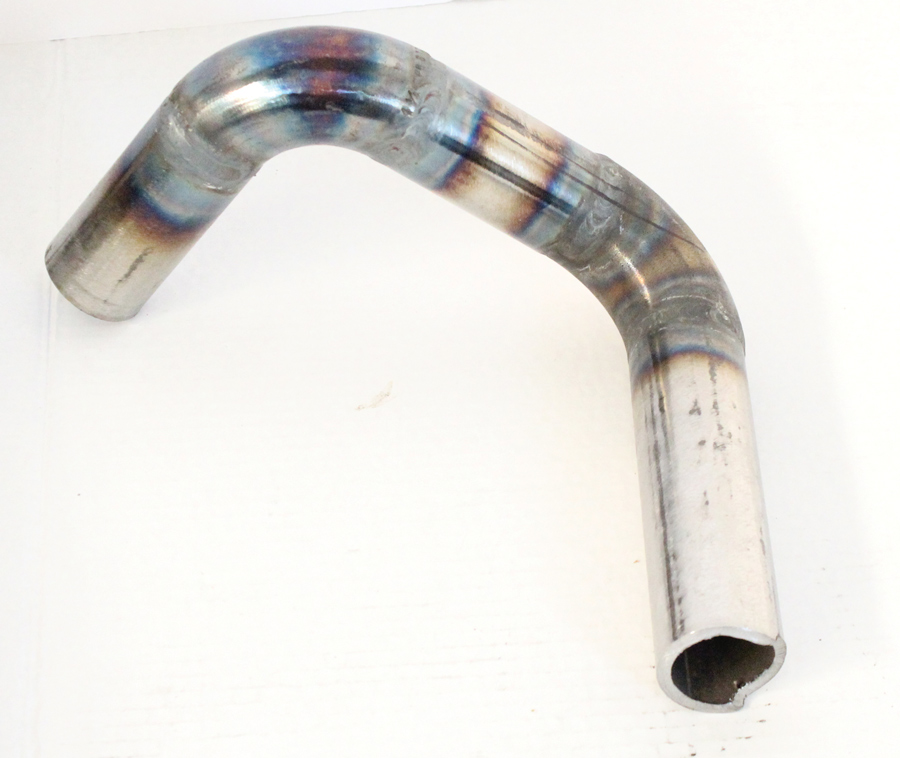
The unique engine mount brackets were made from tubing and more elbows. One end will attach to the framerails, the other to the AME crossmember.
10. The unique engine mount brackets were made from tubing and more elbows. One end will attach to the framerails, the other to the AME crossmember.
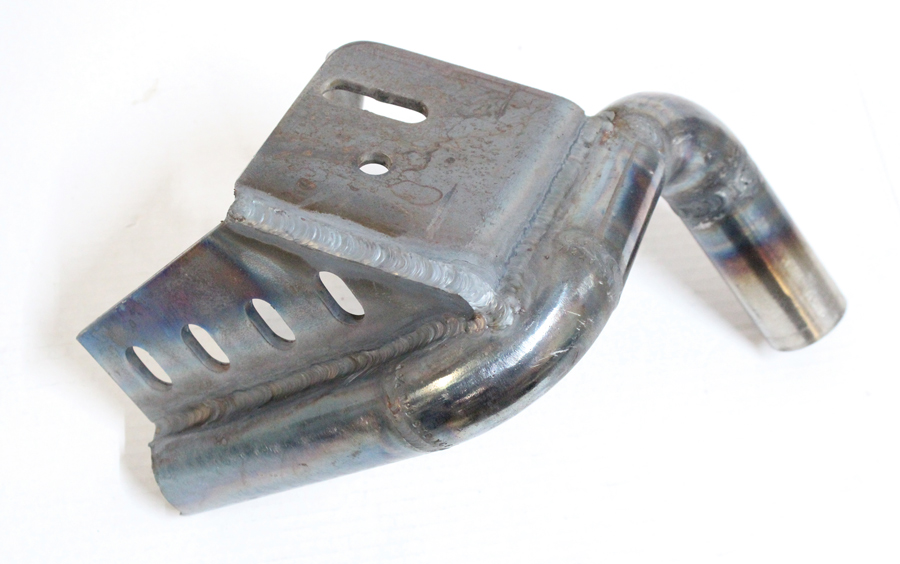
Here is the finished engine mount bracket with a pad for the rubber cushion and an added gusset for strength.
11. Here is the finished engine mount bracket with a pad for the rubber cushion and an added gusset for strength.
Careful planning pays off, the steering shaft fits over the top of the engine mount bracket with room to spare.
12. Careful planning pays off, the steering shaft fits over the top of the engine mount bracket with room to spare.
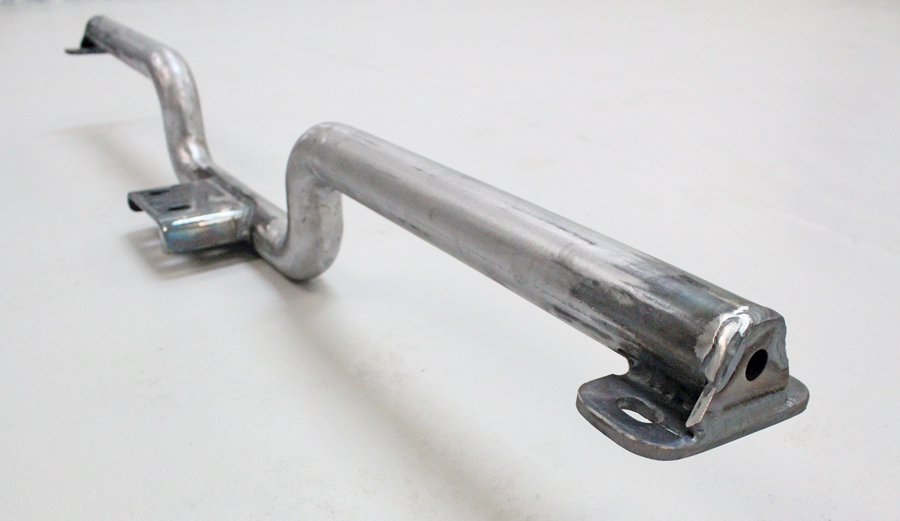
Holding up the rear of the Coyote/Gearstar transmission combination is a custom crossmember made from tubing—and you guessed it, a couple more elbows.
13. Holding up the rear of the Coyote/Gearstar transmission combination is a custom crossmember made from tubing—and you guessed it, a couple more elbows.
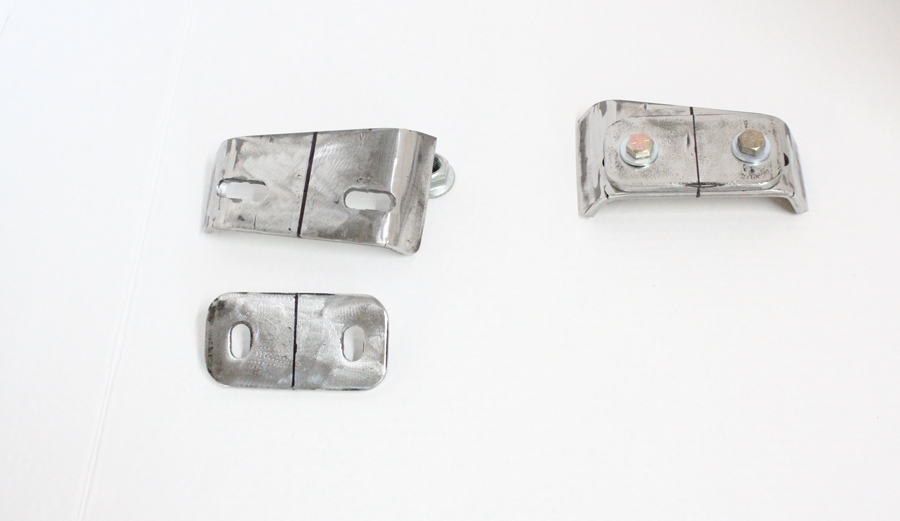
At the top of the photo are the two tabs that will be welded to frame to mount the transmission crossmember. At the bottom is one of the tabs that was welded to the crossmember and will bolt to the frame brackets.
14. At the top of the photo are the two tabs that will be welded to frame to mount the transmission crossmember. At the bottom is one of the tabs that was welded to the crossmember and will bolt to the frame brackets.
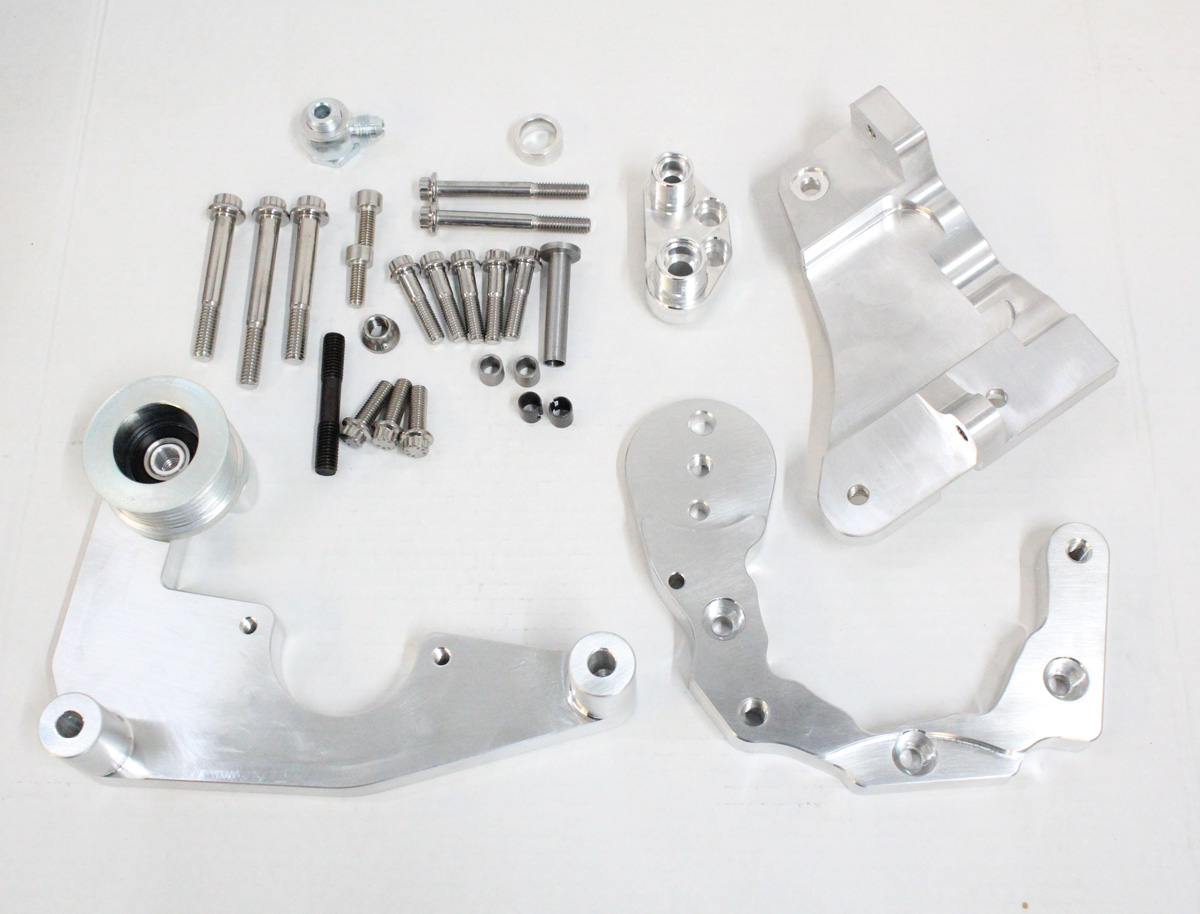
A real problem solver, Vintage Air’s Coyote Front Runner includes the compressor bracket (upper right), tensioner bracket (lower right), and power steering bracket (lower left). To the right of the supplied ARP hardware is the adapter that connects the hoses to the compressor.
15. A real problem solver, Vintage Air’s Coyote Front Runner includes the compressor bracket (upper right), tensioner bracket (lower right), and power steering bracket (lower left). To the right of the supplied ARP hardware is the adapter that connects the hoses to the compressor.
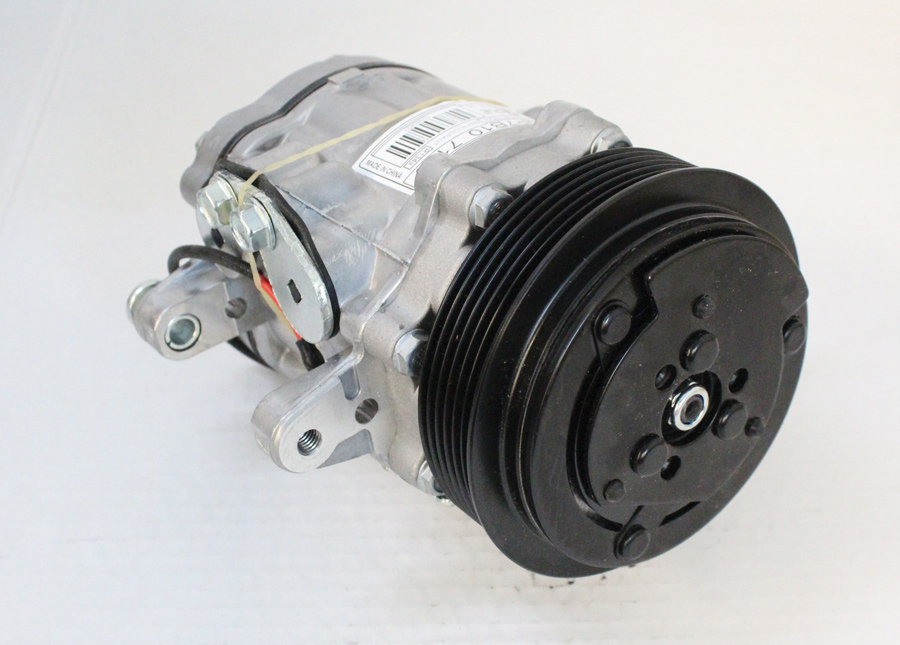
Included in the Vintage Air Front Runner Kit is a 134a A/C compressor with multi-groove pulley and unique O-ring outlets in the side of the body. It is rigidly mounted to the block by the included Front Runner brackets.
16. Included in the Vintage Air Front Runner Kit is a 134a A/C compressor with multi-groove pulley and unique O-ring outlets in the side of the body. It is rigidly mounted to the block by the included Front Runner brackets.
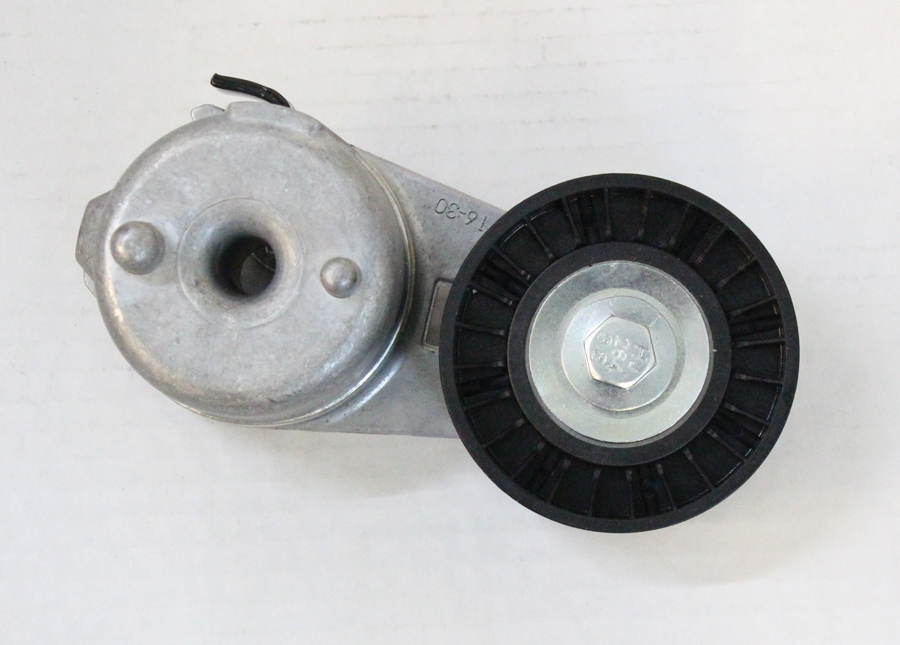
This supplied Dayco OEM-style tensioner is used to keep the power steering and A/C compressor serpentine belt tight.
17. This supplied Dayco OEM-style tensioner is used to keep the power steering and A/C compressor serpentine belt tight.
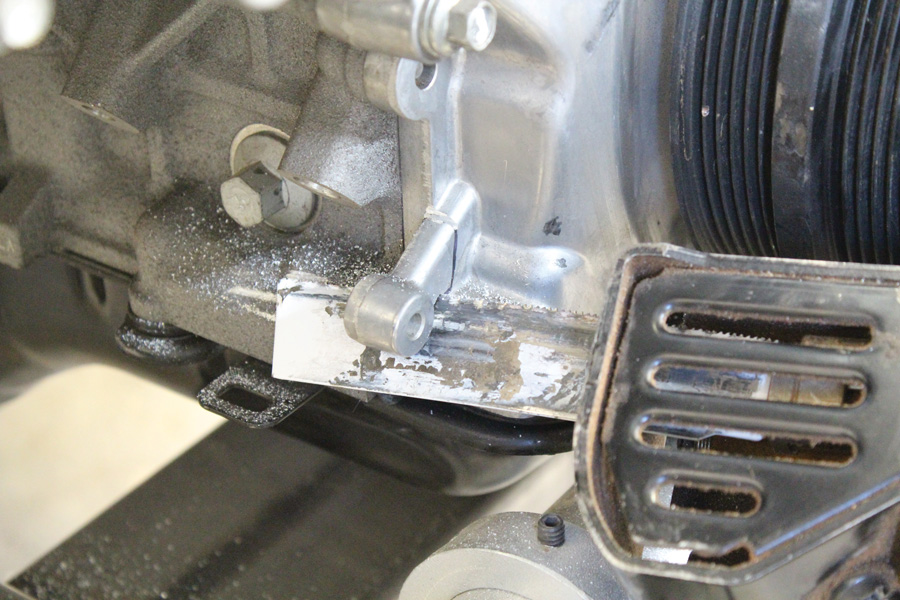
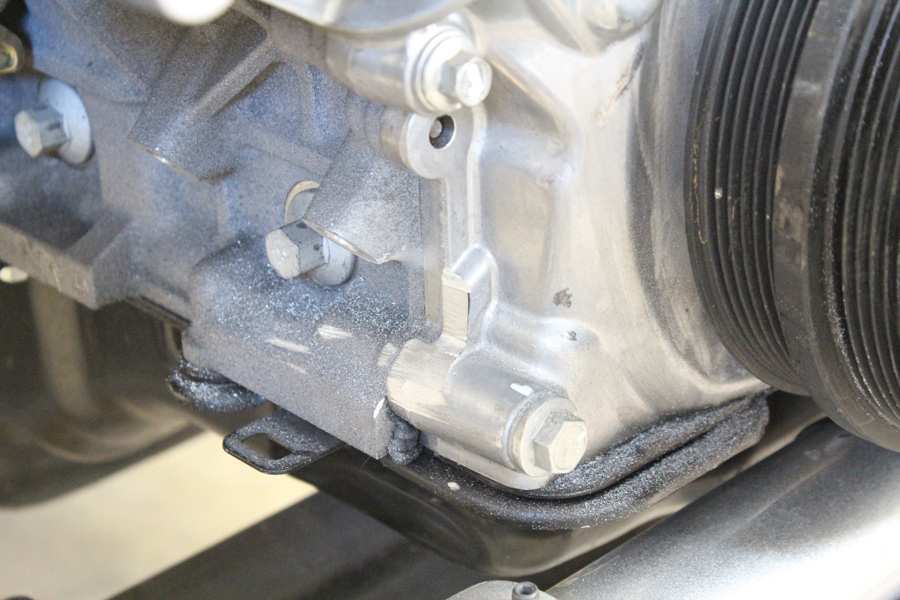
Other than drilling and tapping some holes, the only other modification to the engine is cutting off this small tab on the front cover.
18. Other than drilling and tapping some holes, the only other modification to the engine is cutting off this small tab on the front cover.
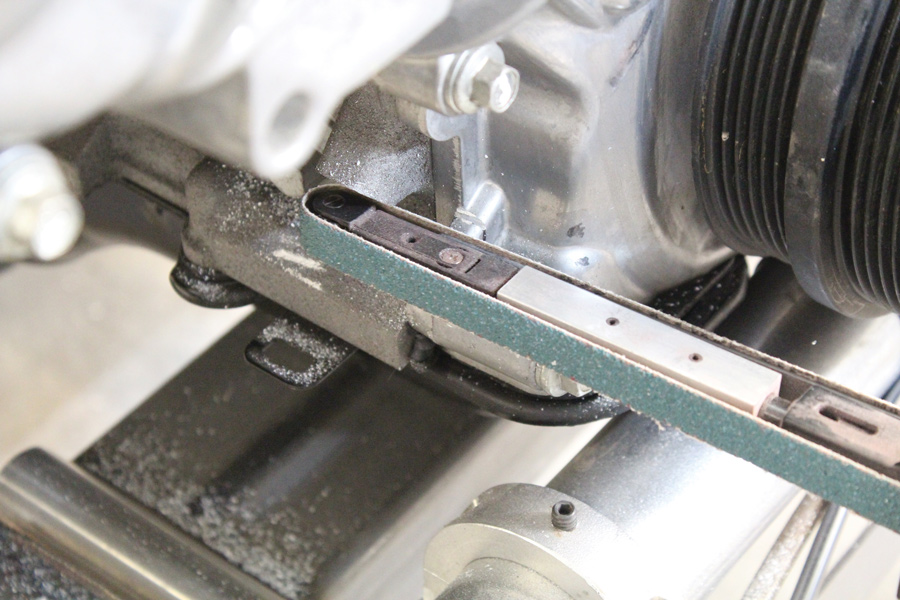
The reason for removing this tab is it will interfere with the A/C compressor. With the tab removed Colin used a small belt sander to smooth the surface.
19. The reason for removing this tab is it will interfere with the A/C compressor. With the tab removed Colin used a small belt sander to smooth the surface.
Cleaned up smoothed it’s hard to tell there were any changes made. There are three holes in the side of the block (not shown) that have to be drilled to M8 x 1.25.
20. Cleaned up smoothed it’s hard to tell there were any changes made. There are three holes in the side of the block (not shown) that have to be drilled to M8 x 1.25.
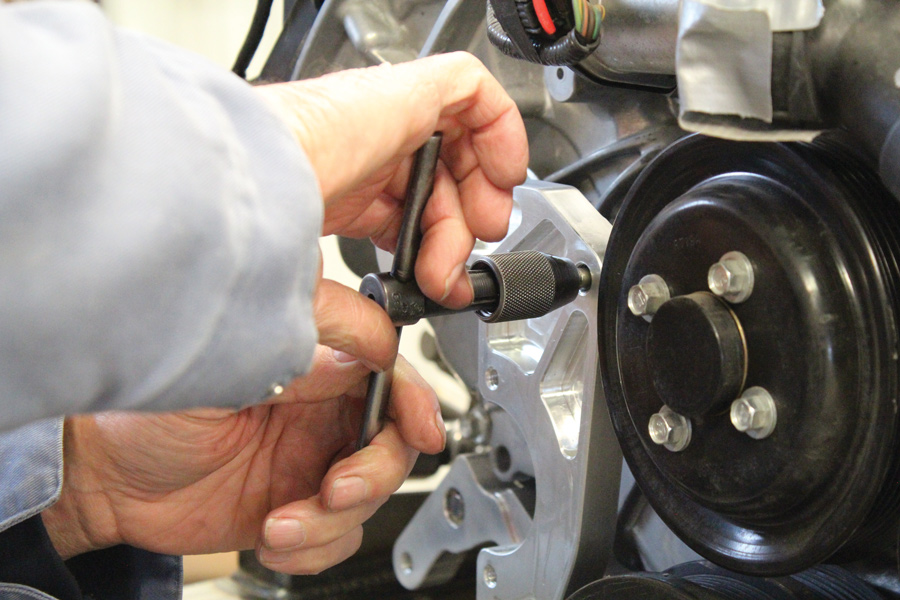
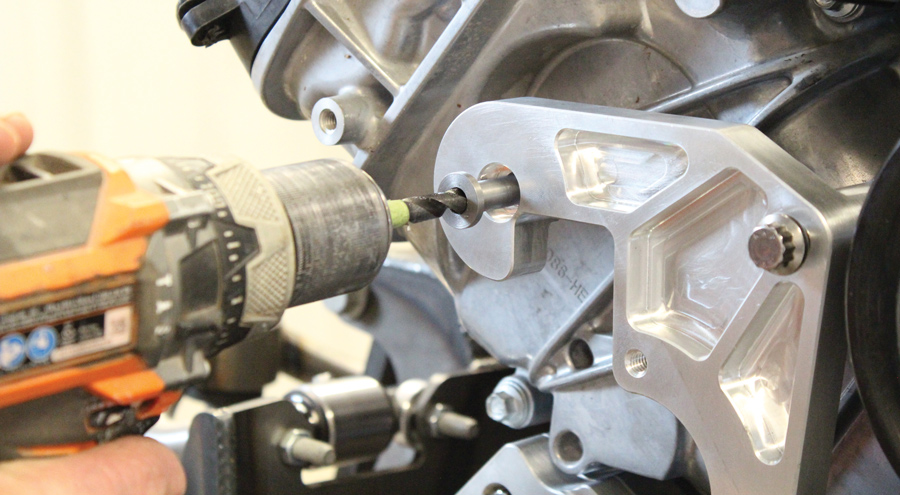
With upper bracket secured to the lower bracket assembly the included guide is used to drill the mounting tabs 1-inch deep and tap the holes 10mm x 1.5.
21. With upper bracket secured to the lower bracket assembly the included guide is used to drill the mounting tabs 1-inch deep and tap the holes 10mm x 1.5.
 Vintage Air cautions that antiseize must be used on all threads or mechanical locking will occur preventing removal and causing damage to fasteners.
22. Vintage Air cautions that antiseize must be used on all threads or mechanical locking will occur preventing removal and causing damage to fasteners.
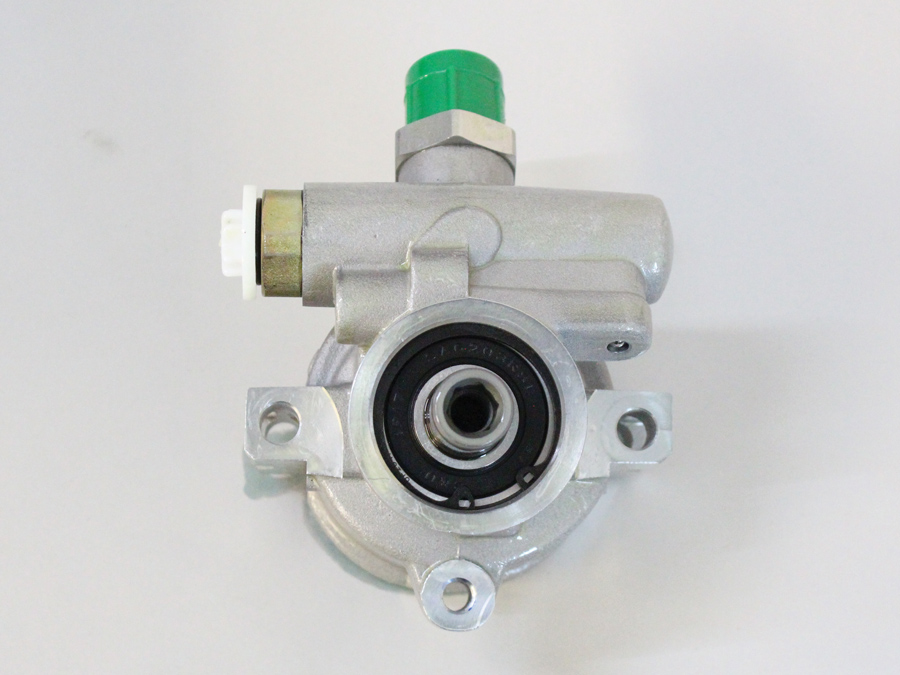
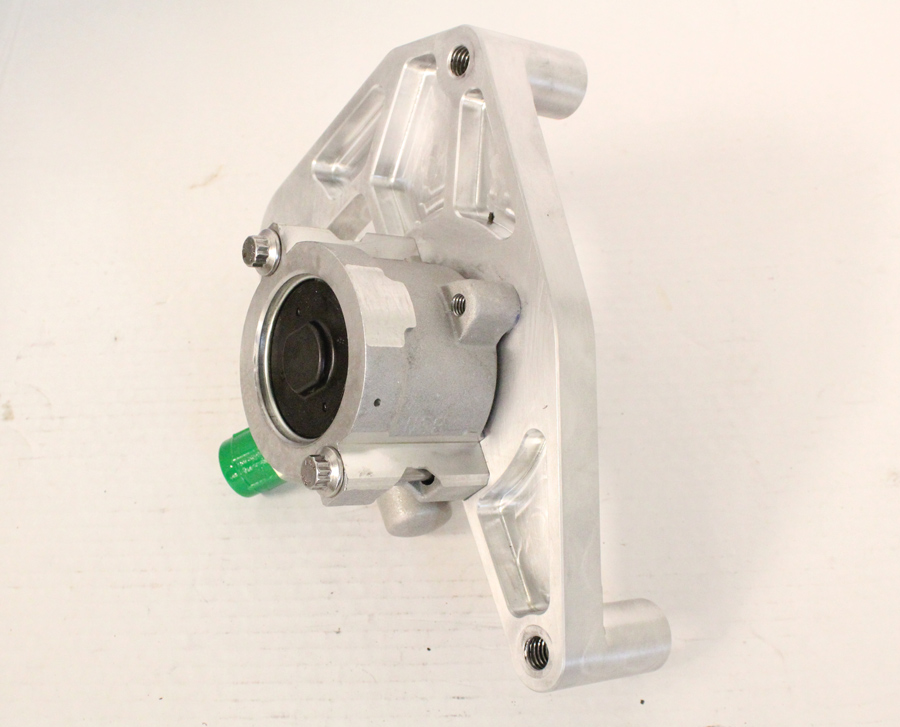
 Included in the Front Runner kit is a new Detroit Speed aluminum power steering pump. A remote reservoir is required.
23. Included in the Front Runner kit is a new Detroit Speed aluminum power steering pump. A remote reservoir is required.
Before the included pulley can be installed the pump is bolted to the bracket.
24. Before the included pulley can be installed the pump is bolted to the bracket.
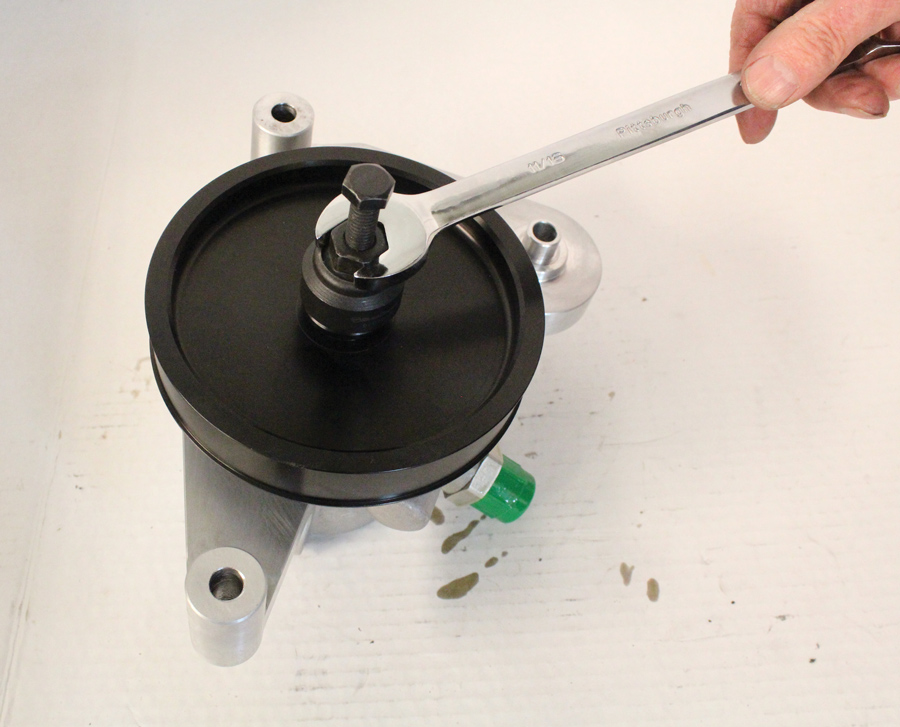
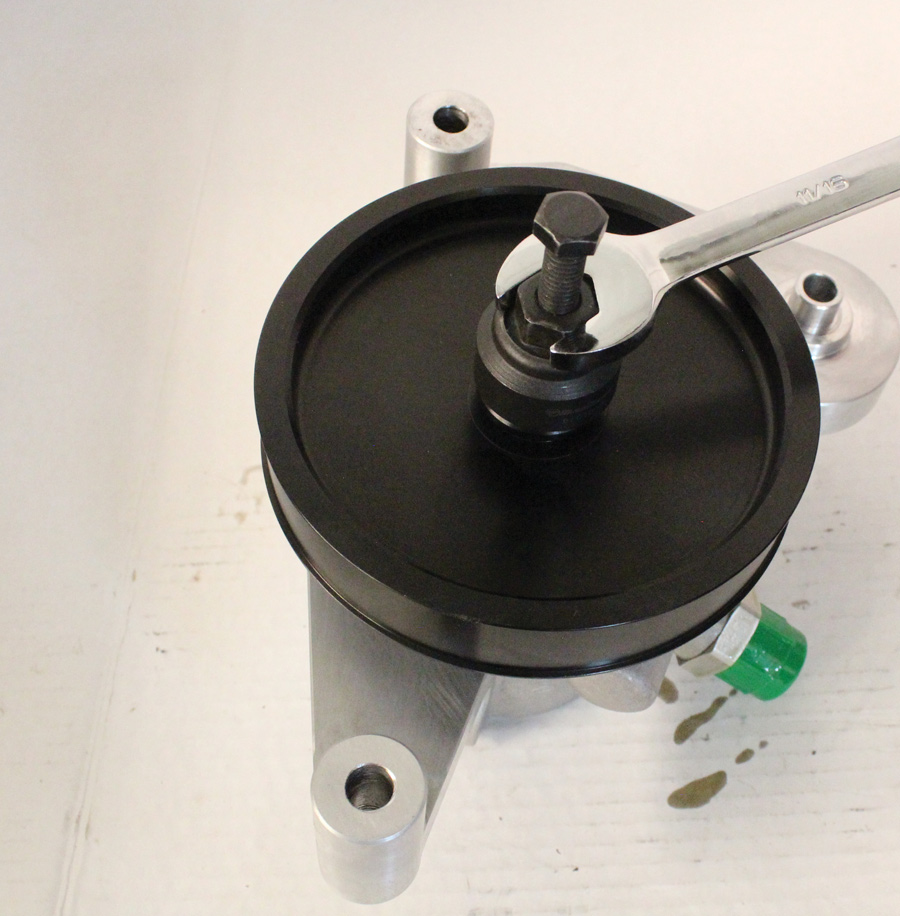
 The supplied power steering pulley requires a special tool for installation. Never drive the pulley on with a hammer as the pump will be damaged. If you don’t have an installation tool most parts houses have them available to rent.
25. The supplied power steering pulley requires a special tool for installation. Never drive the pulley on with a hammer as the pump will be damaged. If you don’t have an installation tool most parts houses have them available to rent.
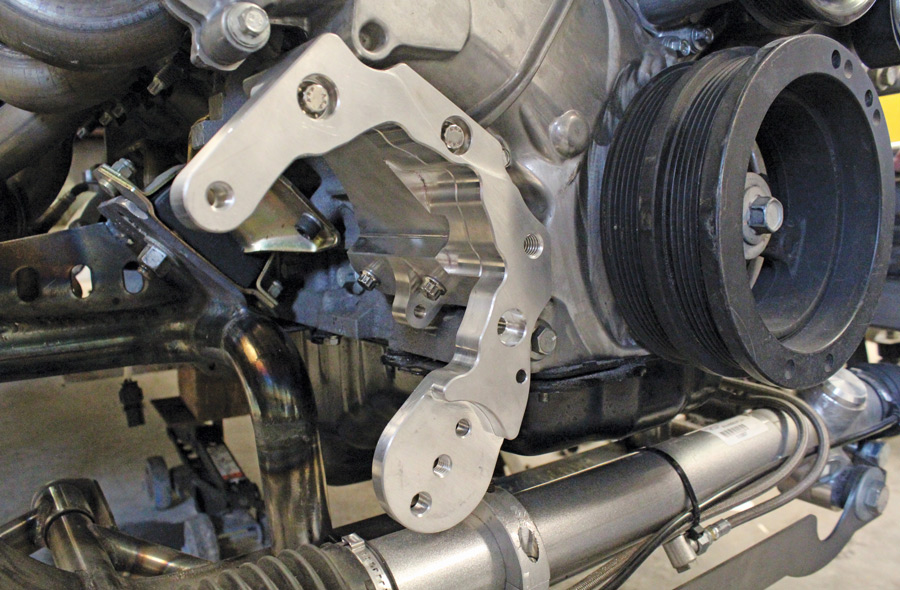
This lower bracket assembly mounts the tensioner for the power steering and A/C compressor belt. It ties into the A/C compressor bracket with two M8 x 1.25 bolts.
26. This lower bracket assembly mounts the tensioner for the power steering and A/C compressor belt. It ties into the A/C compressor bracket with two M8 x 1.25 bolts.
Here the A/C bracket and the lower bracket for the tensioner have been installed.
27. Here the A/C bracket and the lower bracket for the tensioner have been installed.
With the power steering pump in place the pulley faces to the rear. For a clean look dust/debris protection, an A/C clutch cover is included.
28. With the power steering pump in place the pulley faces to the rear. For a clean look dust/debris protection, an A/C clutch cover is included.
The original alternator, idler, and tensioner remain in the stock location. While it looks tight, there’s plenty of room between the Front Runner tensioner (arrow) and the Flaming River rack-and-pinion (but that did take some planning).
29. The original alternator, idler, and tensioner remain in the stock location. While it looks tight, there’s plenty of room between the Front Runner tensioner (arrow) and the Flaming River rack-and-pinion (but that did take some planning).
Art Morrison Enterprises
(866) 808-4759
artmorrison.com
Automotive Racing Products
(800) 826-3045
arp-bolts.com
Flaming River Industries
(806) 648-8022
flamingriver.com
Ford Performance
(800) 367-3788
performanceparts.ford.com
Radford Automotive
(208) 745-1350
Vintage Air
(800) 727-7094
vintageair.com
Modern Rodding
VOLUME 3 • ISSUE 17 • 2022