Modern Rodding Tech
InTheGarageMedia.com
1. The foundation of our 1969 Camaro rear suspension is the Detroit Speed & Engineering QuadraLink setup.
Bringing up the Rear
Part 2: A 1969 Camaro’s Pro Touring Transformation Includes a Detroit Speed QuadraLink Rear Suspension, Mini-Tubs, and More
By Barry Kluczyk Photography by Brian Brennan
T

he primary tenant of Pro Touring is building track-capable handling into a vintage vehicle, and that’s exactly the plan of the 1969 Camaro project we’ve been following at Phoenix-based Hot Rods By Dean. And the Detroit Speed & Engineering QuadraLink rear suspension is just the right call.

In addition to a supercharged LT4 crate engine and TREMEC Magnum six-speed transmission, the car is also receiving a complete, front-to-rear chassis-and-suspension makeover using mostly Detroit Speed components. Our previous installment showed the LT4 engine being nestled into its new home within a Detroit Speed hydroformed front subframe. It was stronger than the original but was the foundation for an all-new coilover front suspension and rack-and-pinion steering system.

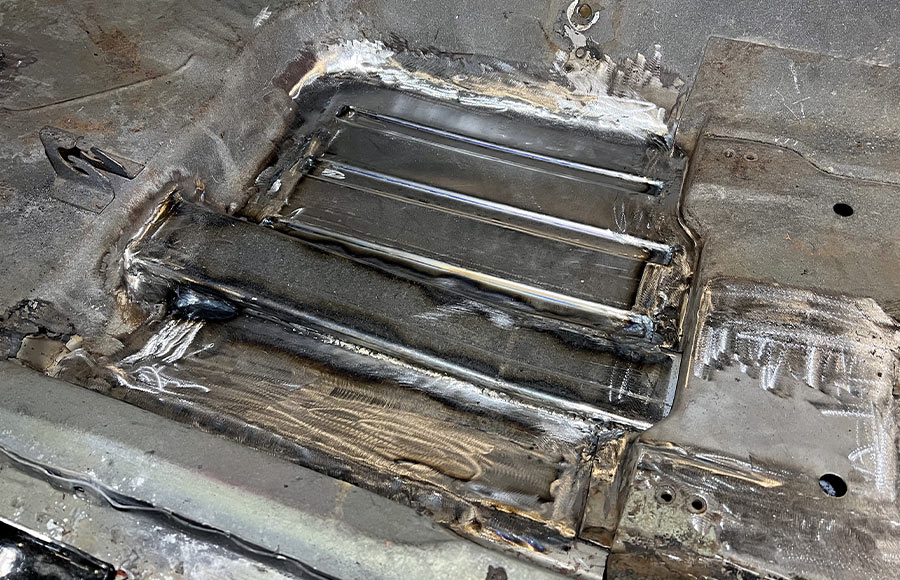
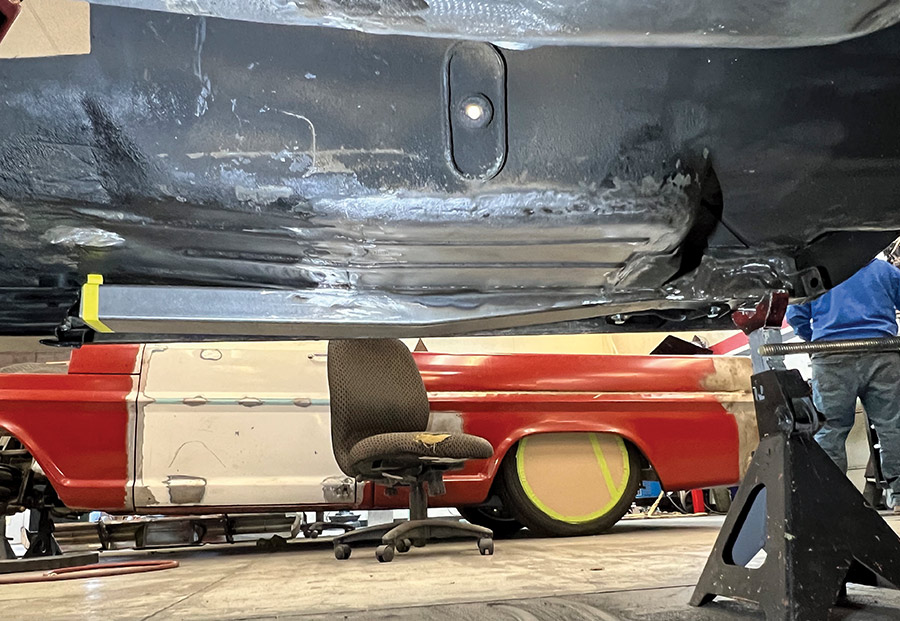
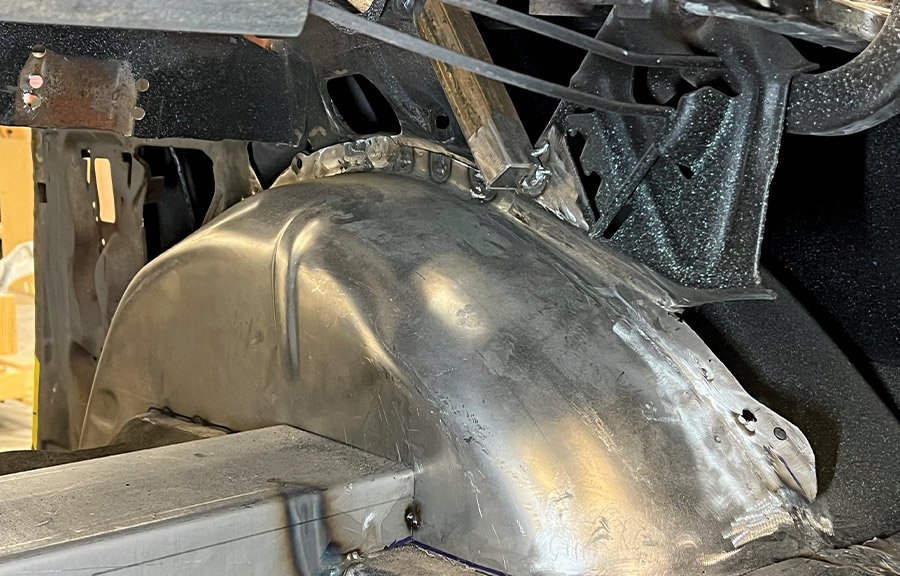
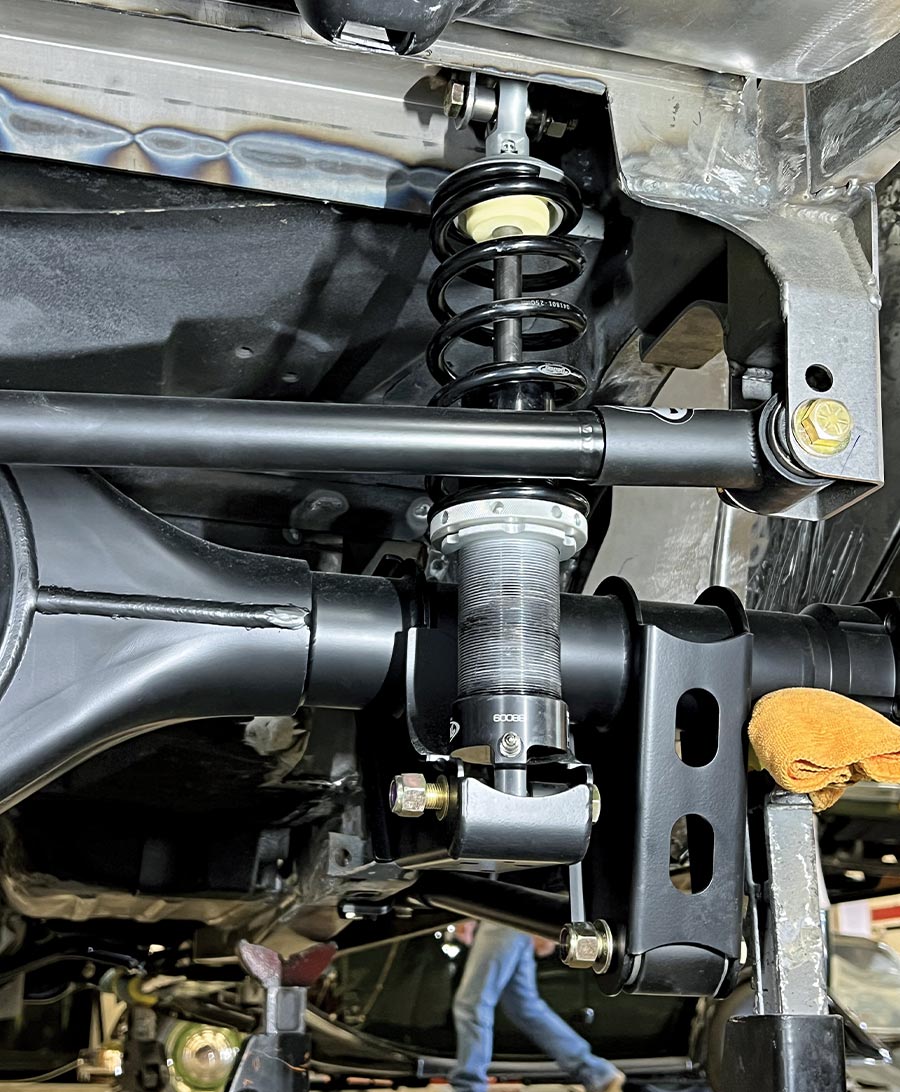
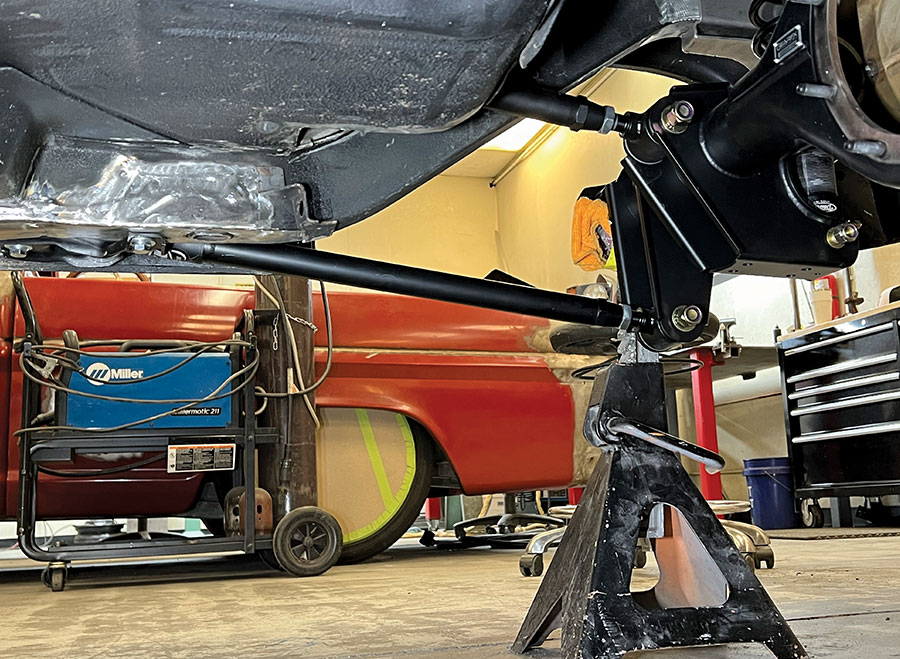
That was the first half of the chassis and suspension upgrades. The project moves rearward, starting with frame connectors that link the new front subframe to the rear rails on the unitized chassis F-body and mini-tubs that provide extra room for extra-wide rubber. Most importantly, this project stage includes installing Detroit Speed’s QuadraLink rear suspension system. It replaces the factory leaf spring setup with a suspension that has a greater range of movement, compliance, and axle location.

In a nutshell, the four-link geometry eliminates the inherent bind in a leaf spring design, especially when channeling big power to the pavement during high-performance driving. The bind comes from the leaf spring’s dual duty to locate the axle and control its travel. Under hard acceleration, especially with the torque of a powerful engine, the axle can rotate—an undesirable condition known as axle wrap. It can produce an axle tramp or hop, which affects traction, but as the axle rotates it also changes the pinion angle, which can damage or break components such as a yoke and even the driveshaft.

To put it succinctly, it’s no bueno. The geometry of a four-link with coilover springs in place of leaf springs eliminates the bind behind axle wrap. With Detroit Speed’s QuadraLink, long lower arms (one per side) and shorter arms provide articulation. At the same time, a Panhard bar, which connects the rear axle to the chassis to prevent side-to-side movement further enhances the tires’ connection to the pavement. Also, the coilover shocks deliver an additional control measure by working as integrated units.

That’s all great but to be honest converting to a four-link rear suspension in an early F-body requires major sheetmetal surgery. As with the previous installment on this Camaro project, Dean Livermore handled the cutting, welding, and cursing by Phoenix-based Hot Rods By Dean. Like our previous installment, we’re providing a 30,000-foot view of the procedures involved rather than every stitch of welding involved.

It’s also worth noting that while some fabrication was involved with the installation of the LT4 engine and complementing six-speed Magnum transmission, the overall installation of the bolt-on Detroit Speed front subframe was comparatively easy compared to the steps involved with the subframe connectors, mini-tubs, and QuadraLink suspension. We’re talking about days and days of cutting, trial-fitting, follow-up trimming, and welding. Lots and lots of welding.

Thankfully, the instruction manuals and the installation videos from Detroit Speed were very thorough and provided excellent guides to the processes. The videos linked on the company’s website should be reviewed before anyone tackles the installation of the frame connectors, mini-tubs, or QuadraLink for the first time. They’re also worth watching before purchasing the parts to help determine whether they’re projects within the owner’s skill set. Believe us, getting halfway into the mini-tubs or QuadraLink installation and discovering one is over his or her head will cause misery while adding needless time and money to the project. For most enthusiasts, these projects are likely best left to the pros.

“A lot is going on with the installation of the mini-tubs and QuadraLink—and even the frame connectors,” Livermore says. “It’s a project that really relies on fabrication experience.”

There will be more from this Camaro’s Pro Touring buildup, but for now, it’s all about the rear suspension and building in the capability to accelerate harder and corner quicker without binding.

subframe with a coilover suspension and rack-and-pinion steering system
2. Previously, this Camaro Pro Touring project started with installing a Chevrolet Performance LT4 crate engine and Magnum six-speed transmission on a Detroit Speed front subframe. The subframe also received a coilover suspension and rack-and-pinion steering system.
new transmission tunnel being fabricated using the existing tunnel
3. The dimensions of the Magnum transmission don’t fit those of the stock F-body transmission tunnel or the tunnels of many other vintage vehicles, so a new one was fabricated after slicing out the existing tunnel.
view of the floorpan
4. Installing the Detroit Speed subframe connectors requires more floorpan surgery. For optimal strength and maximum ground clearance, they are routed through the floor rather than following its contours under the car.
basic installation of one of the connectors linked to the front and rear framerails and the perimeter welded to the floor
5. Here’s the basic installation of one of the connectors linked to the front and rear framerails and the perimeter welded to the floor.
view of the straight-through connector design
6. The lower profile of the straight-through connector design is seen here. There is plenty of ground clearance for a lowered suspension.
closeup of where the connectors blend seamlessly with the framerails at the rear
7. After careful welding and grinding, the connectors blend seamlessly with the framerails at the rear, providing virtually the same structural rigidity as a full frame.
Detroit Speed connectors on the subframe
8. At the front, the Detroit Speed connectors can be welded to the subframe, but they’re also designed to be bolted to them so that the front subframe remains easily removable.
Detroit mini-tubs
9. Next in the project comes the Detroit mini-tubs, which push out the rear wheel housings to accept up to 315-series rubber (about 12.4 inches wide) in early F-bodies, GM X-bodies, and other models.
view of the mini-tubs
10. The tubs are 2 inches wider per side than the stock wheel housings, which means 2 inches per side of the floor must be cut out to make room for them.
wheeltub installation
11. Also, part of the wheeltub installation is a crossover for mounting the coilover dampers of the QuadraLink suspension. It can also move leaf springs inboard, but this project will use a four-link system.
trunk floor being cut open in preparation for the new tank
12. Making room for the shock-mounting crossover requires cutting more off the floor, reinforcing the body structure while ensuring it is level and square. The wider wheeltubs also mean the original fuel tank won’t fit, making a custom replacement necessary. That was already part of the plan for this project, as a new tank with the baffles and openings necessary for the LT4’s direct-injected fuel system was needed anyway. The trunk floor is cut open here in preparation for the new tank.
closeup of the new seatback braces on the backside of each wheeltub
13. Additional fabrication is required to cut out and fit new seatback braces to the backside of each wheeltub. The kit provides templates for the size and shape of the braces.
QuadraLink brackets being TIG-welded
14. The main event is the QuadraLink suspension. It replaces the original parallel leaf springs to provide greater articulation of the suspension under load and eliminate the traction-inhibiting tramp or hop that comes with axle wrap. In the case of this project, the suspension will locate a Moser-equipped 9-inch axle. The axle housing came from Detroit Speed, and the QuadraLink brackets were conveniently TIG-welded, saving lots of time during the installation.
upper link mounting pockets tacked in place near the right-rear wheeltub
15. The first step in the QuadraLink’s installation involves cutting additional holes in the floor to make room for the upper link mounting pockets. Here’s one of them tacked in place near the right-rear wheeltub.
close up of the mounting pocket after it is fully welded
16. Here’s a closer look at the mounting pocket after it is fully welded.
mounting bracket for the track bar welded to the right-side framerail
17. Next, the mounting bracket for the track bar, or Panhard bar, is welded to the right-side framerail. The bar will link between this bracket and the axle housing.
view of the inside of the track bar mount
18. A look at the inside of the track bar mount shows it’s tied into the shock-mount crossmember.
mounts for the longer lower links mount forward on the chassis
19. The mounts for the longer lower links mount forward on the chassis. Fortunately, Detroit Speed provides templates for location, and their videos are invaluable when installing them for the first time.
view of the adjustable coilovers
20. There are a couple of things to note here: First, one of the adjustable coilovers is installed and attached to the mounting crossmember that was installed with the wheeltubs. Also, the track bar is installed, crossing behind the axle housing, and linked to the new bracket. It will keep the axle from moving laterally.
view of the track bar mounts
21. The other end of the track bar mounts to a specific mount on the other end of the axle housing.
Detroit Speed components
22. The workmanship on the Detroit Speed components is excellent. One thing they don’t incorporate is Heim joints, which can be too noisy in a street car. Instead, the links feature high-durometer rubber bushings. They’re stiff without creating an adversely harsh ride.
view of the interior floor with all the fabrications completed
23. Here’s a look at the interior floor with all the fabrications completed. The wider tubs, shock-mount crossover tunnel, and the QuadraLink upper link pockets affect the fitment of the rear seat, the carpet, and other details. They’ll be addressed as the car’s build progresses. Still, anyone else contemplating a similar upgrade should know that the sheetmetal surgery will require additional custom work when trimming the cabin.
new trunk floor
24. A new trunk floor was fabricated, and a new fuel tank is below it.
Here’s a look at the relationship between the shorter upper links and longer lower links of the QuadraLink suspension. No chance for binding here.
25. Here’s a look at the relationship between the shorter upper links and longer lower links of the QuadraLink suspension. No chance for binding here.
view of the axle ends
26. The axle ends have a few options, but this one was ordered to accept C6 Corvette bearings and have flanges to support C6 brakes.
complete QuadraLink installation and the mini-tubs
27. Finally, here’s a look at the complete QuadraLink installation and the mini-tubs. In addition to these modifications’ superior handling capabilities, the subframe connectors also provide a stronger, more rigid foundation that will further enhance the car’s responsiveness and handling. This is not a quick or easy project, but the results will bring this vintage Camaro’s driving experience deep into the 21st century.
SOURCES
Modern Rodding
VOLUME 5 • ISSUE 48 • 2024