
Modern Rodding Tech
View of installed Dakota Digital RTX gauges in 1965 Impala.
1. Dakota Digital’s Chevy installation of the RTX Direct-Fit gauge kit for our 1965 Chevy Impala (PN RTX-65C-IMP-X) preserves a classic vibe while packing in all the technology modern rodders expect.
Cockpit Confidence!
Dakota Digital’s RTX Direct-Fit Gauge Pack Gives the 1965 Chevy Impala Factory-Style Visuals With Contemporary Accuracy and Stability
BY JOHNNY HUNKINS PHOTOGRAPHY BY JASON SCUDELLARI
H

ot rodders have long embraced risk, pushing the limits with untested hardware. The death-defying feats of early hot rodders have been enshrined in the lore of the land but so have the defeats. These days, hot rodding is much safer, and the risk, while significantly reduced, has morphed into a stickier set of inconveniences. Overheating, dead batteries, strange noises, stalling—these are things old cars do when you are planning to do other things. Driving an old car should be an adventure, not a boondoggle with gremlins hiding around every corner. That brings us to the Dakota Digital Chevy installation of their latest RTX gauges in our 1965 Impala.

A fun hot rod adventure starts with cockpit instruments that are readable, attractive, and, most of all, reliable. Aviation learned long ago that wiring and avionics age faster than the machines they serve. Military EWIS studies routinely show that while airframes can run for decades, wiring often fails in half that time due to heat cycling, vibration, and insulation breakdown. The same physics apply to cars, and a 1965 Impala’s original instrumentation is long past its dependable lifespan. The Dakota Digital Chevy installation of their latest RTX Series isn’t just a cosmetic upgrade—it brings improved accuracy and newfound reliability to a vintage dashboard.

Dakota Digital’s RTX series is designed to replicate factory gauge styling while integrating modern electronics. The system uses CNC-machined housings and in-house electronics, combining a vintage-style rolling odometer with a configurable TFT message center for detailed vehicle data. Features include Bluetooth connectivity, GPS support, RGB backlighting, and a full-color screen. The RTX line provides an OEM-style appearance with contemporary instrumentation functions suited for upgraded wiring and modernized vehicle electrical systems. Simply put, the RTX series is function-first, not some cute video game dazzler.

Although our subject vehicle had already been upgraded with an American Autowire vehicle harness, the original instrumentation remained underwater. That gap was finally closed with the Dakota Digital Chevy RTX Direct-Fit Gauge Kit (PN DAK-RTX-65C-IMP-X), which Jason Scudellari at HB Hot Rod installed in our 1965 Chevy Impala. In an afternoon, HB Hot Rod gave this Impala a modern, electrically stable instrumentation backbone that matched the integrity of its new wiring.

For this basic installation, the high-beam indicator and the left and right turn signal junctions were the outputs used to connect to the control box. Wiring to support an MIL function, parking brake, gear selection, assignable warning lights, shift light, cruise control, 4×4 engagement, and wait light (for a diesel glow plug) allows the Dakota Digital Chevy installation multi-application control box to be used across a variety of applications well outside of this 1965 Chevy Impala.

Complete Dakota Digital RTX direct-fit gauge kit and harnesses.
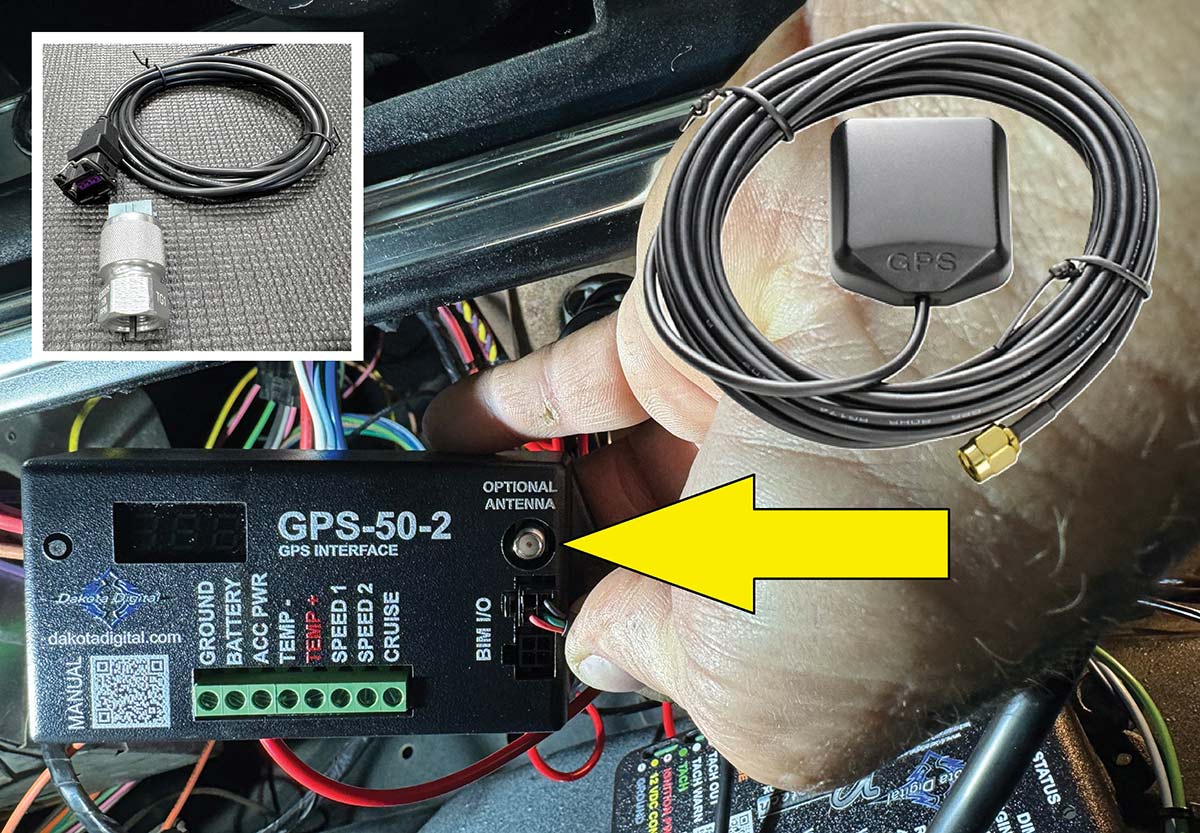
2. The RTX Direct-Fit gauge kit includes all the harnesses and was also supplemented by Dakota Digital’s optional GPS Speed Sensor and interface module (PN GPS-50-2). This addition greatly simplifies the speedometer connection, typically one of the more difficult tasks on a job like this.
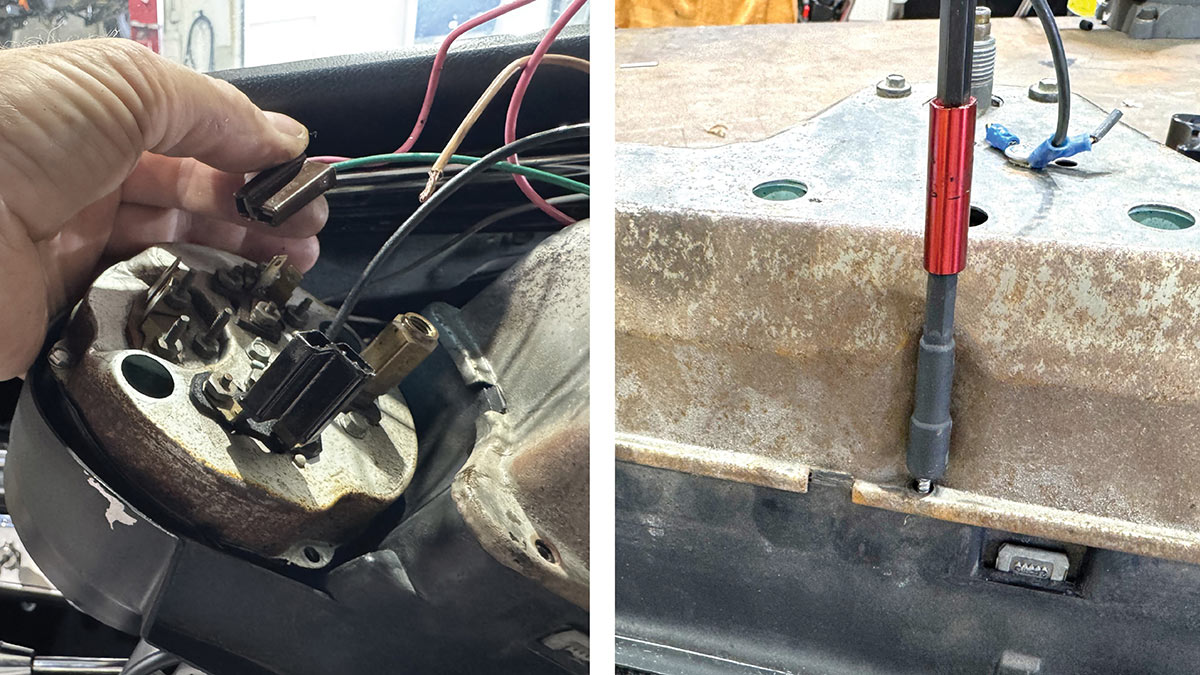
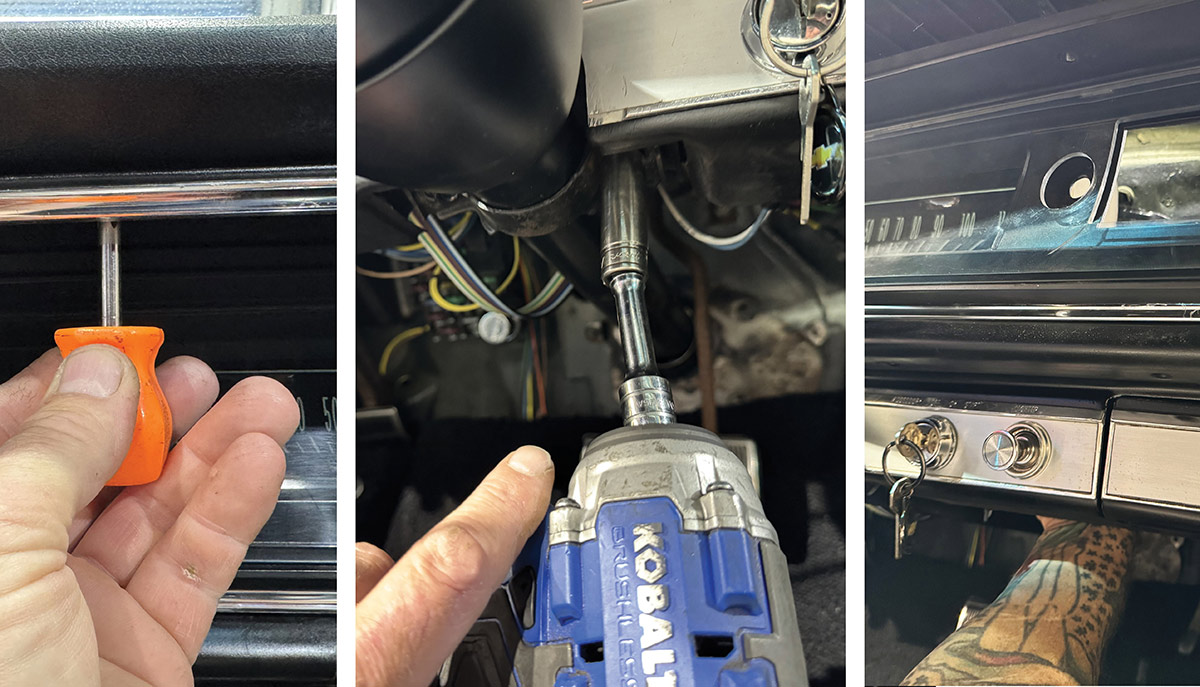
Removing factory instrument binnacles using manual and power tools.
3. HB Hot Rod begins the operation by removing the stock gauge bezel, which houses the three instrument binnacles that will be replaced with the RTX units. (Note that some of the fasteners are well concealed!) You’ll need to retain all the attaching hardware and the stock gauge bezel for installation of the new instrumentation.
Disconnecting original factory wiring harness from the stock binnacles.
4. The Dakota Digital Chevy installation for the 1965 Impala instrument panel consists of three displays: the main display with the speedometer, a tachometer binnacle, and a satellite gauge binnacle. These are attached with 11 screws, which must be retained. Carefully disconnect the factory harness connections from all three factory gauge binnacles. These connections are not reused.
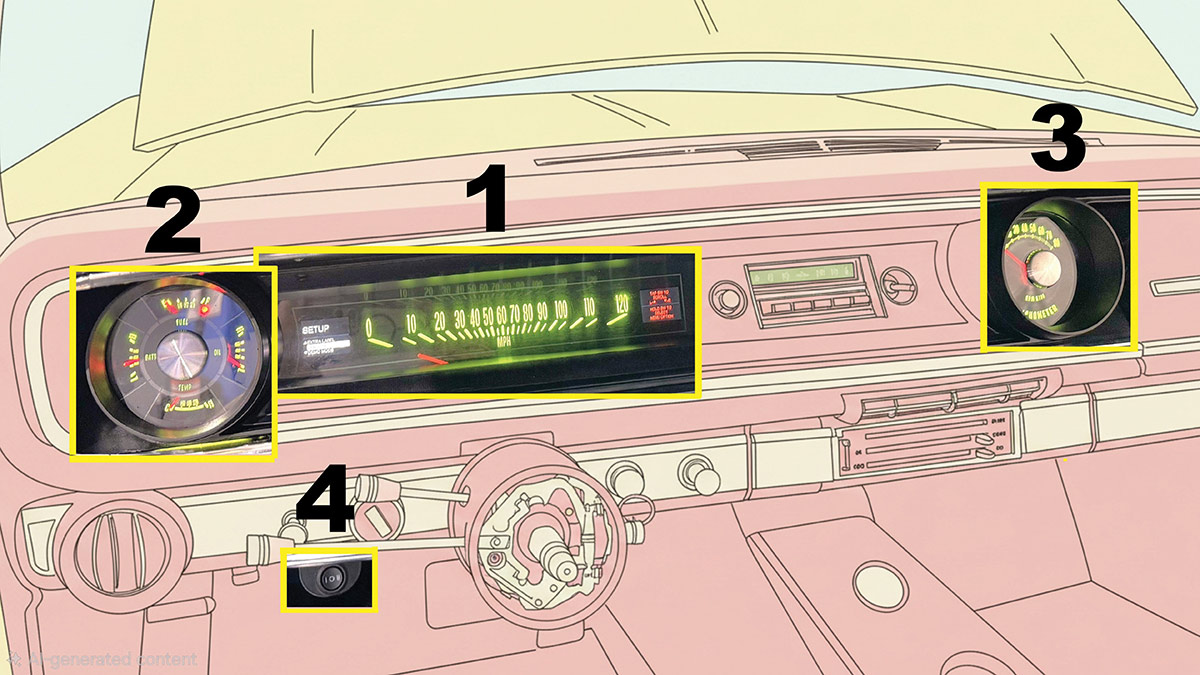
Dakota Digital RTX system components for 1965 Chevy.
5. Dakota Digital’s Retrotech RTX Direct-Fit system for fullsized 1965 Chevys integrates seamlessly with the factory display and includes a speedometer/TFT driver information center (1), a satellite gauge binnacle with fuel, battery, oil, and temp displays (2), a dedicated tachometer display (3), and a programming switch (4).
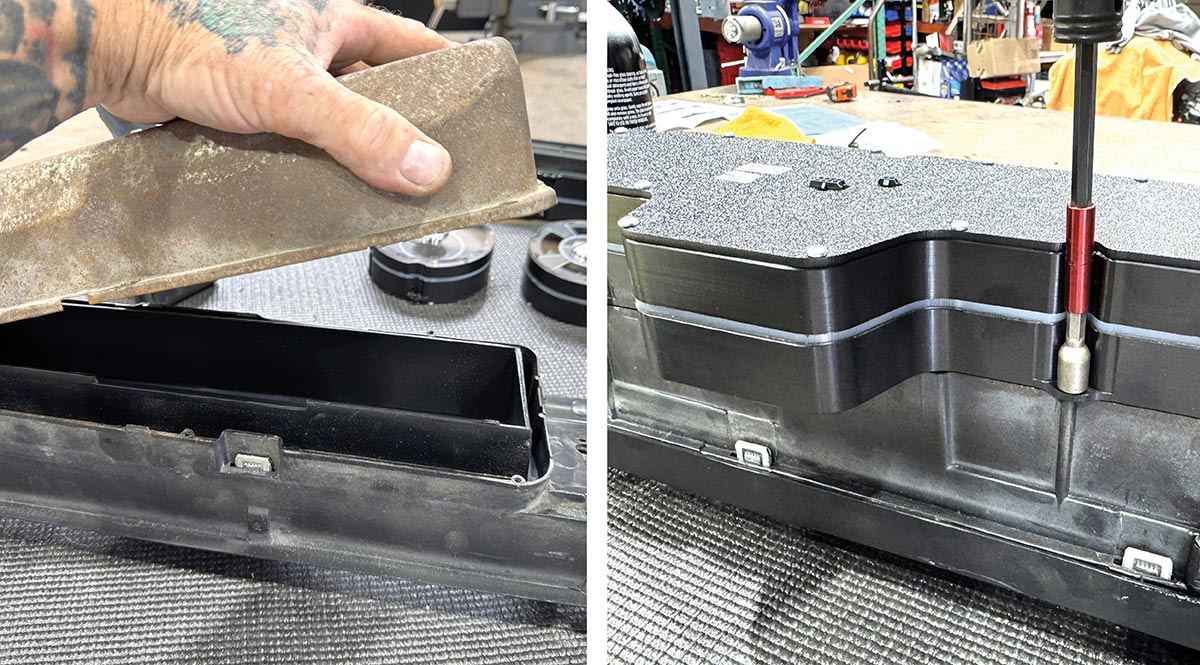
Mounting the new RTX speedometer binnacle into the dashboard.
6. The fun starts here with the removal of the tired stock speedometer binnacle and the installation of Dakota Digital’s new RTX speedometer/driver information center, using the screws Scudellari saved earlier.
Connecting interconnection harnesses between the speedometer and satellite binnacles.
7. With the installation of the new RTX tachometer and satellite binnacles, Scudellari picks up speed by snapping the main 36-inch harness into the speedometer binnacle and bridging it to the tachometer binnacle. A shorter 12-inch interconnection harness connects the speedometer binnacle to the satellite gauge binnacle. No homemade harnesses or wiring skills required.
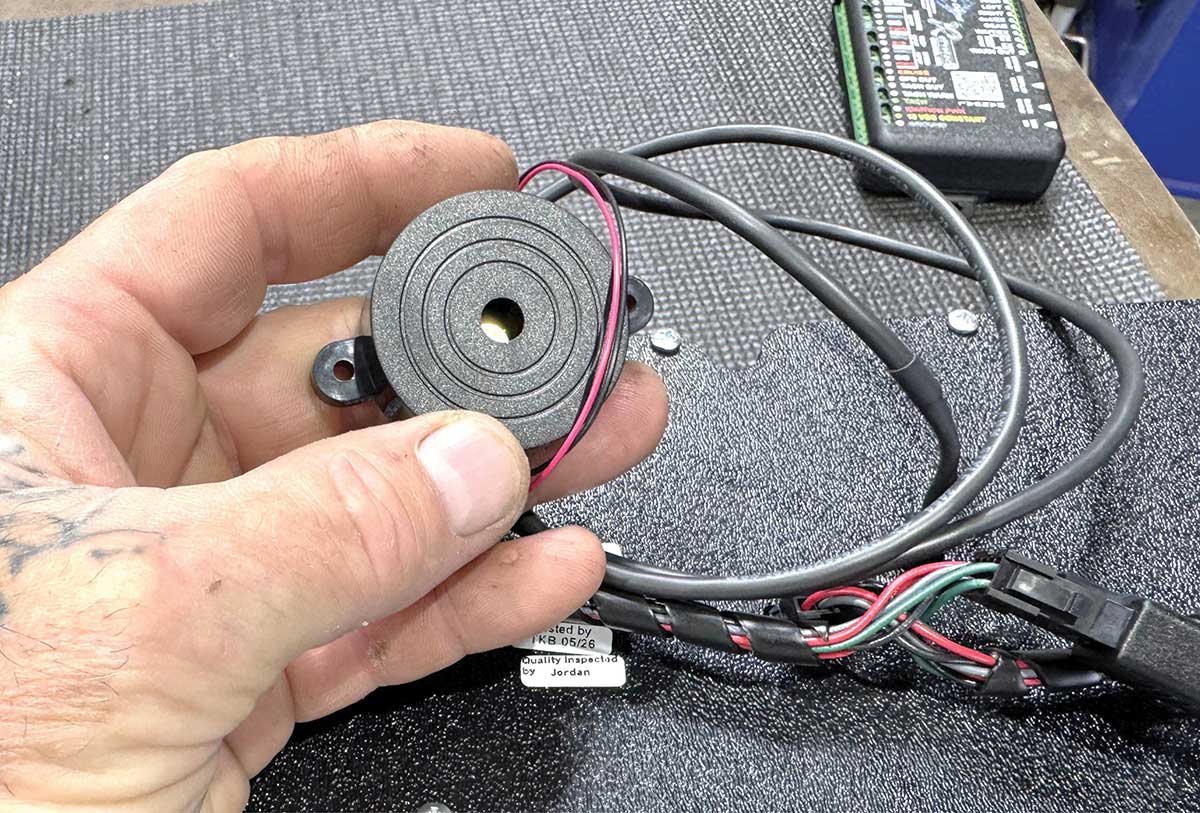
Warning buzzer and harness module for instrument panel installation.
8. Here’s a part you never think about until you need it: the warning buzzer. It’s part signal clicker, hazard tick-tock, and open-door buzzer, and it comes with a 3-foot harness that plugs directly into the speedometer binnacle, allowing it to be mounted anywhere under the dash.
Wiring terminal junctions on the Dakota Digital control box.
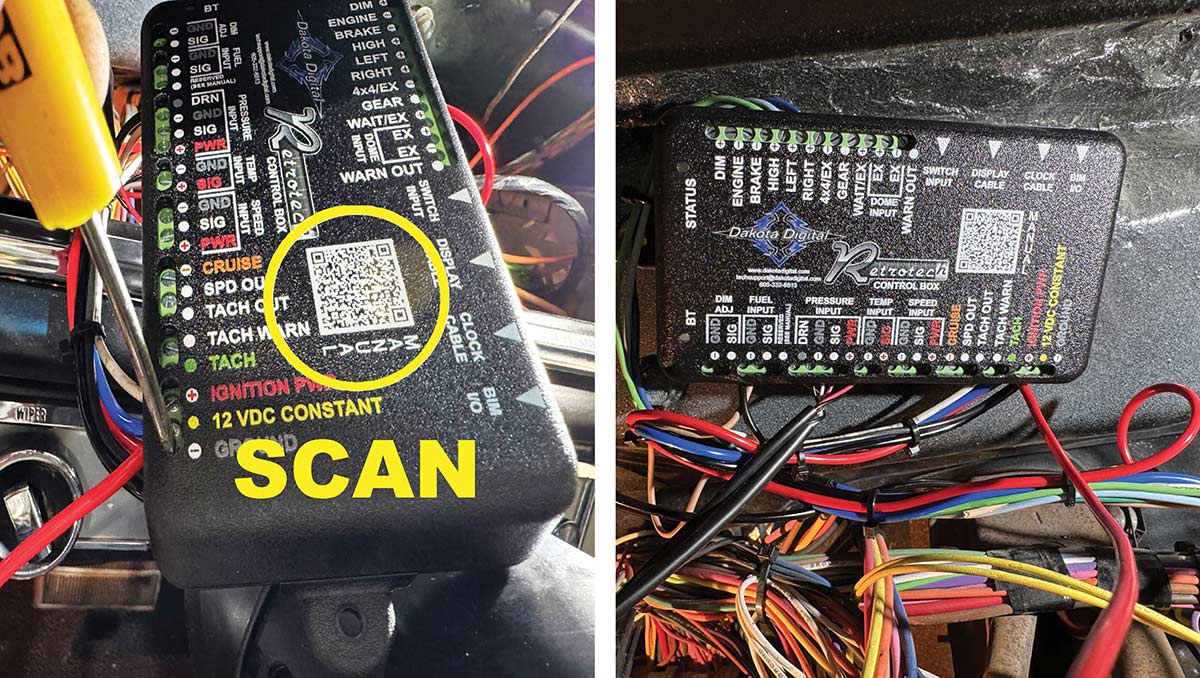
9. Underdash wiring is always a headache—no exception—but Dakota Digital makes gauge installation easier with clearly labeled terminal junctions—just strip the wire, insert it into the appropriate junction block, and tighten with a screwdriver. We suggest holding off on mounting the box until the power, tach, turn signals, sender returns, speedo input, and program switch connections are made and tested. Do not mount the box or run harnesses near your ignition box or other sources of RF interference. Dakota Digital prints a QR code (yellow circle) for the installation instructions right on the box, giving you instant access on your cell phone.
Optional GPS speed sensor module and antenna kit components.
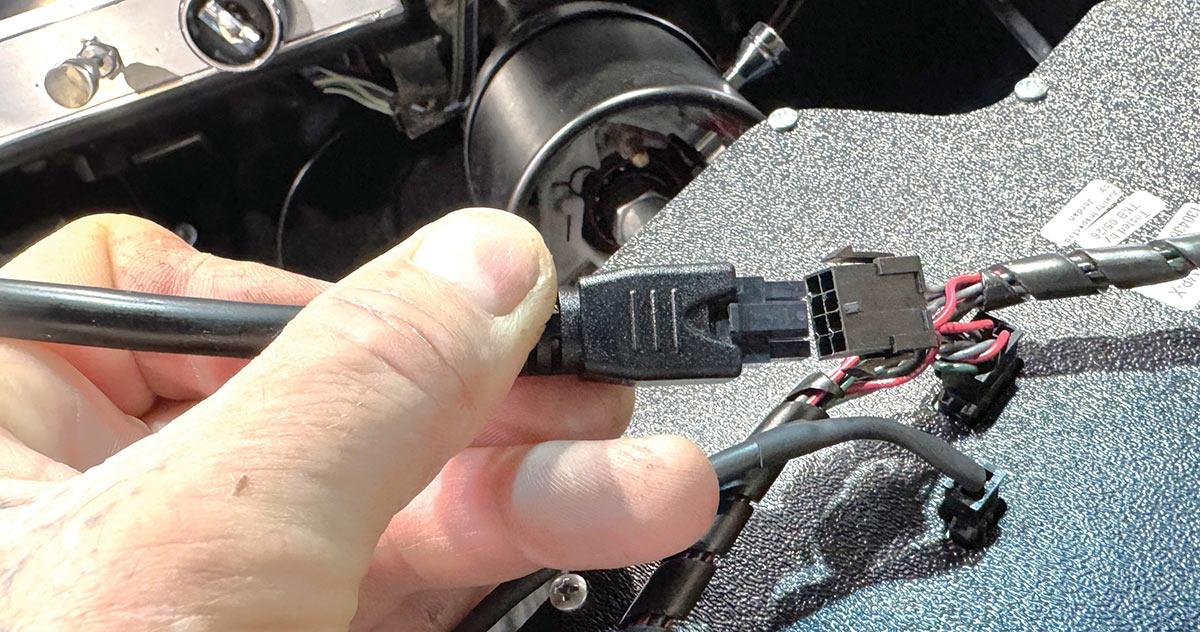
10. For the speedometer, you’ll have the option of using a transmission-mounted speed sensor (inset image) that converts the transmission’s mechanical output into a digital signal. However, for this install, the customer chose Dakota Digital’s PN GPS-50-2 module and antenna kit. The box piggybacks onto the gauge controller via the included harness, and the antenna screws into a port on the optional GPS-50-2 box.
Snapping gauge harnesses together before reinstallation of the panel.
11. The Dakota Digital gauge harnesses couldn’t be any easier to connect—just snap them all in before the instrument panel is reinstalled in the dashboard. Now’s the time to make all the connections for ground, 12V power, switched power, fuel sending unit, tach signal, and any other functions you plan to use, such as cruise control, shift light, boost, dimmer module, and others.
Carefully reinserting the instrument panel into the dashboard housing.
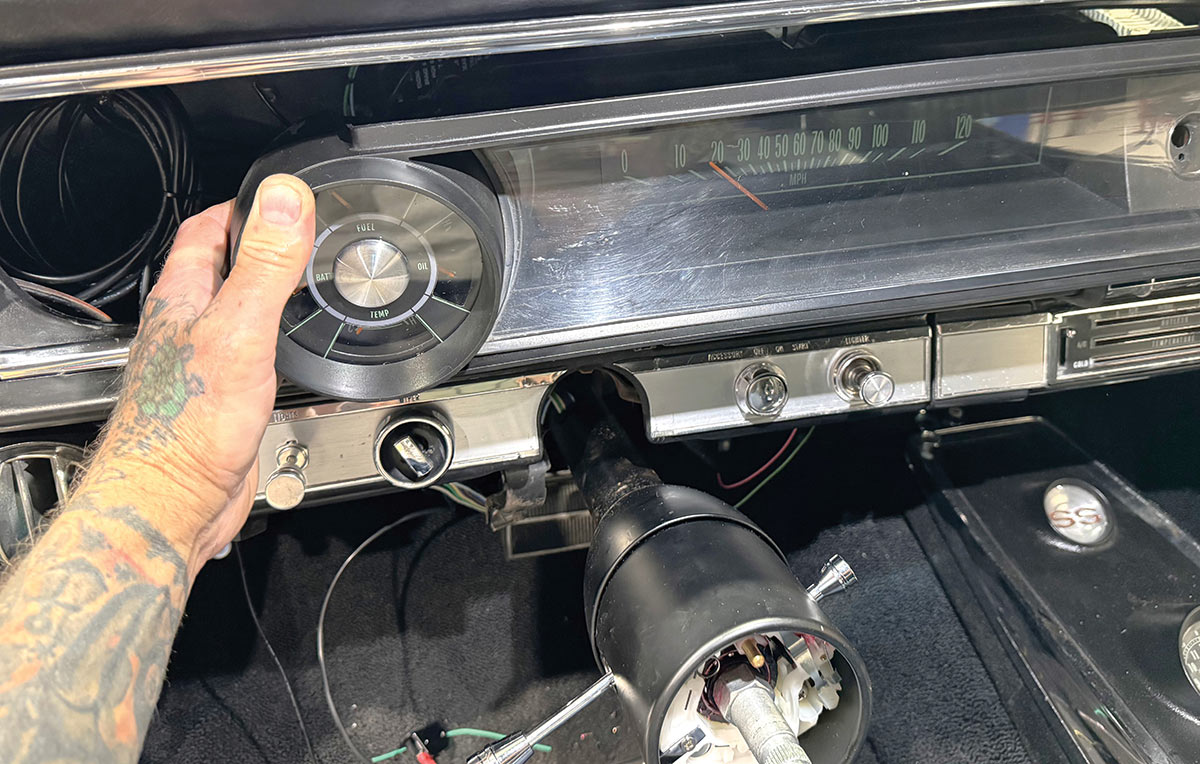
12. Once all your vehicle wiring connections are routed to the control box and the interconnecting tachometer and satellite gauge binnacle harnesses are attached, carefully reinsert the stock instrument panel into the dashboard, securing it with the original vehicle fasteners.
Coolant temperature sensor and oil pressure unit with sealant.
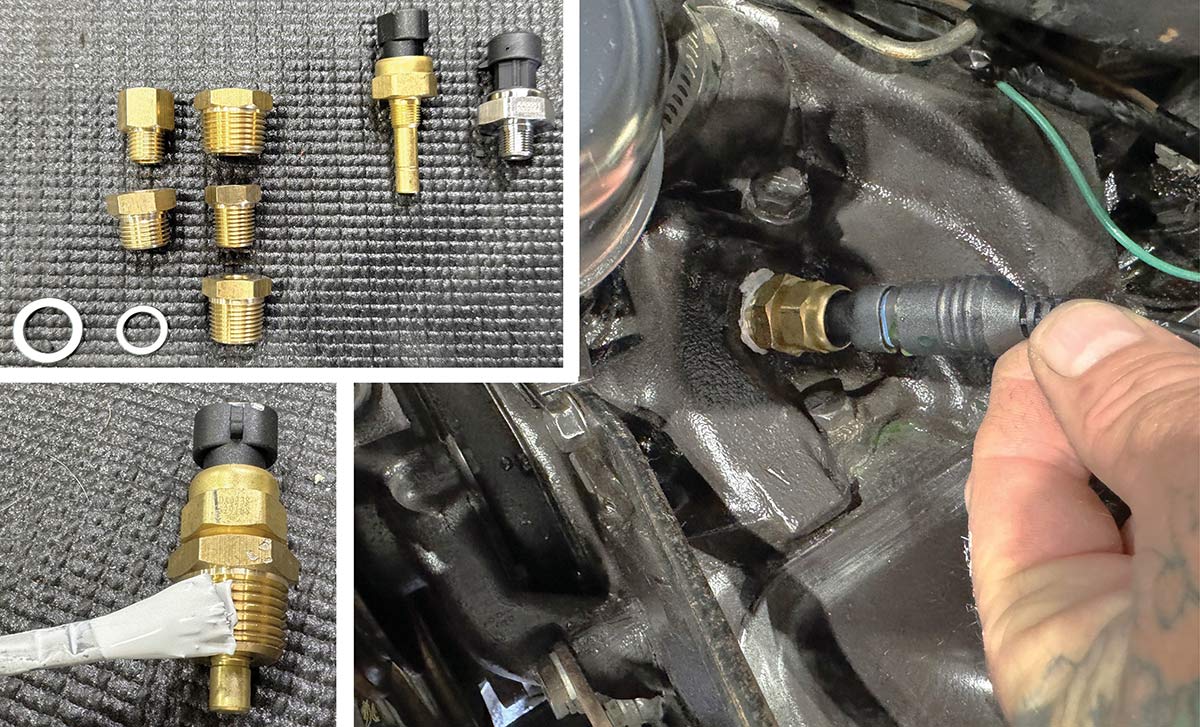
13. The Dakota Digital Chevy installation includes a compatible coolant temperature sensor and oil pressure sending unit, and both must be used to produce accurate readings for proper electronic calibration. These should be prepared with a liquid Teflon sealant to prevent leaks. Connections to the control unit are made using the harnesses provided.
Momentary contact programming switch mounted under the dashboard.
14. The programming switch for Dakota Digital’s RTX Direct-Fit gauges is a small, two-position momentary contact switch. It should be mounted within the driver’s reach (the controller harness is included) and is used to program the gauge’s many settings for a truly custom setup.
Close-up of the thin-film transistor driver information center.
15. The driver information center in Dakota Digital’s Retrotech RTX gauge kit uses a thin-film transistor (TFT) screen, a type of active-matrix LCD that delivers vivid colors and high contrast in real-world driving conditions. You will be able to select from many displays, alerts, and configurations, just like many of today’s factory muscle cars.
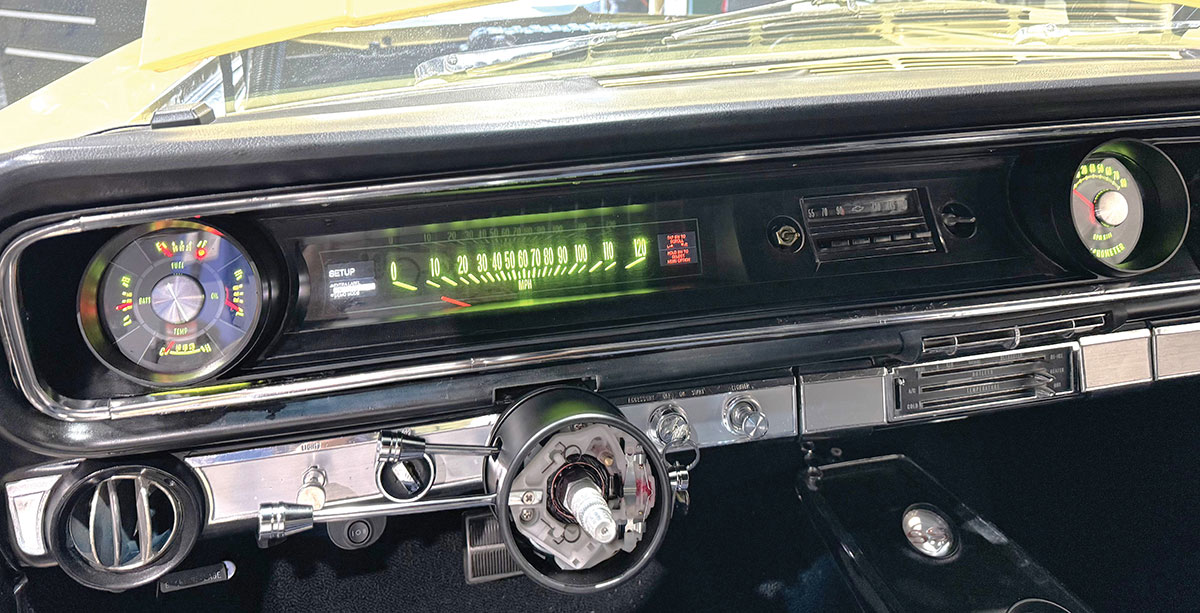
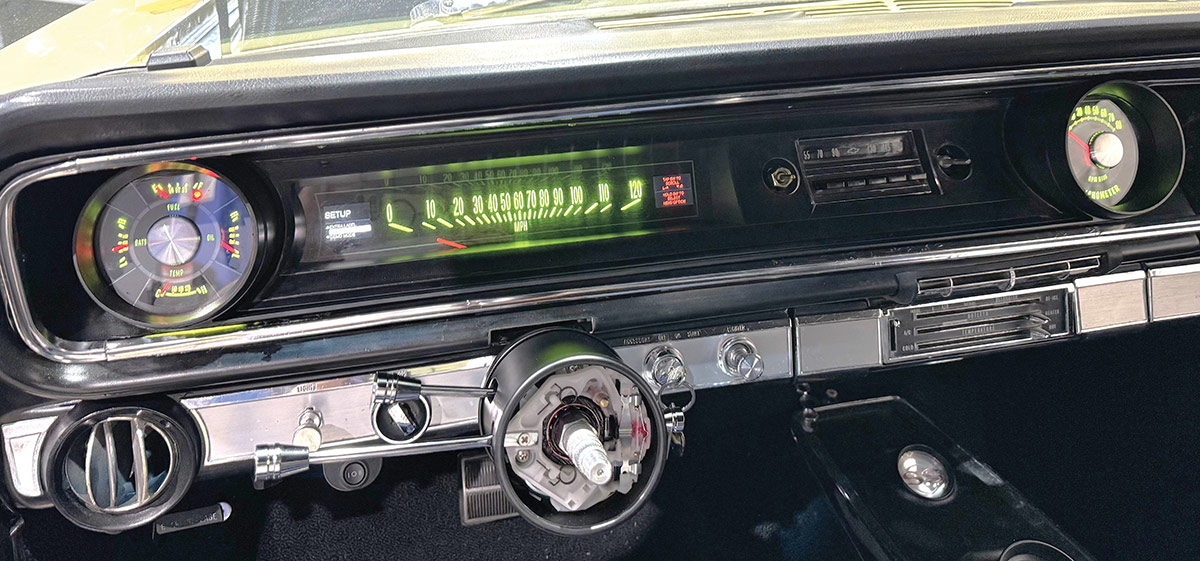
Completed dash installation showing the illuminated RTX gauge cluster.
16. It’s a shame that a steering wheel must block these gauges, so here’s what the Dakota Digital RTX system looks like unencumbered! While this install was strictly a basic setup, if the owner steps up later, there is plenty of functionality in reserve for boosting output level, a shift light, multiple warning lights, TPMS, Bluetooth, and cruise control.
In The Garage Media

(605) 332-6513
dakotadigital.com
HB HOT ROD

Modern Rodding
VOLUME 7 • ISSUE 73 • 2026