Modern Rodding Tech
InTheGarageMedia.com
Before the quarter-panels can be replaced on this Camaro, a lot of work is needed on the floor
1. Before the quarter-panels can be replaced on this Camaro, a lot of work is needed on the floor. The door openings have been braced, and new, wider wheelwells have been installed to accommodate the rear wheels and tires.
Repairing a 1969 Camaro’s Sheetmetal Floors
Hot Rods by Dean Uses Auto Metal Direct’s New Sheetmetal to Repair a 1969 Camaro
By Ron Covell Photography by Brian Brennan
R

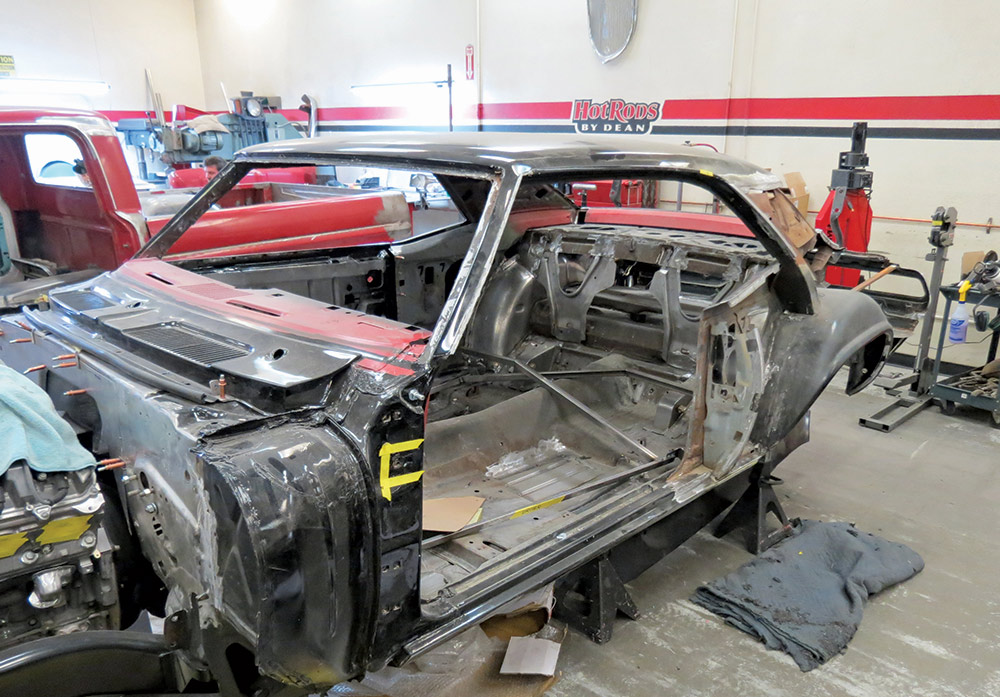
ust takes a toll on most vintage vehicles, and when one is resurrected to make a modern street machine, lots of repairs are usually in order. Fortunately, good-quality patch panels are available for most popular cars. In this case, we will follow Paul Gilbert at Hot Rods by Dean in Phoenix as he expertly fits panels from Auto Metal Direct (AMD) to a 1969 Camaro.

Every donor car is different, but the essential first step in any project is to carefully assess what sheetmetal parts need to be repaired or replaced. While this Camaro was in decent condition, the rust on the quarter-panels and many interior panels was extensive enough to make panel replacement a better option than trying to patch the original panels. This will often save time and give you better results.

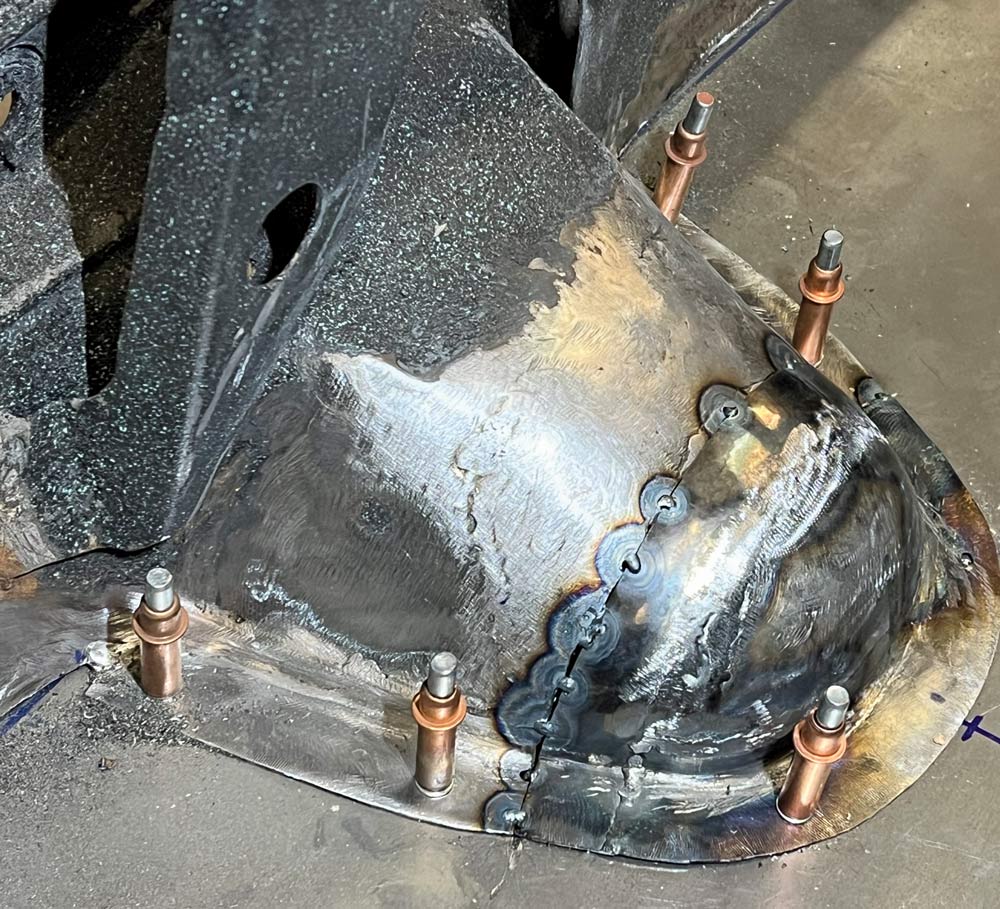
The quarter-panels are the largest body components that will be replaced, but the repairs and modifications to the floor and inner panels must be completed first. This build will use modern wheels and tires; the wheelwells must be modified to fit them. While cutting out and widening the original inner wheelwells is possible, when wider replacements are available that’s generally a better way to go. Fortunately, Detroit Speed & Engineering has inner wheelwell panels available that are 2.75 inches wider than stock—just the right amount for this build.

The first step was to add some bracing to the Camaro body so the alignment of all panels would be maintained as some of the structural panels were cut away. Next, the original inner wheelwell panels were cut out and the wider replacements were fitted and installed.

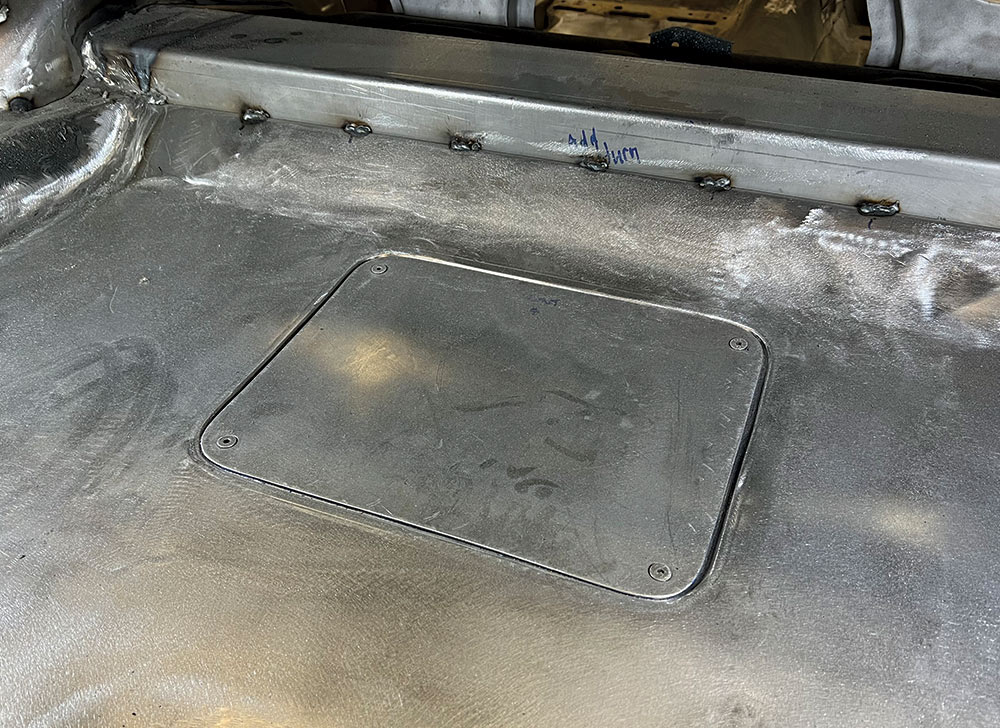
A new trunk floor was required, and since access was needed for a larger fuel tank, a flat sheet of 16-gauge steel was used. A hatch door was added to allow maintenance on the in-tank pump and access to the tank fittings.

The oversized fuel tank required a special, longer filler neck, and the original tunnel for the neck was modified to fit. All these modifications were ground smooth after welding to give the project a finished and professional appearance.

The lower panels behind the wheelwells were in poor shape, so new AMD replacements were used here. TIG welding was used for all these panels. While MIG welding would undoubtedly work, a skilled welder can get a smaller weld with the TIG process, which usually causes less distortion and makes it easier to work and finish the joint.

With all the preparation on the floor and inner panels completed, the car is ready to install the new quarter-panels. Look forward to the next installment where we’ll look at the details of this process, bringing the work to a high level of finish.

Lots of careful fitting has been done to integrate wider aftermarket wheelwells into the existing floor
2. Lots of careful fitting has been done to integrate wider aftermarket wheelwells into the existing floor. This makes a much cleaner installation than widening the original wheelwells.
With the work on the wheelwells completed, the old quarter-panels can be removed
3. With the work on the wheelwells completed, the old quarter-panels can be removed.
The center panels of the rear floor area will be replaced with new metal. A new brace has been installed between the wheelwells, and the old trunk floor has been cut aw
4. The center panels of the rear floor area will be replaced with new metal. A new brace has been installed between the wheelwells, and the old trunk floor has been cut away.
A new panel of 16-gauge steel is fitted into place and held temporarily with Clecos
5. A new panel of 16-gauge steel is fitted into place and held temporarily with Clecos.
A new 17-gallon stainless tank from Detroit Speed & Engineering will be installed in the car
6. A new 17-gallon stainless tank from Detroit Speed & Engineering will be installed in the car.
New straps are fashioned to fit the oversized tank and hold it securely into place
7. New straps are fashioned to fit the oversized tank and hold it securely into place.
Fuel is heavy and the straps must be fastened to allow easy access and trouble-free operation.
8. Fuel is heavy and the straps must be fastened to allow easy access and trouble-free operation.
The tank's filler neck is in the correct position, but an extension will be required to place the cap where it’s needed
9. The tank’s filler neck is in the correct position, but an extension will be required to place the cap where it’s needed.
The new filler extension is made of stainless steel and attached to the tank with a rubber connector
10. The new filler extension is made of stainless steel and attached to the tank with a rubber connector.
The original floor had a tunnel for the tank filler tube, but it needs to be enlarged for adequate clearance
11. The original floor had a tunnel for the tank filler tube, but it needs to be enlarged for adequate clearance. The end of the tunnel has been cut away here and will be reused in a new position.
The filler tunnel is repositioned in its proper location with some careful cutting and fitting
12. The filler tunnel is repositioned in its proper location with some careful cutting and fitting. Clecos temporarily hold everything in place as the parts are fitted together.
The new floor is held to its bracing with more Clecos as the fit is checked in preparation for welding
13. The new floor is held to its bracing with more Clecos as the fit is checked in preparation for welding.
Once the new floor is positioned correctly, the entire perimeter is welded and the joints are ground smooth
14. Once the new floor is positioned correctly, the entire perimeter is welded and the joints are ground smooth.
A good-sized hatch is added to provide access to the tank fittings and the in-tank fuel pump
15. A good-sized hatch is added to provide access to the tank fittings and the in-tank fuel pump.
The new trunk floor fits so well that you might think it was factory-made
16. The new trunk floor fits so well that you might think it was factory-made.
The structural panel behind the wheelwell was in poor shape, so the old panels were cut away in preparation to fit new AMD panels
17. The structural panel behind the wheelwell was in poor shape, so the old panels were cut away in preparation to fit new AMD panels.
The new panels are temporarily held in place with Clecos to ensure proper alignment before welding
18. The new panels are temporarily held in place with Clecos to ensure proper alignment before welding.
Once correctly positioned, the panels are stitch-welded into place
19. Once correctly positioned, the panels are stitch-welded into place.
After tacking, the long seams on the top surface are welded to make a watertight seal
20. After tacking, the long seams on the top surface are welded to make a watertight seal. All these joints are TIG welded to produce a low-profile weld bead with minimal distortion, which makes the cleanup effortless.
The floor is completed with all the joints welded and smoothed. In the next installment we’ll see how the replacement quarter-panels are aligned, fitted, welded, and fi
21. The floor is completed with all the joints welded and smoothed. In the next installment we’ll see how the replacement quarter-panels are aligned, fitted, welded, and finished.
SOURCES
Modern Rodding
VOLUME 5 • ISSUE 49 • 2024