InTheGarageMedia.com
 Photography by THE AUTHOR & Evan Iseli
o, you’ve finished chopping your top. After months of planning and days executing the perfect profile, you’re finally ready to cruise among the ranks of the full-custom elite. Just a few pieces of glass to cut and down the road you go, right? Not quite. As much work as it takes to lower the lid, a great deal must be done before your chop is truly finished.
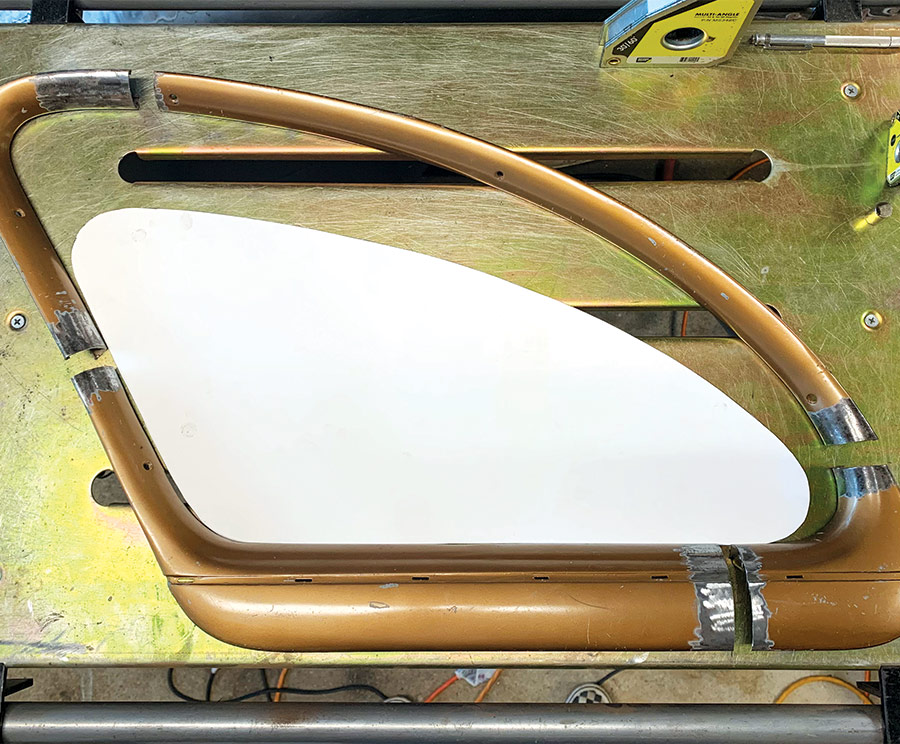
In this second installment on our ’41 Buick top chop, we’re tackling the garnish moldings—those all-important pieces that will frame your view every time you roll down the road. As with chopping the roof itself, planning is critical. These moldings are far from simple in their shape or profile, so the “measure twice, cut once” mantra is even more critical here; you don’t want to cut too much and find yourself fabricating complex filler pieces unnecessarily. Since each piece of molding comprises numerous complex, compound curves (especially in the quarter windows), serious thought will go into how and where each cut is made to ensure all the profiles and transitions come out just right.
Not including the backlite molding (which remains stock and has been leaned forward), the complexity of the trim modifications increases from the front of the car to the back. The windshield moldings are fairly simple, needing only to come straight down in height. The side window moldings are a little trickier since the tops of the doors have effectively been lengthened and the moldings will need to be extended. The quarter windows will require the most thought. Because the window openings have been shortened (lengthwise) and the radii reshaped, significant work will be required to navigate all those compound curves. It’s not a bad idea to chop the moldings when the top is still in bare metal because, in most cases, the location of the cuts you make to the trim will correspond with those made to the window openings.
TIG welding is always preferred, but with patience and care a MIG can get the job done. Just keep the voltage low and make sure the gaps between the sections you’re welding are square and tight. I found that with my old workhorse Millermatic 175 set at 35-wire speed and 2.5 on the volt dial and with a gap just wide enough for a scrap of 20-gauge steel to fit between, I could fuse the pieces with a series of tack welds that required minimal sanding and resulted in a nice, smooth finish. That said, decide whether the moldings will be painted or chrome-plated when the job is done. Seamless welds and perfect metal finishing are always the goal, but there’s more forgiveness if everything is painted (as these will be) since a little filler can mitigate any minor sins.
Hopefully, when you disassembled everything at the start of this madness, you bagged and tagged the hardware. Throughout this process, you’ll install and uninstall your moldings about a thousand times, so having a small magnetic tray with trim screws close by will serve you well. Just make sure you’ve got the right hardware for each piece; though most of the screws are universal throughout your car’s trim, there are a few that are location specific. Also, before you start cutting, use a razor to strip away any chunks of the original gasket rubber still attached to the back edges of the moldings. This will ensure they’re straight and level when checking alignment and welding cut pieces back together.
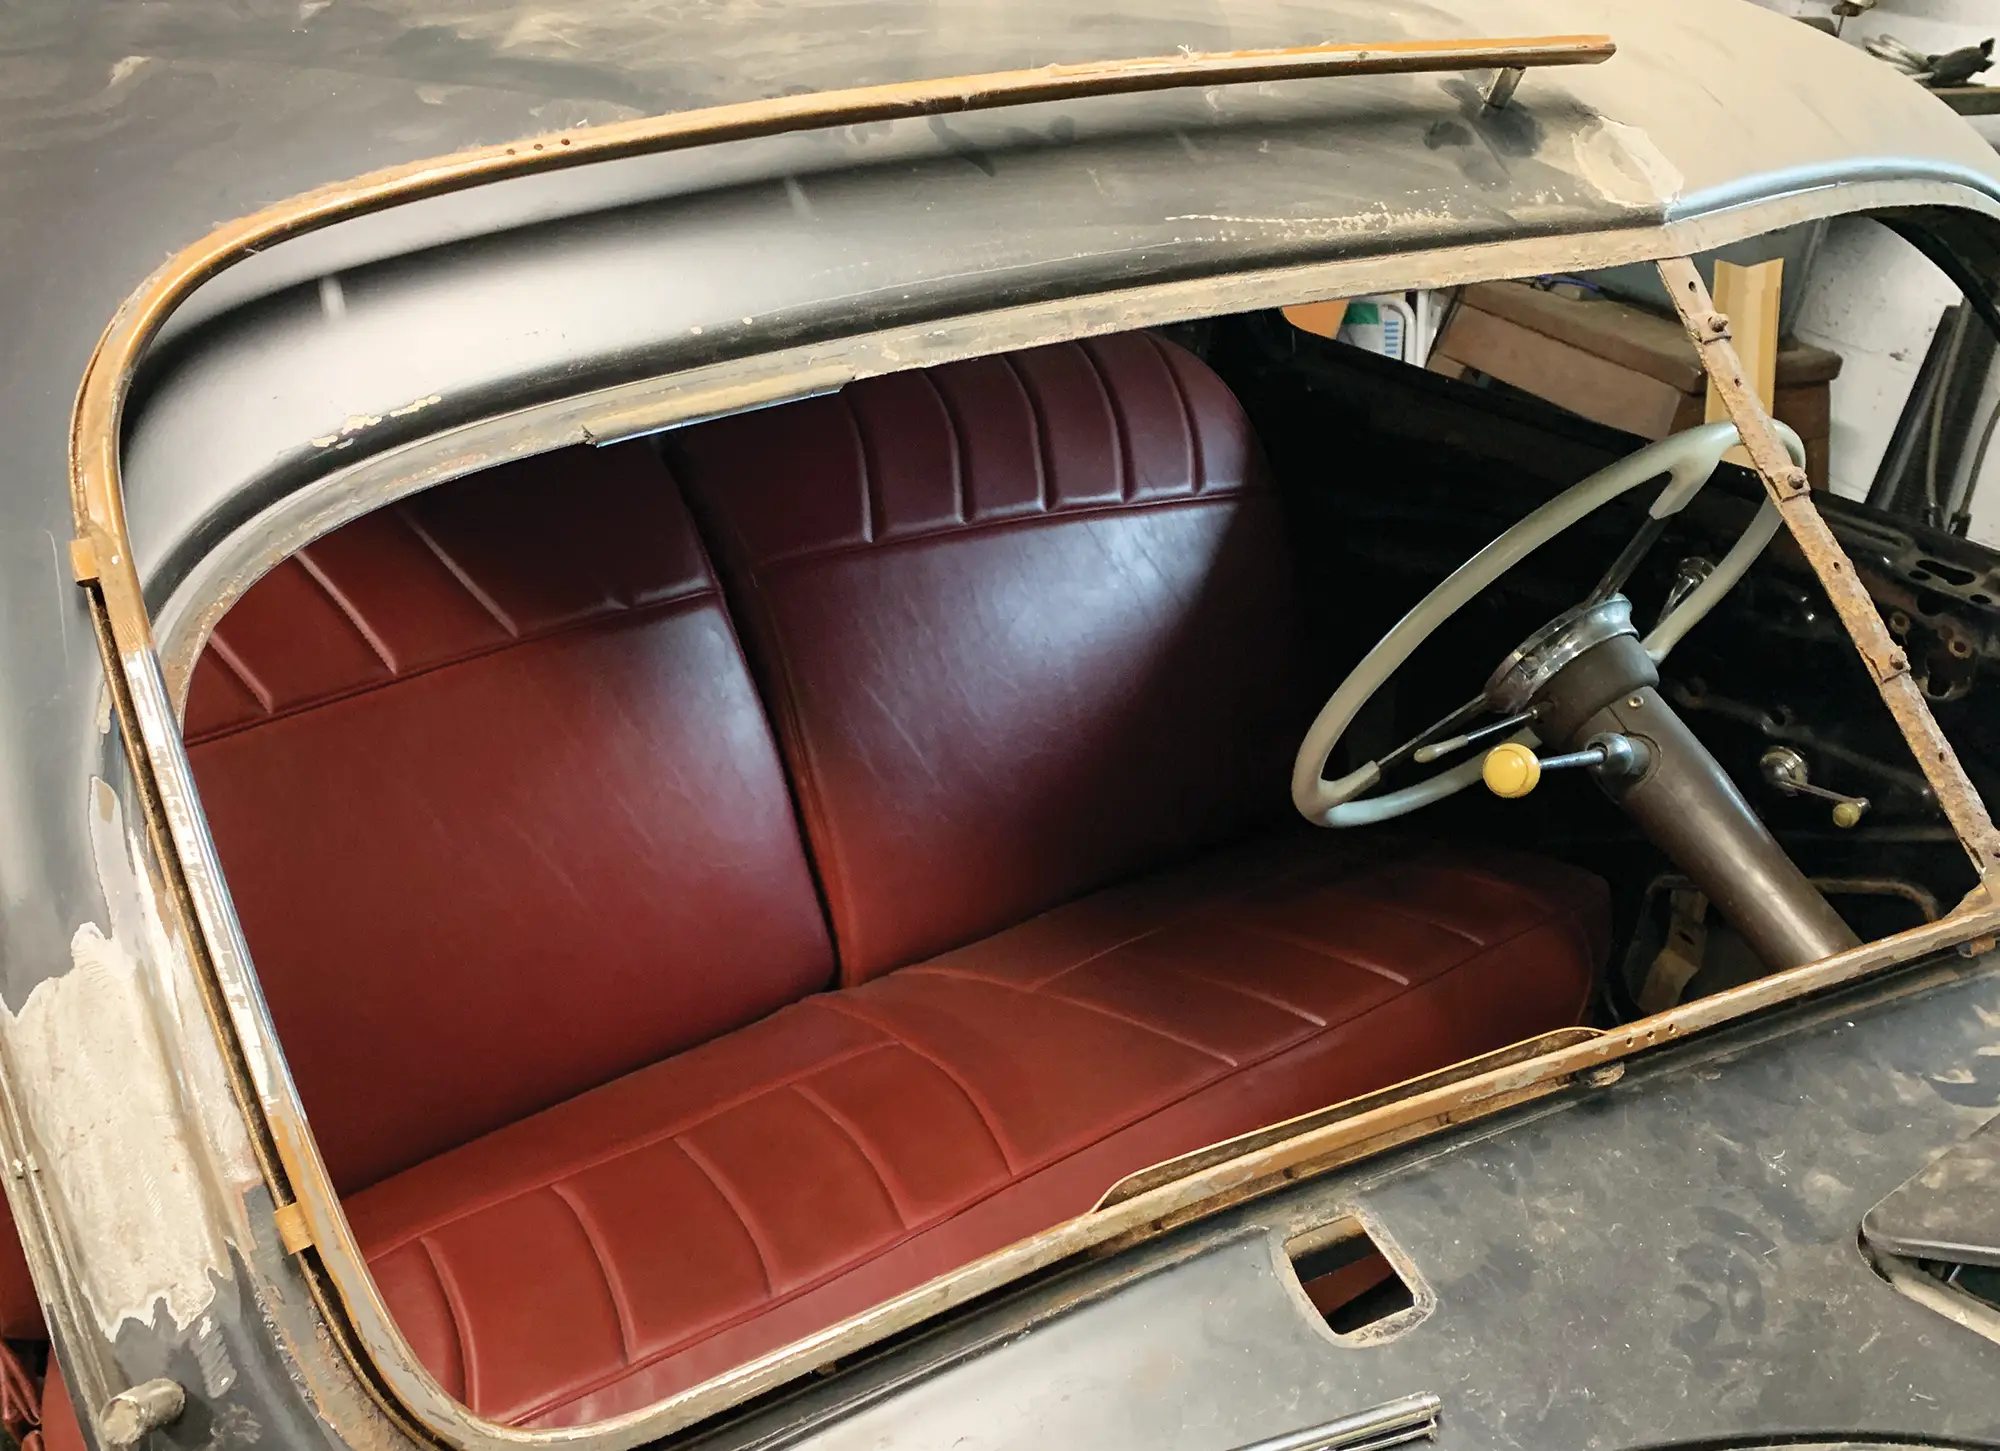
Since the windshield moldings are the most straightforward, we’ll start there. With the paint stripped away wherever you’ll be cutting and welding, begin marking your cuts by holding the trim in place along the bottom edge and scribing where it meets the line where the A-pillar was cut. The exact location isn’t critical since this first cut is simply the starting point but mark each cut straight and square. A transparent plastic ruler is helpful because you can line up the hatch marks with the edge of the trim to create a right angle along which to scribe your cut line. Be mindful of any screw locations. If you planned things properly when you were chopping the roof, you maintained as many screw holes as possible, which will greatly ease reassembly.
You’ll want to use a small, thin blade or cutting wheel to ensure the precision of each cut. I like to use a Dremel tool with a cutoff wheel on a flexible extension. The handle on the extension is smaller than that of the Dremel itself, which makes it easier to cut perpendicular to the trim, keeping all edges straight and uniform. Once the first slice is made, screw the lower half of the trim securely in place, then hold the upper half in position and mark the approximate location of the next cut, leaving a small amount of overlap. That overlapped section can then be sanded or filed a small amount at a time to ensure the perfect fit. A disc sander works well because it takes thousandths off at a time and keeps everything square.
When you’ve dialed in your 20-gauge gap, and the top and bottom halves of the windshield molding are screwed in place, check that the space between the trim and the windshield lip where the glass and gasket will go is consistent all the way around. You can do this by measuring the gap by one of the trim screws (since that is a fixed location), then using a block of wood cut to the width of the gap to check all the way around the rest of the trim. I used sections of paint stirrers stacked on top of each other, leaving them wedged in a place where the upper and lower halves of the trim met to maintain the spacing as I welded up the seam.
Chopping the window trim in the doors is similar to doing the windshield. The biggest difference is that you’ll need to add material to the horizontal piece at the tops of the frames since they became longer when the roof came down. A section of trim from a donor car will make your life infinitely easier if you can find it. Make your initial cuts to the A- and B-pillar areas, then screw the lower half in place and begin trimming and aligning the rest from the bottom up.
You may notice, especially with the side windows, that when you make your first cut, the trim springs out of shape. These pieces have some tension built into them, so when you’re checking how the chopped pieces fit back together, you may have to get creative with clamps (in addition to screwing the pieces in place). Using a straightedge to check the edges and face of each piece will also help ensure everything is aligned. This is particularly important when you weld in the filler piece at the top of the window frame. You don’t want to wind up cutting that too short because the upper corners of the trim weren’t seated into the corners of the opening. Last, use those wood blocks to maintain the gaps in the window glass and don’t forget to visually check things out from both the inside and the outside of the car. The part of the molding visible from the outside must be consistent all the way around.
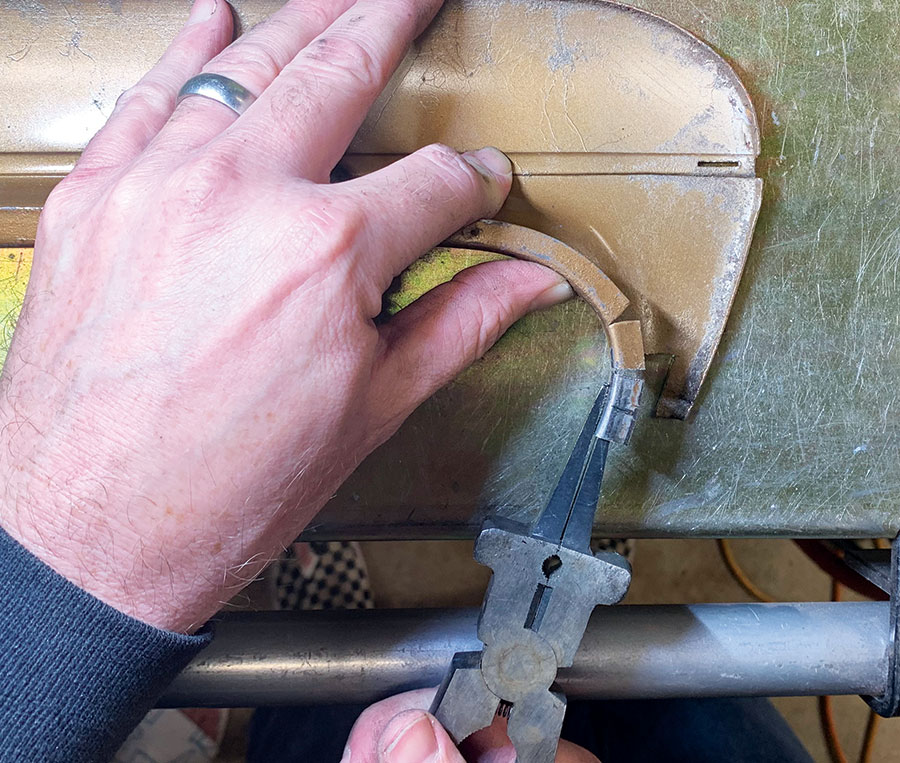
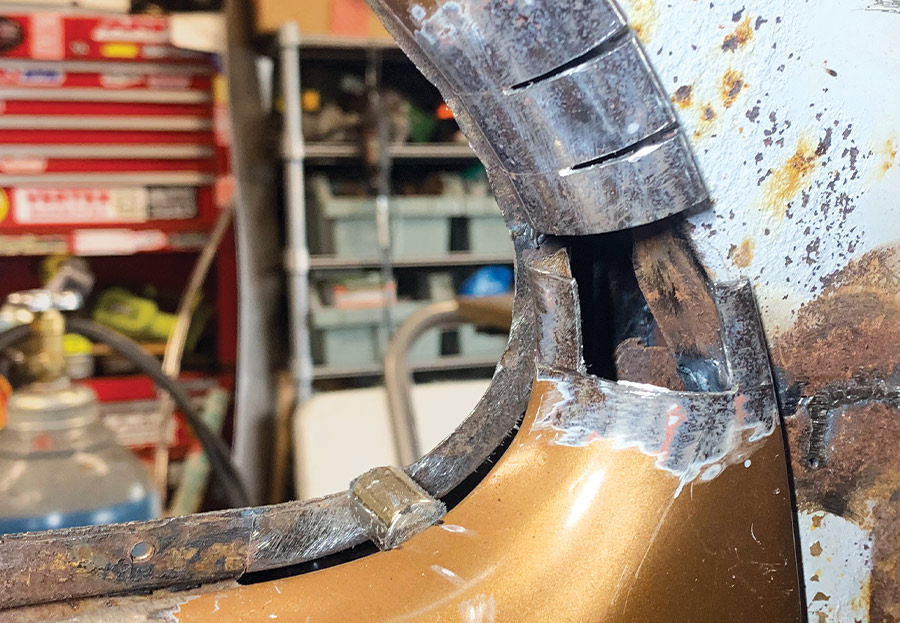
The quarter window trim is the most complicated since the window opening was shortened and the sweeping radius along the top was reshaped. As with the other pieces, start by cutting the trim in half horizontally at approximately the same place where the B-pillar and sail panel were cut. The bottom part of the frame will then need to be split vertically and shortened (lengthwise) to fit the new opening. Some moldings, like those on the Buick, have stainless trim that must be removed and modified, so while you’re shortening the molding, pay attention to any mounting holes for the stainless that may be important when you reattach it later.
Chopping the B-pillar section will be relatively easy because, as on the doors, it simply needs to be shortened; the corner radius at the top of the pillar remains unchanged. Where you’ll need to spend some time is in the rear corner by the sail panel and with the curved trim framing the top of the window. Since both these radii have been tightened, and because of the rounded cross section of the trim, these areas will need to be reshaped using a shrinker/stretcher or by making a series of relief cuts in the edges and bending them by hand. Either way, it will require cutting and removing sections of the trim and stitching them back together once they’ve been reshaped.
The process of chopping garnish moldings is complicated, but with time and patience your new, lower profile looks as good from inside the car as it does from outside. Just study the curves, strategize the best way to cut, bend, and weld things back together, and pay close attention to the details, and you’re bound to achieve that all-important flow.