Modern Rodding TECH

InTheGarageMedia.com

close up of a gear
1. A lot can be expected of the venerable Chrysler 8-3/4-inch rearend when properly prepped for performance driving.
Geared for Performance
Building & Installing the Chrysler 8-3/4 Rearend for Durable Performance
By Barry Kluczyk Photography by THE AUTHOR
M

illions of Mopars left the factory with the ubiquitous 8-3/4-inch rear axle. It was Chrysler’s midrange muscle car axle, offering greater torque capacity than the pedestrian 8-1/4-inch rearend used on most Slant-6–powered and other lower-end, V-8 vehicles, but not quite the bomb-proof strength of the Dana 60 used with Hemis and other top-shelf V-8s.

Introduced in 1957 and employed through about 1974, Chrysler produced three basic versions of the axle, which varied by the size of pinion bearing and corresponding pinion stem diameter. There was a 1-3/8-inch pinion stem diameter, a 1-3/4-inch pinion stem, and the later style with a 1-7/8-inch tapered pinion stem.

Each variant is generally known by its ’64-and-later casting number. The 2070741, or “741,” axle used the smaller pinion bearing and is consequently the least desirable from a performance standpoint. The 2070742, or “742,” and 2881489, or “489,” castings feature the larger pinion bearings and are more desirable when scanning Craigslist and swap meets for a suitable axle.

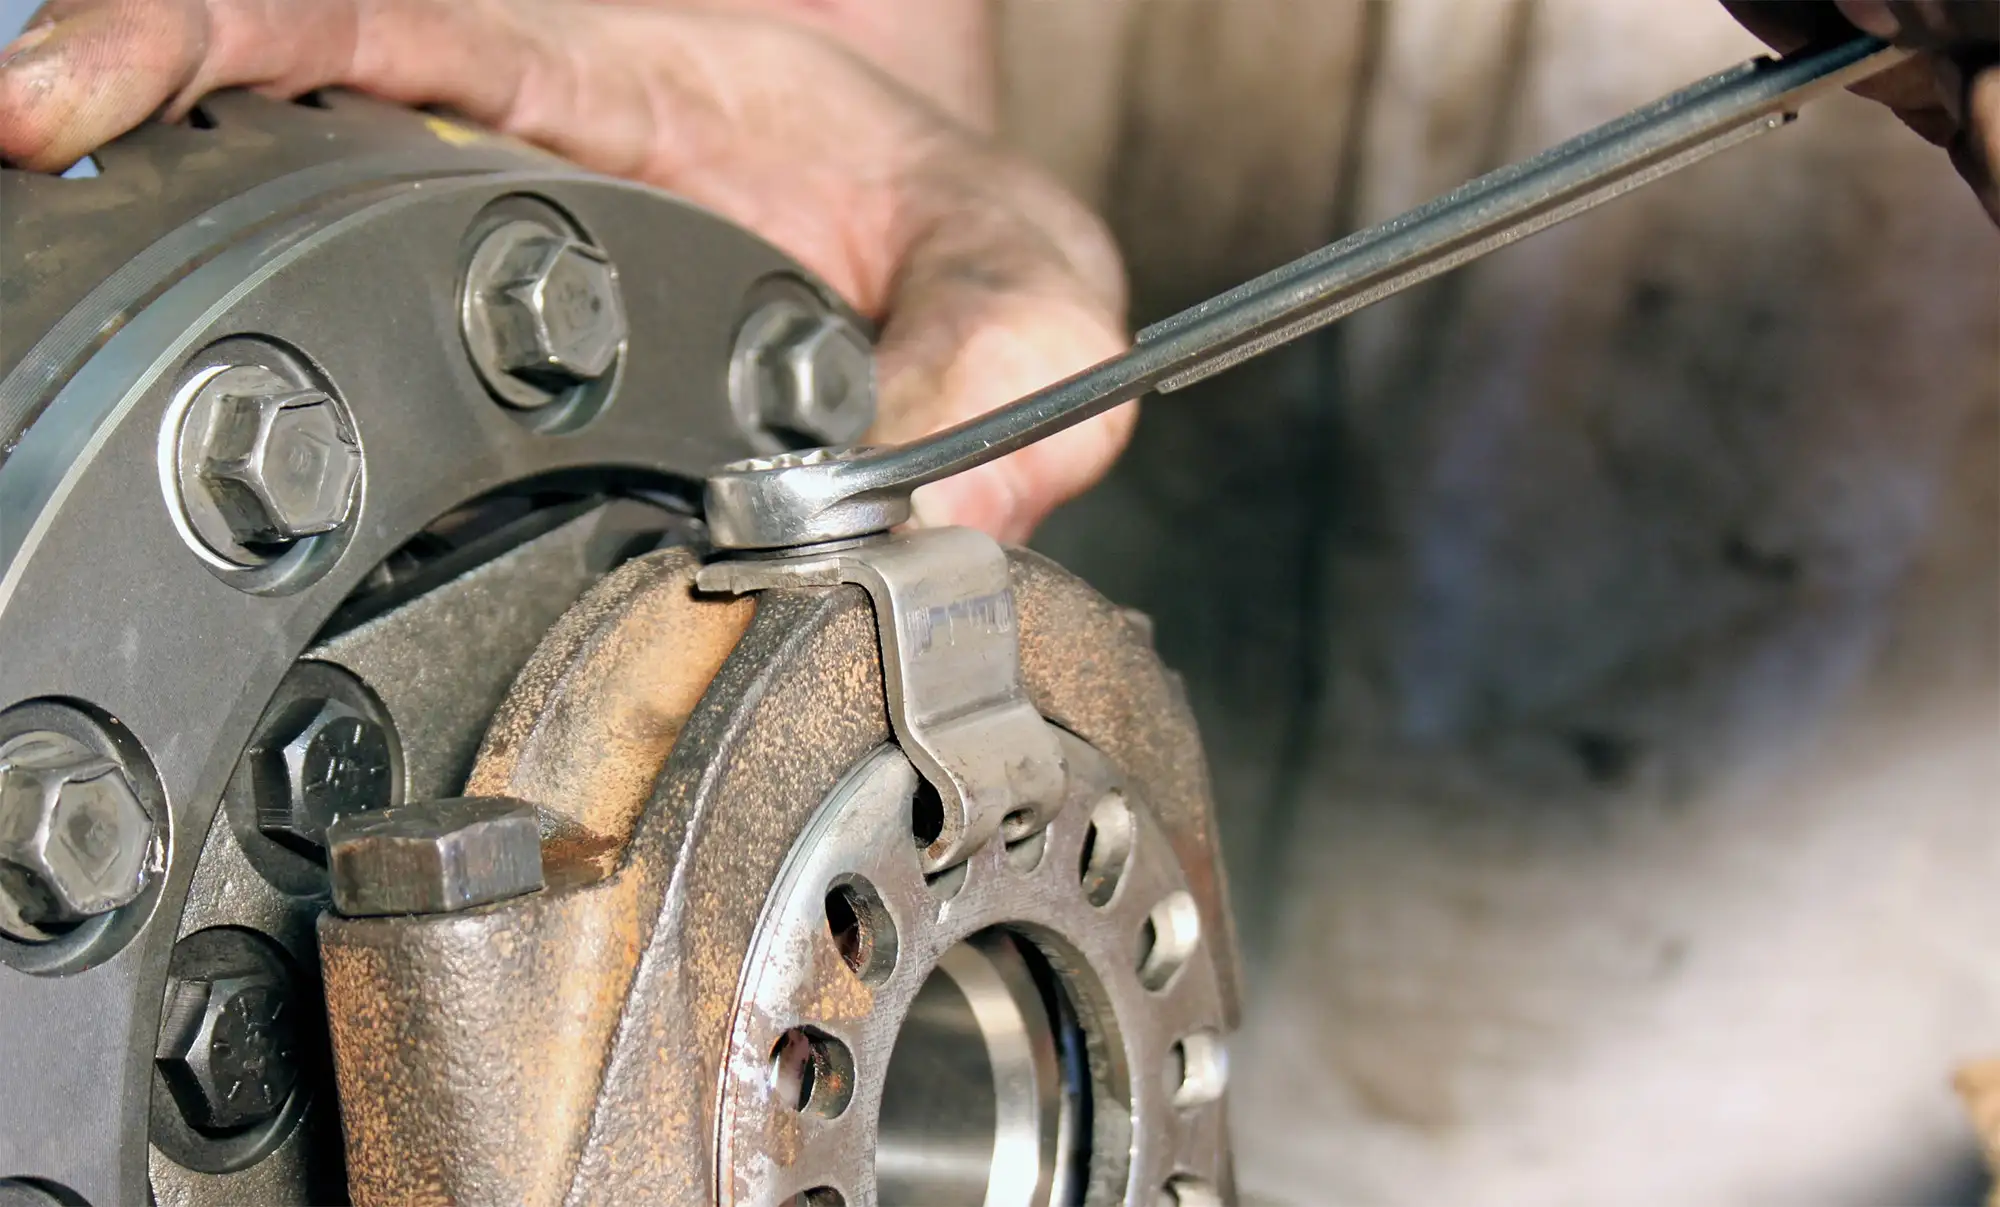
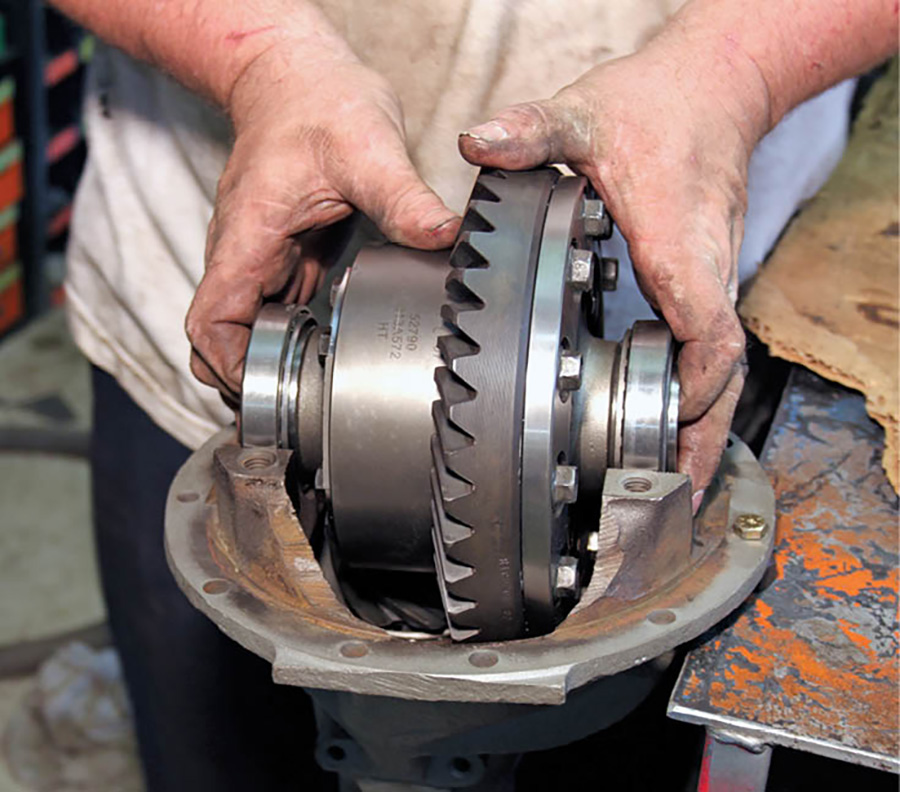
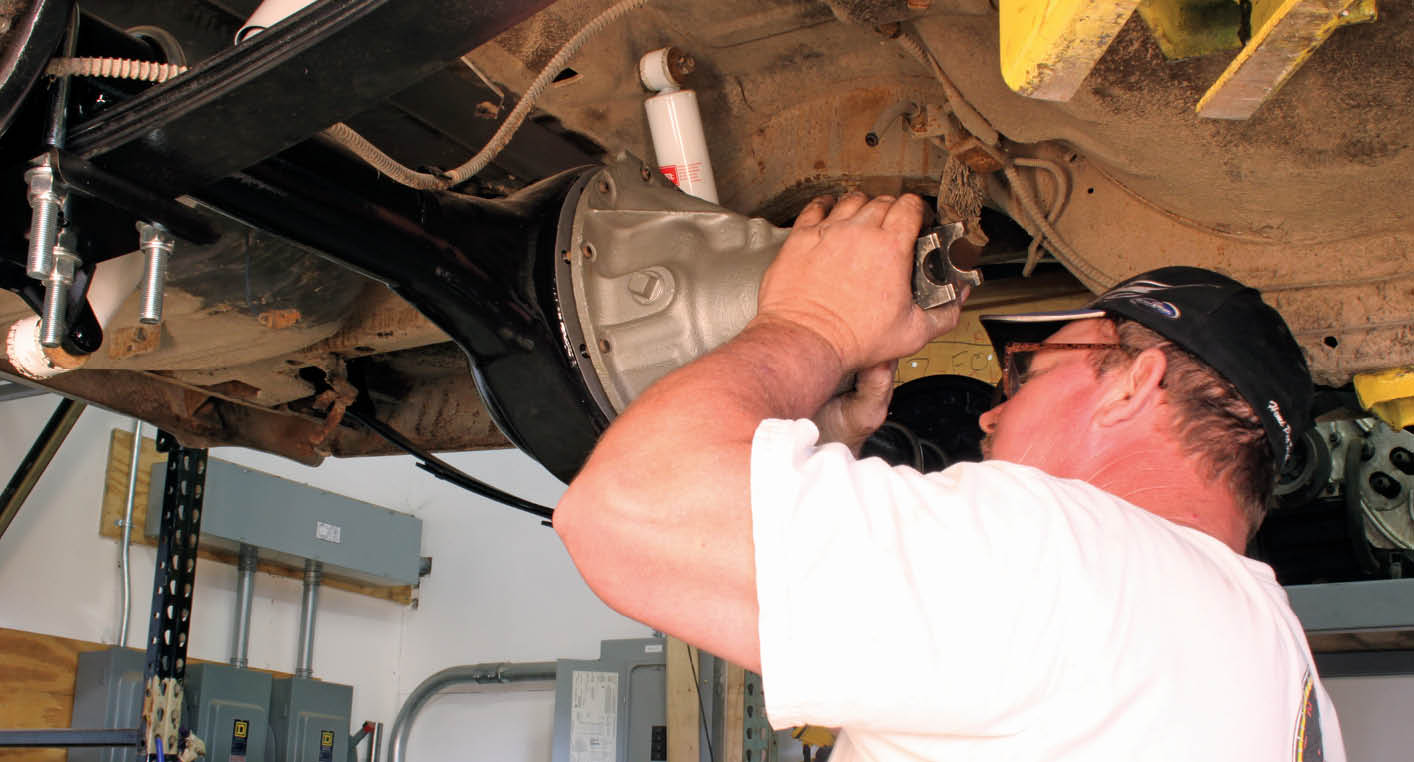
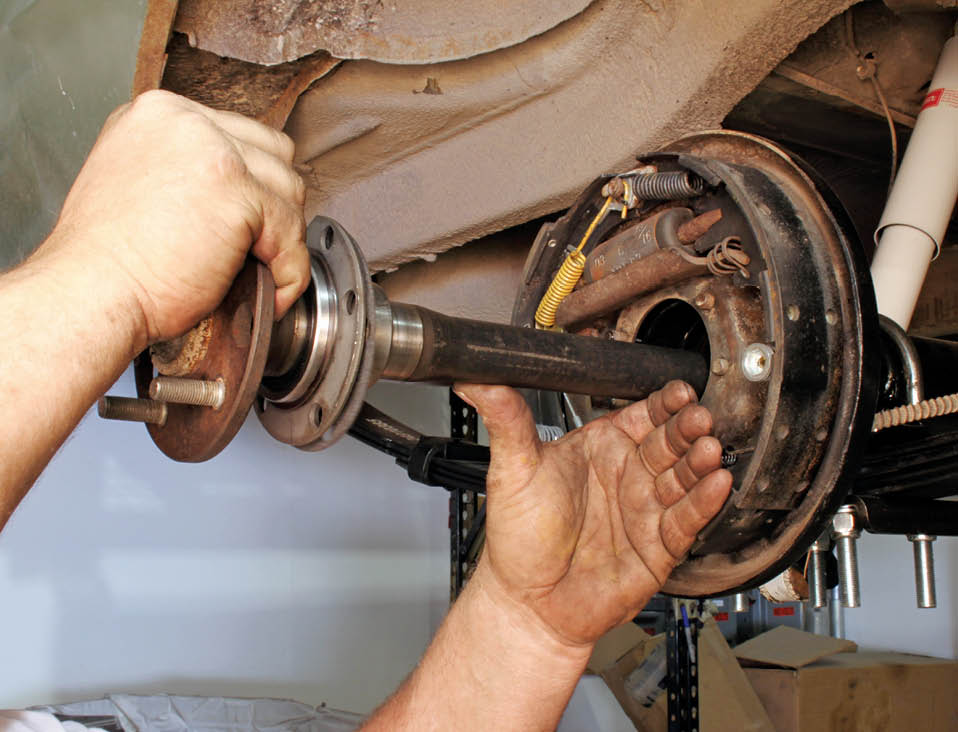
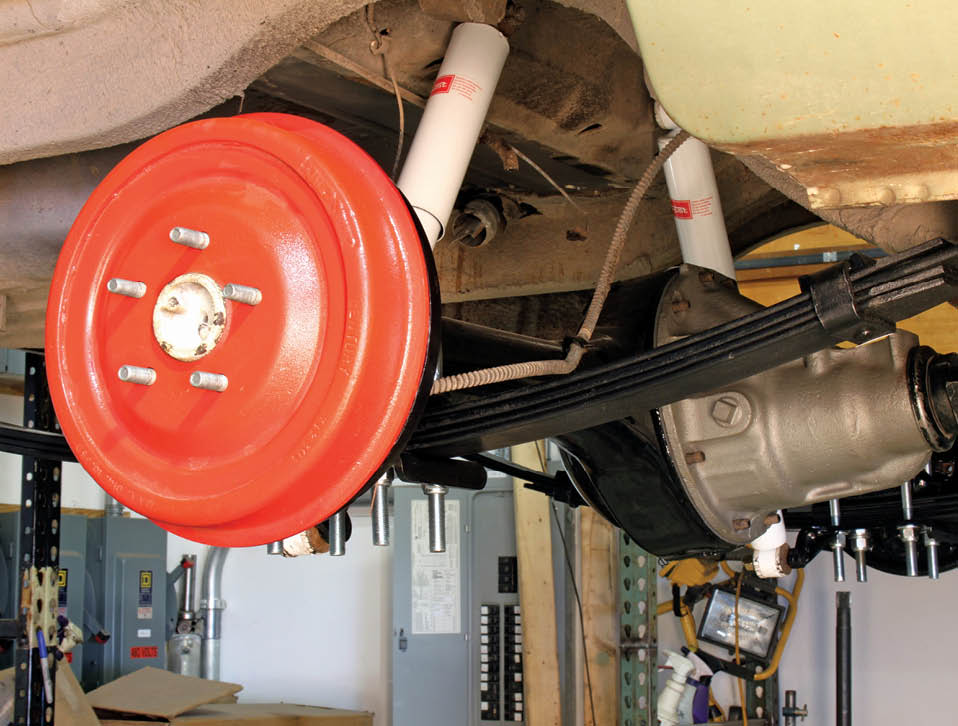
Believe us, the 8-3/4-inch axle is more than suitable for the vast majority of high-performance combinations. It will hold up to modified big-block combinations and offers a real weight advantage over the admittedly beefier Dana 60—not to mention a cost advantage. With its easily removable carrier assembly, servicing the 8-3/4 is straightforward. It was, therefore, a good choice for a friend’s restomod ’69 Dodge Dart, which was set up with a Sure Grip differential and a highway-friendly 3.55 cog set.

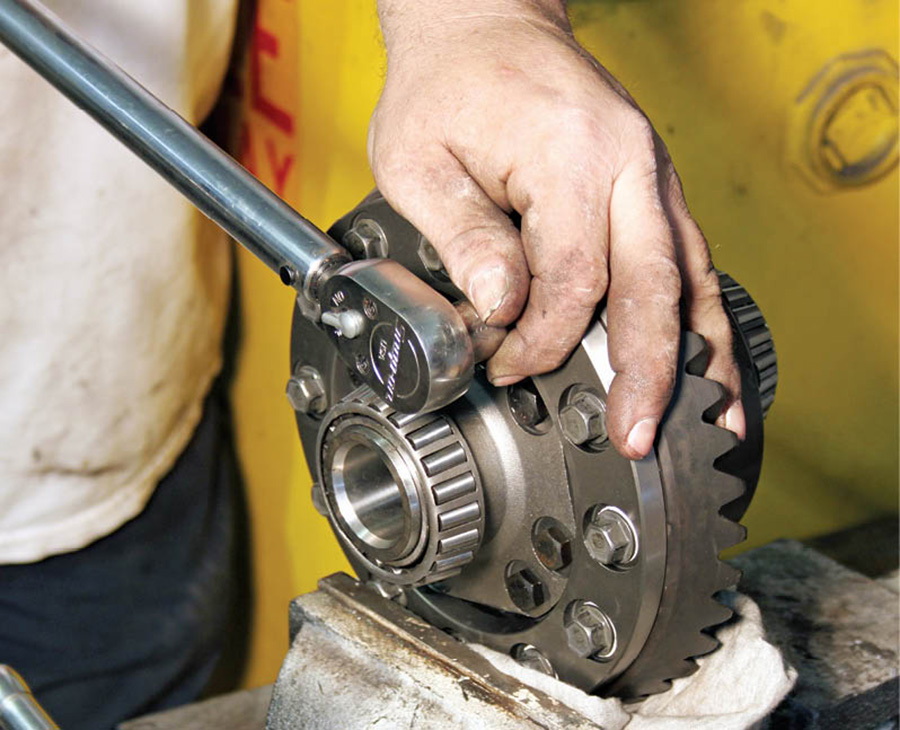
It also gave us a great opportunity to follow the rebuild and assembly of the axle, a task with which many enthusiasts simply don’t have much experience. Like tinkering with the guts of an automatic transmission, rear-axle assembly is one of those infrequently performed projects that foster more than a little fear. Get the pinion depth and mesh patterns wrong and you’re back to square one—and that’s if you haven’t already installed the axle and heard an ominous whine or felt vibrations.

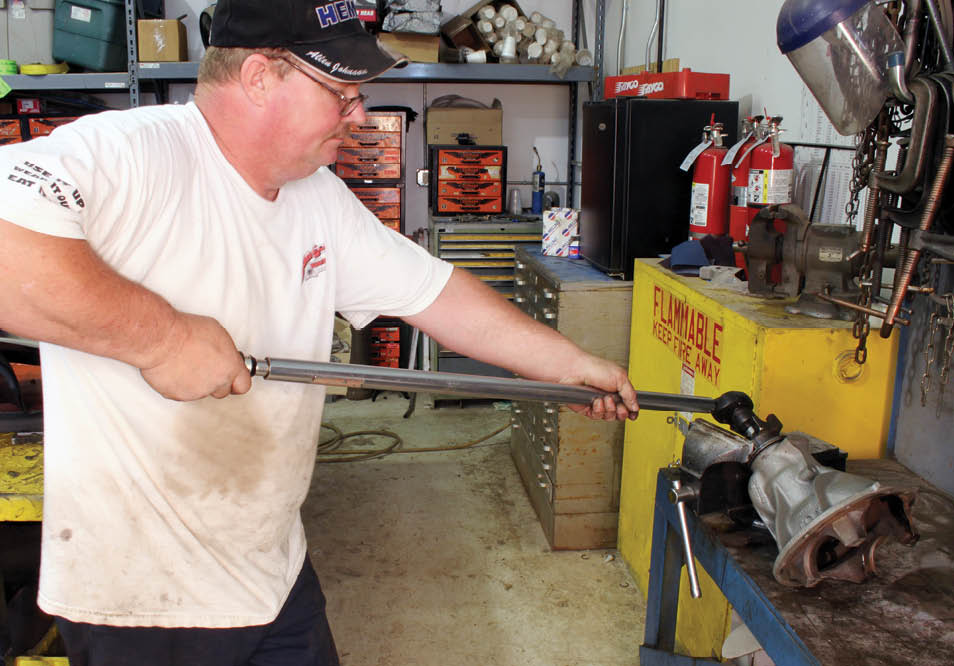
The accompanying photos and captions show the basics of building and installing the 8-3/4-inch. While there are nuances to a project like this, it should serve as a strong primer to those considering tackling the project themselves. We were fortunate to have Mopar guru Dan Cook perform the build. He’s forgotten more about these axles than we’ll ever know and was a great instructor.

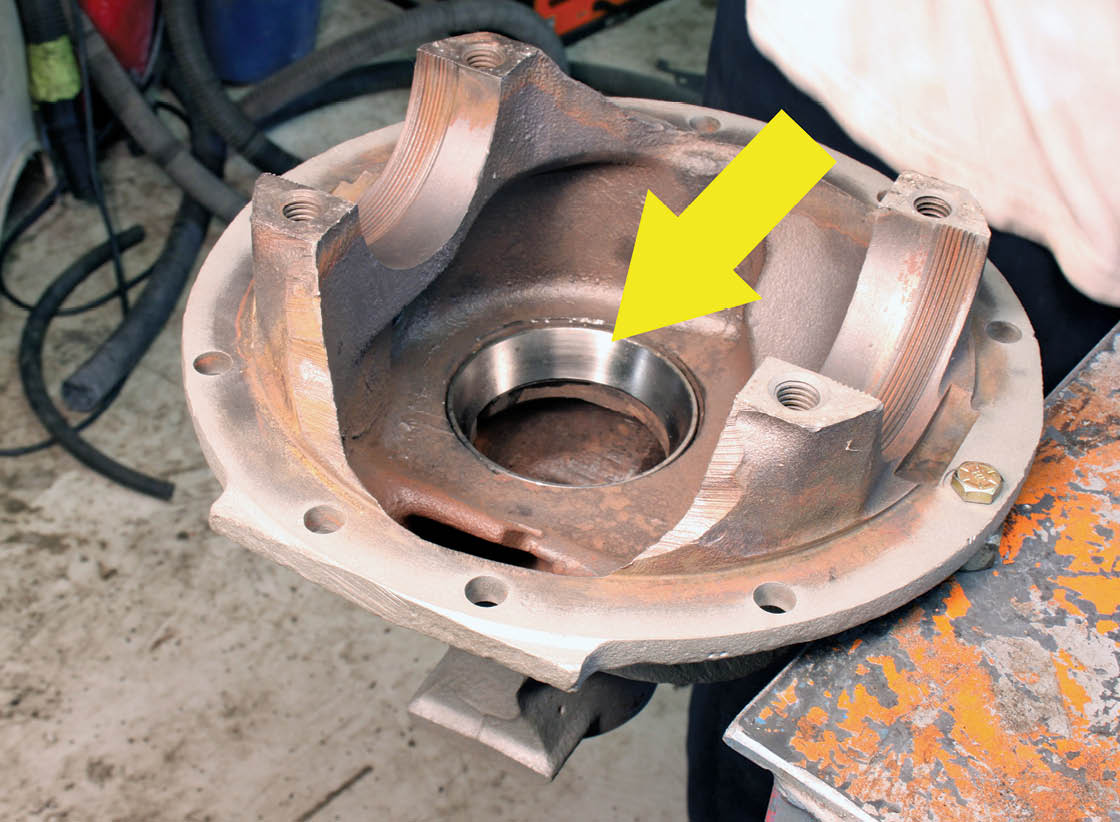
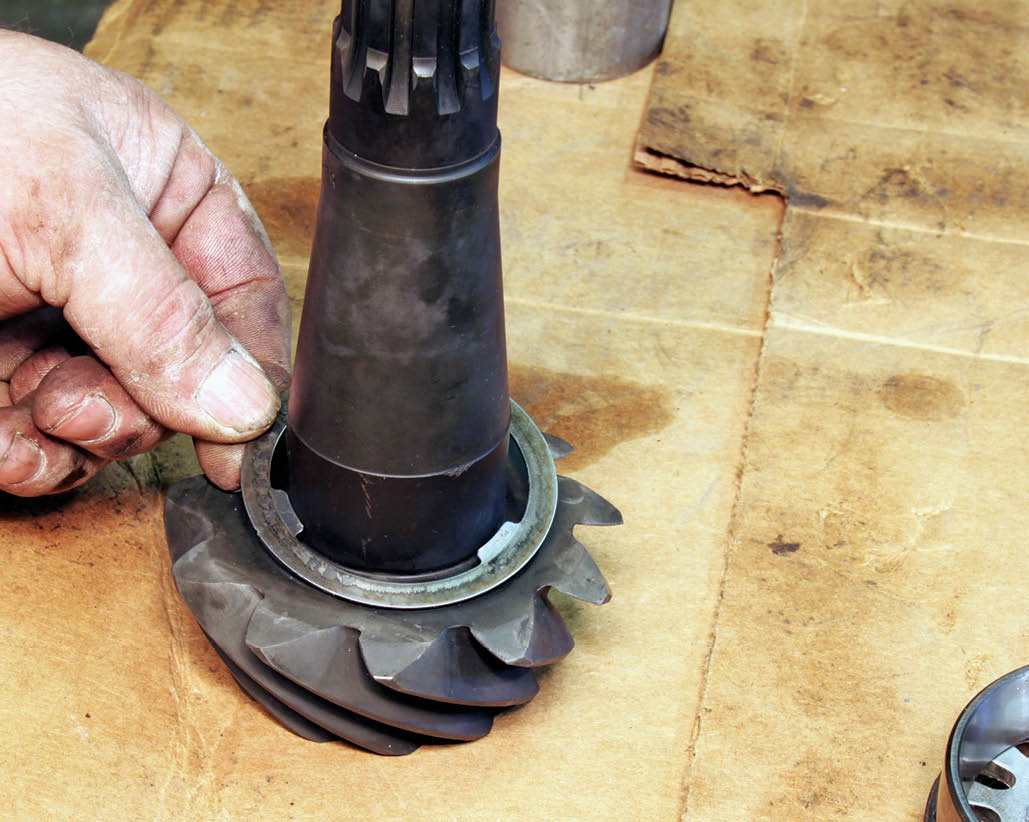
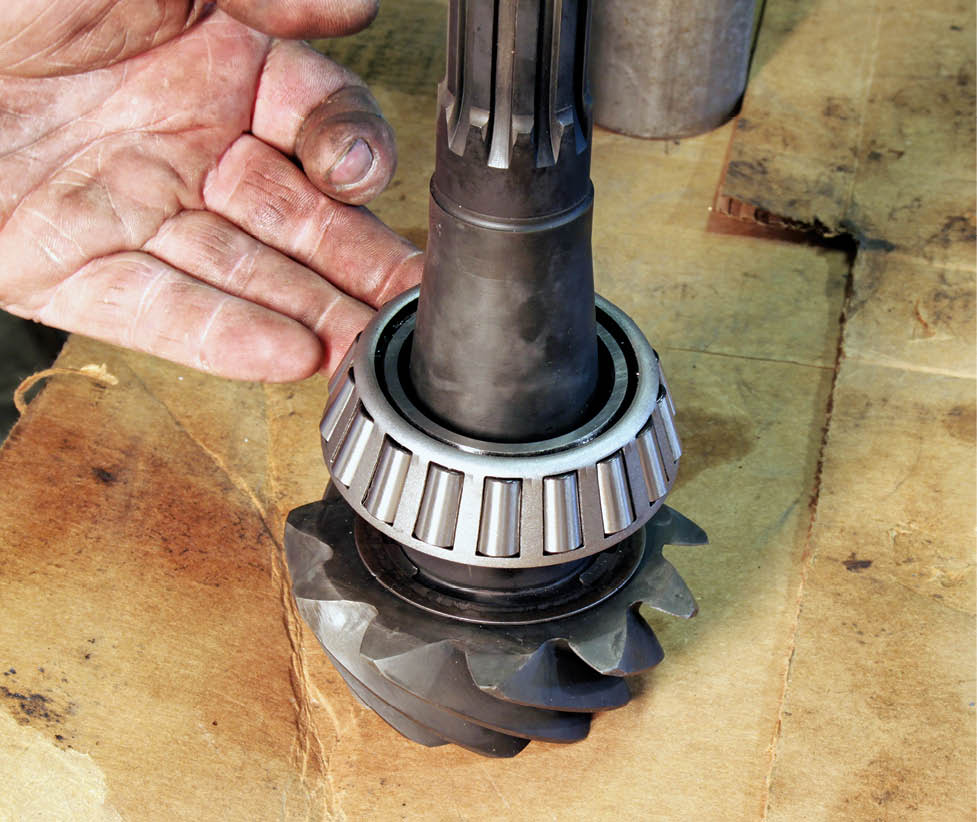
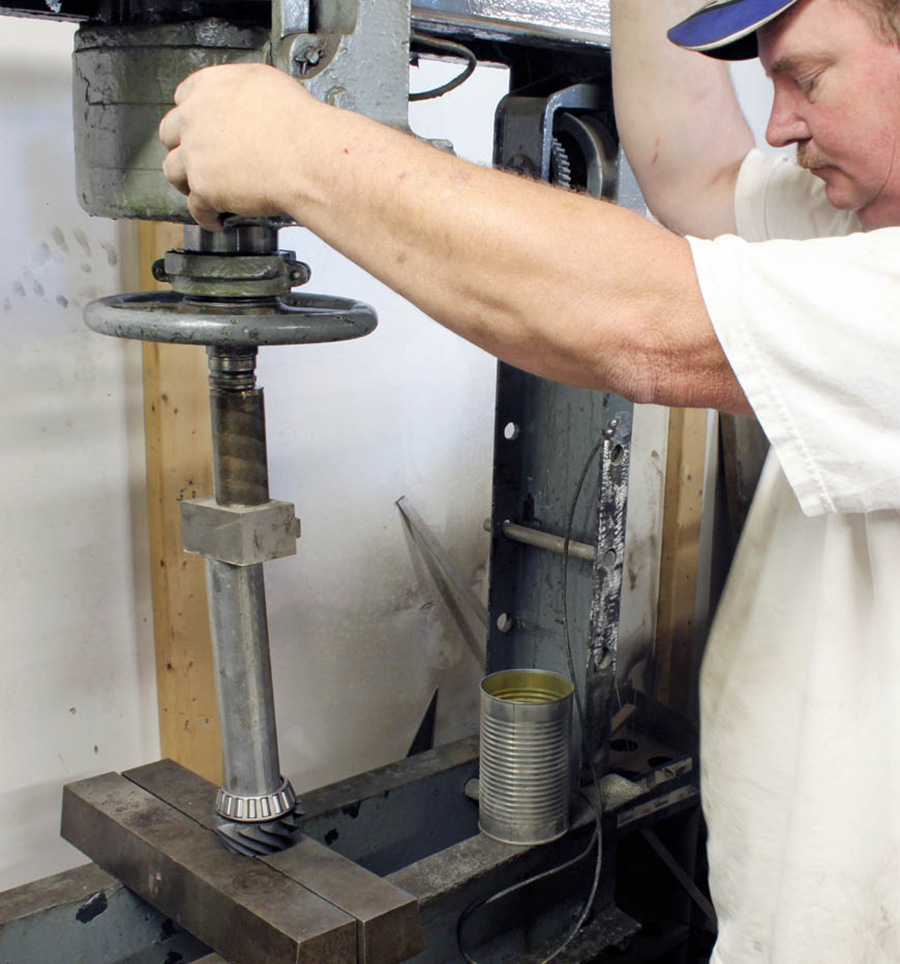
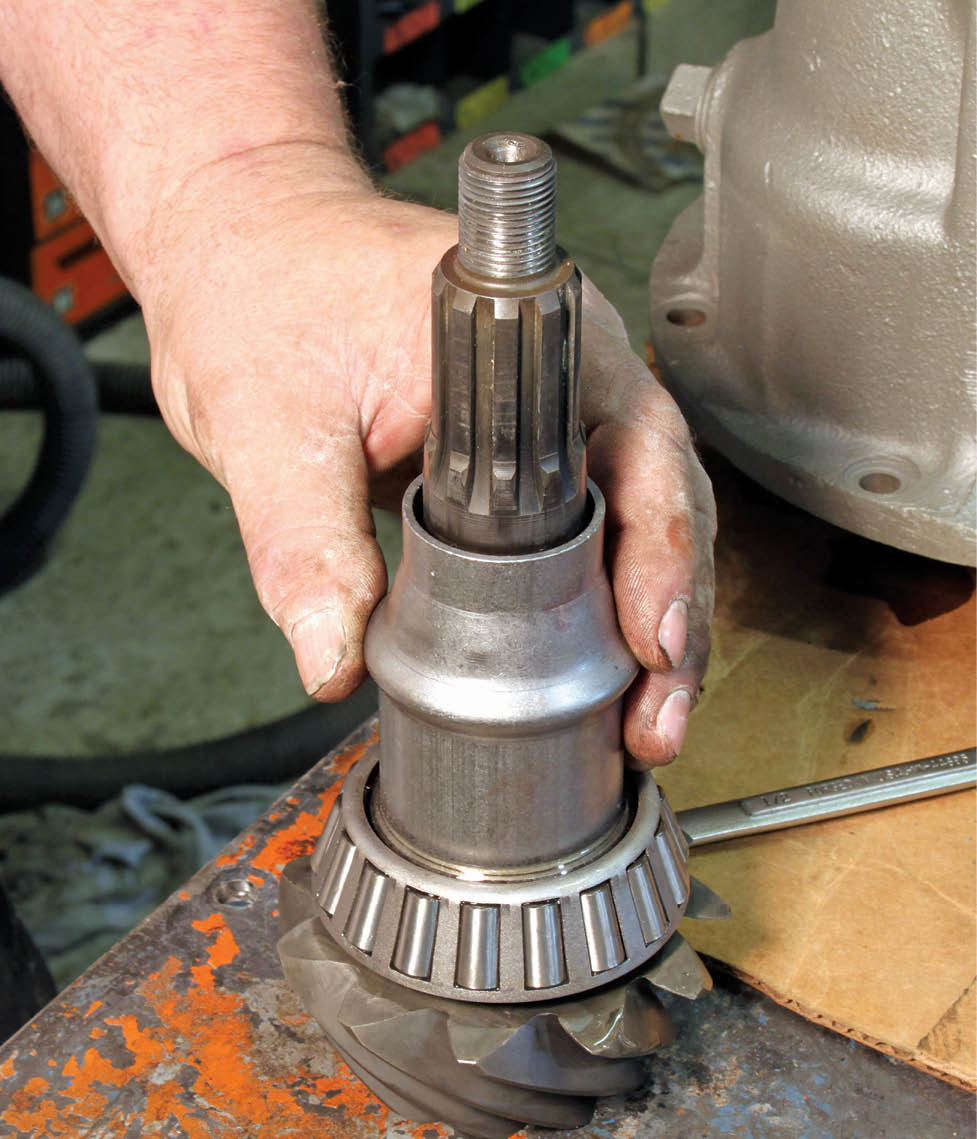
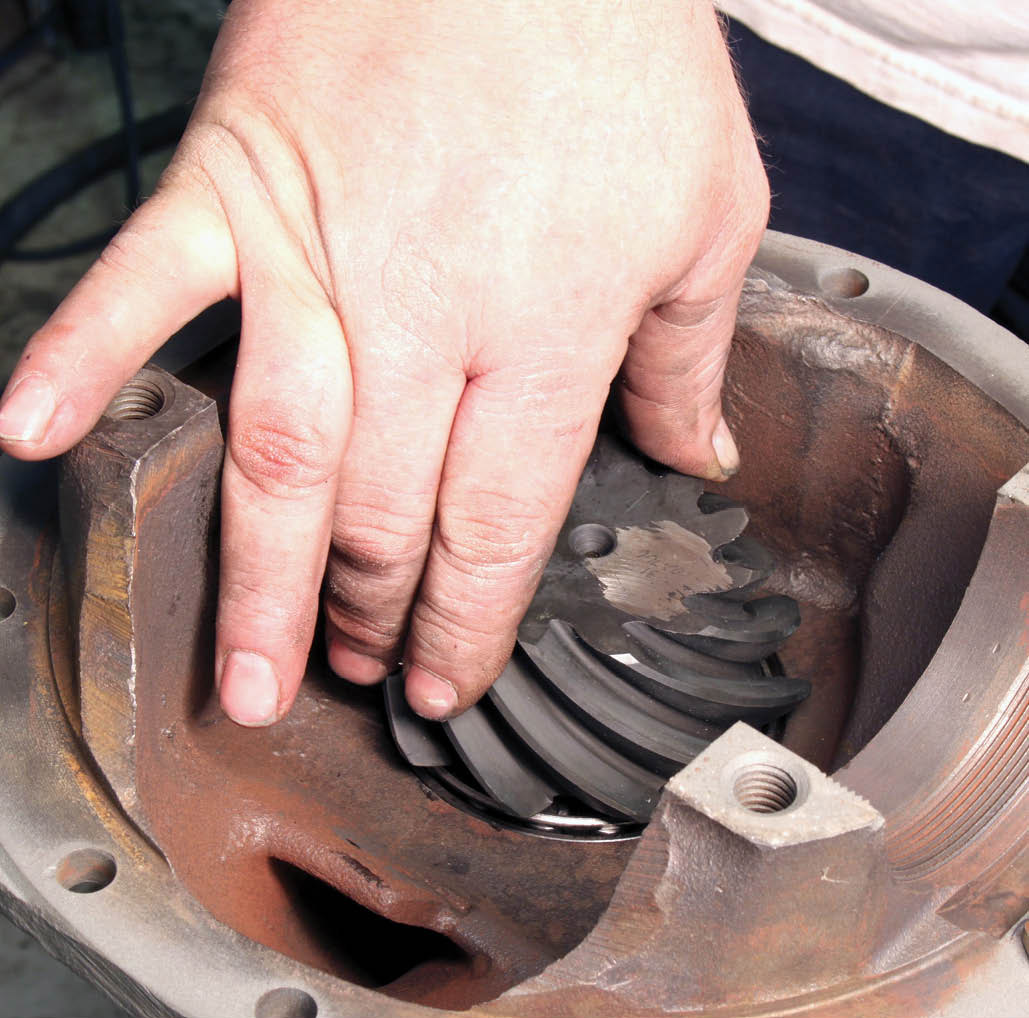
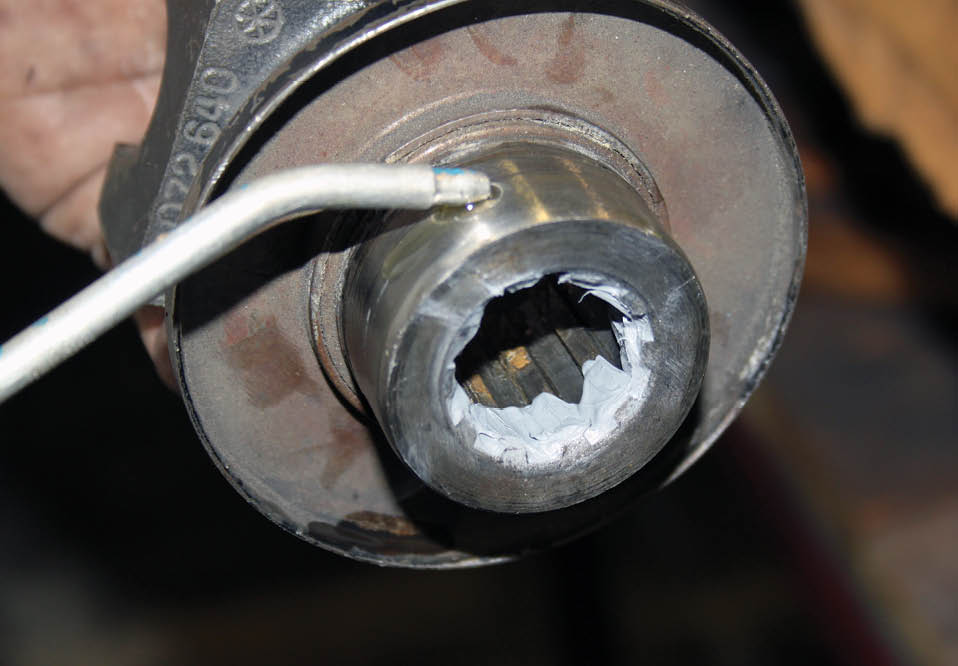
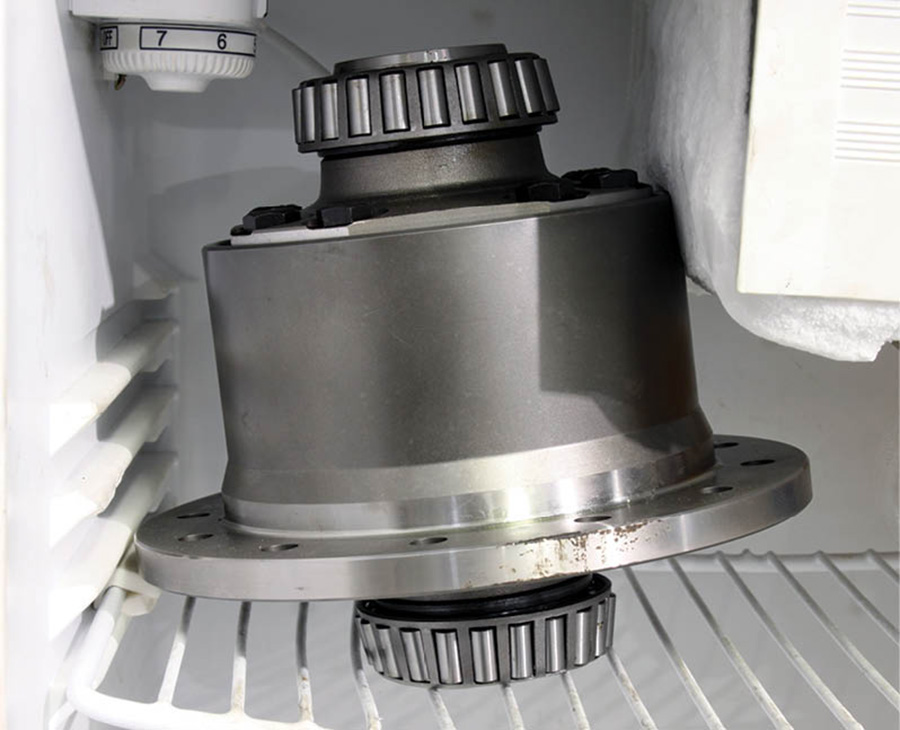
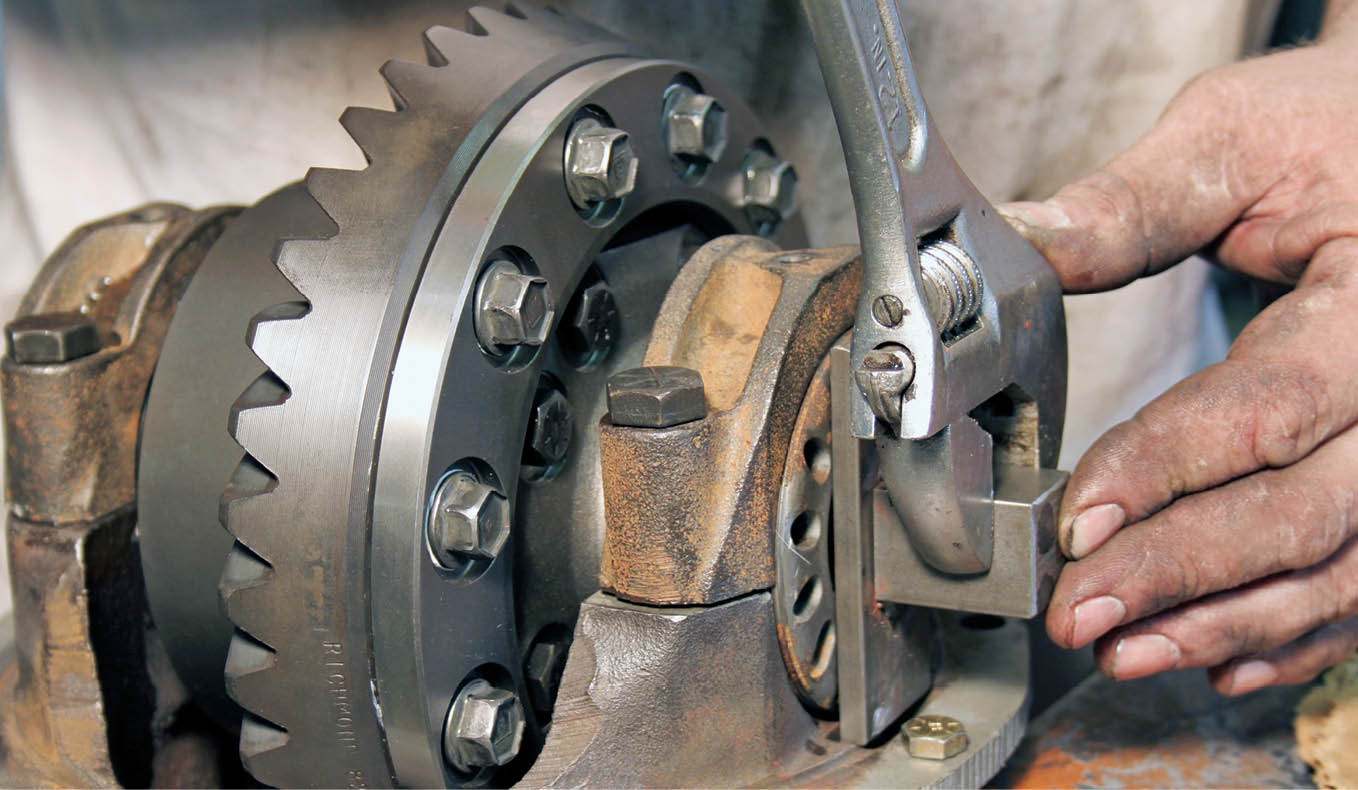
For the record, the 8-3/4 depicted here is a “489” case, which uses the largest pinion bearing. It also uses a shim to set the pinion depth and crush sleeve to set the preload. Additionally, the differential bearing setting (backlash) is set with threaded adjusters. We’ve also joined the project right at the start of the assembly, after the original assembly was disassembled, cleaned, and the necessary new components acquired.

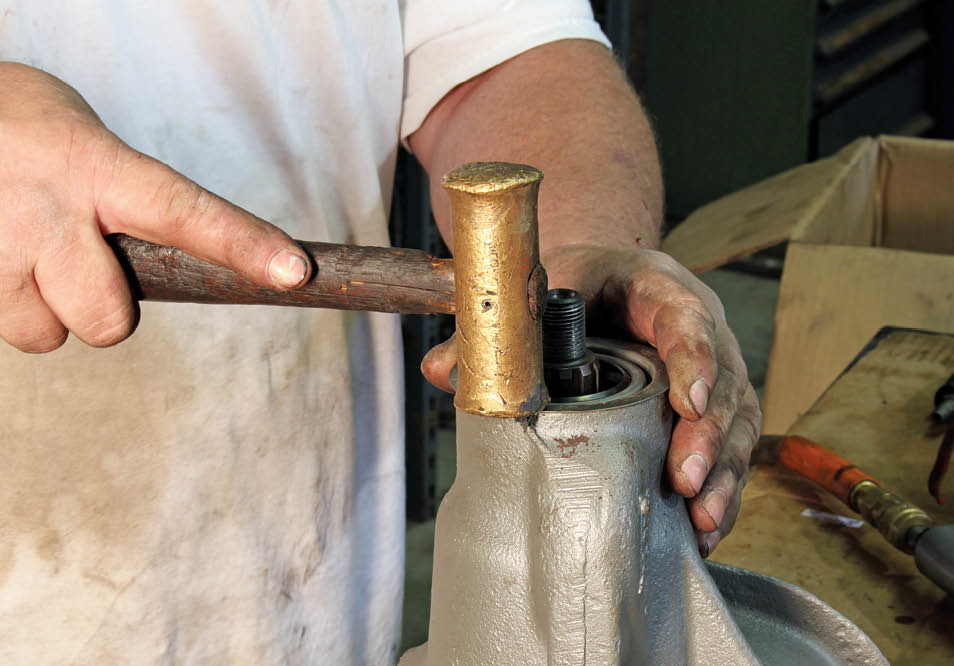
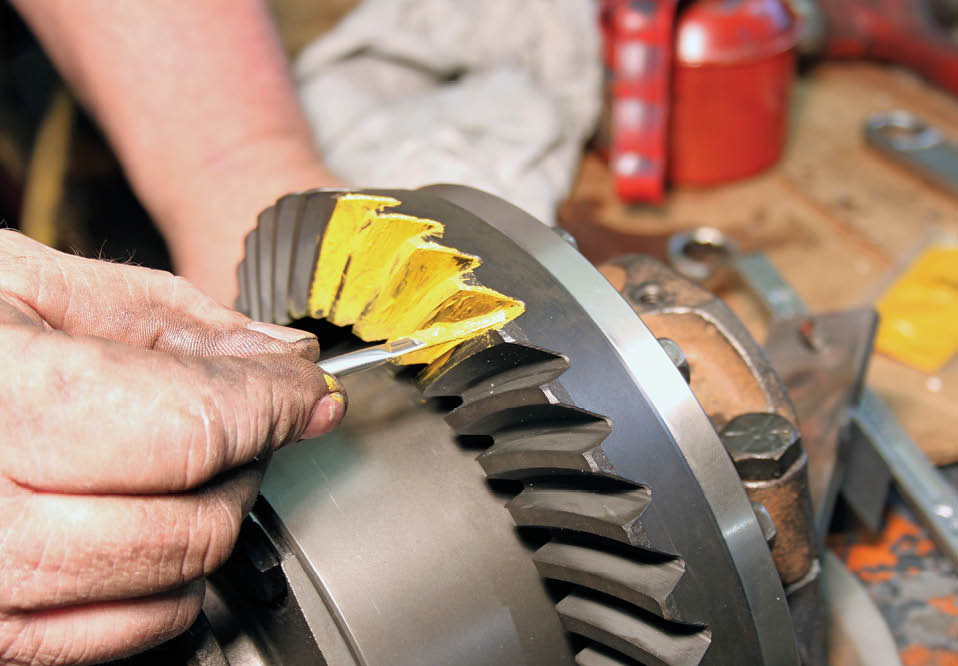
One more thing: Cook didn’t have the expensive tool for measuring the pinion depth during assembly, so the procedures outlined here illustrate the assembly and checking the mesh pattern with paint to determine its accuracy. It’s the way most enthusiasts at home will tackle the job.

With patience and attention to detail, particularly when it comes to setting the backlash and measuring the pinion depth, it’s a project most enthusiasts should be able to tackle with great success—even if it’s their first rearend rebuild.

The project started with inserting new pinion bearing races in the carrier, one here (arrow) and another at the far end of the case where the pinion shaft protrudes. There are shims behind the races that can typically be reused during a rebuild. It can be a challenge seating the races straight and true. There are specialty tools to make it easier but a brass drift generally does the trick.
2. The project started with inserting new pinion bearing races in the carrier, one here (arrow) and another at the far end of the case where the pinion shaft protrudes. There are shims behind the races that can typically be reused during a rebuild. It can be a challenge seating the races straight and true. There are specialty tools to make it easier but a brass drift generally does the trick.
Moving onto the pinion, the correct shim must be slipped on before the rear bearing. This is critical for ensuring the proper mesh with the ring gear and is a trial-and-error process measuring the mesh pattern before finding the just-right shim. Pinion gears are physically smaller with “shorter” ratios, such as 4.11s and 4.56s, and generally require thinner shims, while “taller” ratios, such as the 3.55 used in this project, require a thicker shim. A 0.030-inch shim is the general baseline for most 8-3/4-inch assemblies.
3. Moving onto the pinion, the correct shim must be slipped on before the rear bearing. This is critical for ensuring the proper mesh with the ring gear and is a trial-and-error process measuring the mesh pattern before finding the just-right shim. Pinion gears are physically smaller with “shorter” ratios, such as 4.11s and 4.56s, and generally require thinner shims, while “taller” ratios, such as the 3.55 used in this project, require a thicker shim. A 0.030-inch shim is the general baseline for most 8-3/4-inch assemblies.
 The new rear pinion bearing is slipped onto the pinion shaft. A tapered 1-7/8-inch pinion shaft is used with the desirable “489” case. Since there are three versions of the 8-3/4-inch axle, there will be three different part numbers when it comes to ordering new bearings, making it more important to know which version of the axle you’re working with.
4. The new rear pinion bearing is slipped onto the pinion shaft. A tapered 1-7/8-inch pinion shaft is used with the desirable “489” case. Since there are three versions of the 8-3/4-inch axle, there will be three different part numbers when it comes to ordering new bearings, making it more important to know which version of the axle you’re working with.
Here, Dan Cook simply presses the rear pinion bearing onto the pinion shaft. If performing this project at home, a length of bar stock long enough to cover the pinion shaft will be needed for accurate installation.
5. Here, Dan Cook simply presses the rear pinion bearing onto the pinion shaft. If performing this project at home, a length of bar stock long enough to cover the pinion shaft will be needed for accurate installation.
A crush sleeve is part of the installation with the 489 case. It serves as a spacer between the pinion bearing just installed and another used at the other end of the pinion shaft. The crush sleeve compresses when the pinion nut is tightened, allowing the bearings to press against their respective races with the proper preload. Aftermarket kits are available that eliminate the crush sleeve in favor of a solid spacer, which can be helpful when relying on trial and error to determine the pinion depth.
6. A crush sleeve is part of the installation with the 489 case. It serves as a spacer between the pinion bearing just installed and another used at the other end of the pinion shaft. The crush sleeve compresses when the pinion nut is tightened, allowing the bearings to press against their respective races with the proper preload. Aftermarket kits are available that eliminate the crush sleeve in favor of a solid spacer, which can be helpful when relying on trial and error to determine the pinion depth.
The pinion is slipped into the case, with care being taken not to nick the new bearing race. The rear bearing should be lubed prior to installation. The crush sleeve is not installed yet.
7. The pinion is slipped into the case, with care being taken not to nick the new bearing race. The rear bearing should be lubed prior to installation. The crush sleeve is not installed yet.
On the flip side, the crush sleeve is slipped over the pinion shaft and the front pinion bearing is tapped into place. It’s important not to tap hard enough to deform the crush sleeve at this point. Like the rear bearing, the front one should be lubed prior to installation.
8. On the flip side, the crush sleeve is slipped over the pinion shaft and the front pinion bearing is tapped into place. It’s important not to tap hard enough to deform the crush sleeve at this point. Like the rear bearing, the front one should be lubed prior to installation.
The pinion oil seal comes next, and it is properly installed when the flange is seated against the face of the case. No liquid sealer is required. It simply taps in place.
9. The pinion oil seal comes next, and it is properly installed when the flange is seated against the face of the case. No liquid sealer is required. It simply taps in place.
The pinion yoke comes next, and it is lubed prior to installation. It’s installed with the pinion nut, using red thread locker on the nut’s threads. It torques to 210 lb-ft. This will deform the crush sleeve, requiring a new one if the pinion depth and resulting mesh pattern turn out to be unacceptable.<br />
10. The pinion yoke comes next, and it is lubed prior to installation. It’s installed with the pinion nut, using red thread locker on the nut’s threads. It torques to 210 lb-ft. This will deform the crush sleeve, requiring a new one if the pinion depth and resulting mesh pattern turn out to be unacceptable.
Next, the preload on the pinion bearings is set by torquing the pinion nut with an in-lb torque wrench. For new bearings in the 489 case, the spec is 14 to 19 in-lb. With reused bearings, it’s only 6 to 9 in-lb.
11. Next, the preload on the pinion bearings is set by torquing the pinion nut with an in-lb torque wrench. For new bearings in the 489 case, the spec is 14 to 19 in-lb. With reused bearings, it’s only 6 to 9 in-lb.
Work now moves to the differential and ring gear. For easier installation of the ring gear, the differential assembly was stashed overnight in a freezer. That makes the ring gear easier to slip over the body of the differential.
12. Work now moves to the differential and ring gear. For easier installation of the ring gear, the differential assembly was stashed overnight in a freezer. That makes the ring gear easier to slip over the body of the differential.
The ring gear fastens to the differential using lefthand-thread 3/8-inch bolts and red thread locker, torqued to 55 lb-ft. Most rebuild kits include new ring gear bolts and it’s advised to use them in place of the originals. All Chrysler 8-3/4-inch variants use lefthand bolts.
13. The ring gear fastens to the differential using lefthand-thread 3/8-inch bolts and red thread locker, torqued to 55 lb-ft. Most rebuild kits include new ring gear bolts and it’s advised to use them in place of the originals. All Chrysler 8-3/4-inch variants use lefthand bolts.
With new carrier bearings and races installed, the differential is lowered into the 489 case. The bearing caps are installed next, but not completely tightened. Somewhere around 10 lb-ft is good at this point.
14. With new carrier bearings and races installed, the differential is lowered into the 489 case. The bearing caps are installed next, but not completely tightened. Somewhere around 10 lb-ft is good at this point.
Adjusters for both carrier bearing assemblies are used to set the bearing’s preload and the ring gear backlash. When tightening, the adjusters squeeze the bearings against their races. To start, move the carrier all the way into the pinion gear until there is no backlash (movement), but no binding, either. That can be accomplished by loosening one side and tightening the other, as necessary. The pinion should be rotated continually to check there is no binding.
15. Adjusters for both carrier bearing assemblies are used to set the bearing’s preload and the ring gear backlash. When tightening, the adjusters squeeze the bearings against their races. To start, move the carrier all the way into the pinion gear until there is no backlash (movement), but no binding, either. That can be accomplished by loosening one side and tightening the other, as necessary. The pinion should be rotated continually to check there is no binding.
When there is no backlash and no binding with the ring-and-pinion, install a dial indicator on one of the ring gear’s teeth. Tighten the rightside adjuster (passenger side of vehicle) until the backlash comes in between 0.006 and 0.010 inch.
16. When there is no backlash and no binding with the ring-and-pinion, install a dial indicator on one of the ring gear’s teeth. Tighten the rightside adjuster (passenger side of vehicle) until the backlash comes in between 0.006 and 0.010 inch.
When the backlash is established, the carrier bearing preload is also set. Then, the bearing caps are torqued to 90 lb-ft.
17. When the backlash is established, the carrier bearing preload is also set. Then, the bearing caps are torqued to 90 lb-ft.
Now comes the moment of truth: Checking the mesh pattern. Rebuild kits typically include the paint to use on the ring gear. Apply it to about three or four of the teeth, front and back, called the drive and coast sides. The outer edge of each tooth is called the heel.
18. Now comes the moment of truth: Checking the mesh pattern. Rebuild kits typically include the paint to use on the ring gear. Apply it to about three or four of the teeth, front and back, called the drive and coast sides. The outer edge of each tooth is called the heel.
Turn the gearset to check how the pinion gear meshes with the ring gear. If all the preloads and backlash specs are correct, the pinion depth should be the only factor in the pattern, which should indicate the pinion teeth are meshing generally in the middle of the ring gear teeth with a relatively wide contact patch. The pattern here suggests the pinion is a little shallow, but within the range of acceptability. That means the whole shebang doesn’t have to disassembled to install another pinion shim.
19. Turn the gearset to check how the pinion gear meshes with the ring gear. If all the preloads and backlash specs are correct, the pinion depth should be the only factor in the pattern, which should indicate the pinion teeth are meshing generally in the middle of the ring gear teeth with a relatively wide contact patch. The pattern here suggests the pinion is a little shallow, but within the range of acceptability. That means the whole shebang doesn’t have to disassembled to install another pinion shim.
With the mesh pattern deemed acceptable, the adjusters are tightened and locked into place. That essentially completes the carrier assembly.
20. With the mesh pattern deemed acceptable, the adjusters are tightened and locked into place. That essentially completes the carrier assembly.
With a fresh gasket on the housing studs, the carrier slips into place. The fasteners are tightened to 45 lb-ft.
21. With a fresh gasket on the housing studs, the carrier slips into place. The fasteners are tightened to 45 lb-ft.
The axles slip into place next and bolt to the flanges at the outer ends of the tubes. The outer axle shaft bearings are not lubricated with gear lube, so they must be packed with grease prior to installation.
22. The axles slip into place next and bolt to the flanges at the outer ends of the tubes. The outer axle shaft bearings are not lubricated with gear lube, so they must be packed with grease prior to installation.
There’s a break-in period with rebuilt axle assemblies. Keep the engine load and vehicle speed low for the first 20 miles or so and let the axle cool down completely. After that, take it easy for the first 500 miles or so. It’s also a good idea to change the gear oil after that 500-mile threshold.
23. There’s a break-in period with rebuilt axle assemblies. Keep the engine load and vehicle speed low for the first 20 miles or so and let the axle cool down completely. After that, take it easy for the first 500 miles or so. It’s also a good idea to change the gear oil after that 500-mile threshold.
Because the axles have to be removed, the rearend rebuild provides a convenient opportunity to replace the original rear drum brakes with discs and it couldn’t be easier for the 8-3/4. Several aftermarket kits are available, including from Wilwood, and the project mostly requires the simple replacement of the drums with caliper mounting brackets, the calipers, and the discs. It’s a straightforward conversion that delivers a big performance enhancement.
24. Because the axles have to be removed, the rearend rebuild provides a convenient opportunity to replace the original rear drum brakes with discs and it couldn’t be easier for the 8-3/4. Several aftermarket kits are available, including from Wilwood, and the project mostly requires the simple replacement of the drums with caliper mounting brackets, the calipers, and the discs. It’s a straightforward conversion that delivers a big performance enhancement.
Another must when building a rear axle with a limited-slip differential is a friction-modifying additive to keep down the chatter that may come from the differential’s clutch pack. AMSOIL Slip Lock does the trick and it works with conventional or synthetic gear lubes.
25. Another must when building a rear axle with a limited-slip differential is a friction-modifying additive to keep down the chatter that may come from the differential’s clutch pack. AMSOIL Slip Lock does the trick and it works with conventional or synthetic gear lubes.
Products such as AMSOIL Severe Gear 75W-90 offer greater resistance to heat and oxidation and typically last much longer than conventional gear lube.
26. Products such as AMSOIL Severe Gear 75W-90 offer greater resistance to heat and oxidation and typically last much longer than conventional gear lube.
SOURCES
AMSOIL Inc.
(800) 777-7094
amsoil.com
Dan Cook Racing
(248) 904-2150
dancook@dancookracing.com
Modern Rodding
VOLUME 5 • ISSUE 40 • 2024