Modern Rodding Tech

InTheGarageMedia.com
mechanic stands next to a yellow Chadly Coupe holding a package of Dynaliner
1. The new, fully removable floors are in and insulated with Dynamat Xtreme. After the steering and pedals are installed, the next phase entails completing the job with DynaPad.
East Coast Graffiti’s Quest for Comfort
Sealing Out Heat, Cold & Noise
By John Gilbert Photography by THE AUTHOR
T

here are some guys content to load a folding chair into their hot rod and drive to a local cruise, sit there all day, and then drive home. On the other hand, there are guys like me who can’t wait to jump in their hot rod and road trip across multiple state lines at a moment’s notice. And that’s where Dynamat Xtreme and Dynaliner come in.

I’ve always had a bad case of wanderlust; it started in 1970 riding a rigid frame Harley-Davidson chopper from California to Michigan and back. Then as the decades went by my interest in enjoying more comfort evolved my cross-country mode of transportation into driving old Corvettes and hot rods. 

To celebrate my 60th birthday I made a banzai run from Florida to California in a 7-1/2-inch chopped Model A that I christened the “Chadly Coupe.” I learned a lot from my cross-country journey in the Chadly Coupe and kept mental notes regarding how I would equip my future Model A for road trips.

The Chadly Coupe’s restricted vision was inspiration for my next Model A to have a stock height top. Next, the Chadly Coupe had bare steel floors with an abbreviated exhaust system that dumped carbon monoxide fumes into the interior. “Hotter than the hinges on the gates of hell” is how I would describe driving the Chadly Coupe from Florida into Georgia and stopping in Chattanooga, Tennessee, that night. I suffered all the way home to California.  

I knew my next hot rod for the long haul would feature better creature comforts.

In 2018, while covering Vintage Air’s leg of the Street Rodder Road Tour on our way to the Back to the 50’s, I spent part of the ride in Rick Love’s ’32 Ford coupe. Love’s ’32 Ford is as refined as a ’32 Ford can get and still captures every essence of a traditional hot rod. Love is the president of Vintage Air, so naturally his coupe has Vintage Air A/C and to hold in the cold and buffer road noise he chose to install Dynamat Xtreme with Dynaliner closed-cell foam on top.

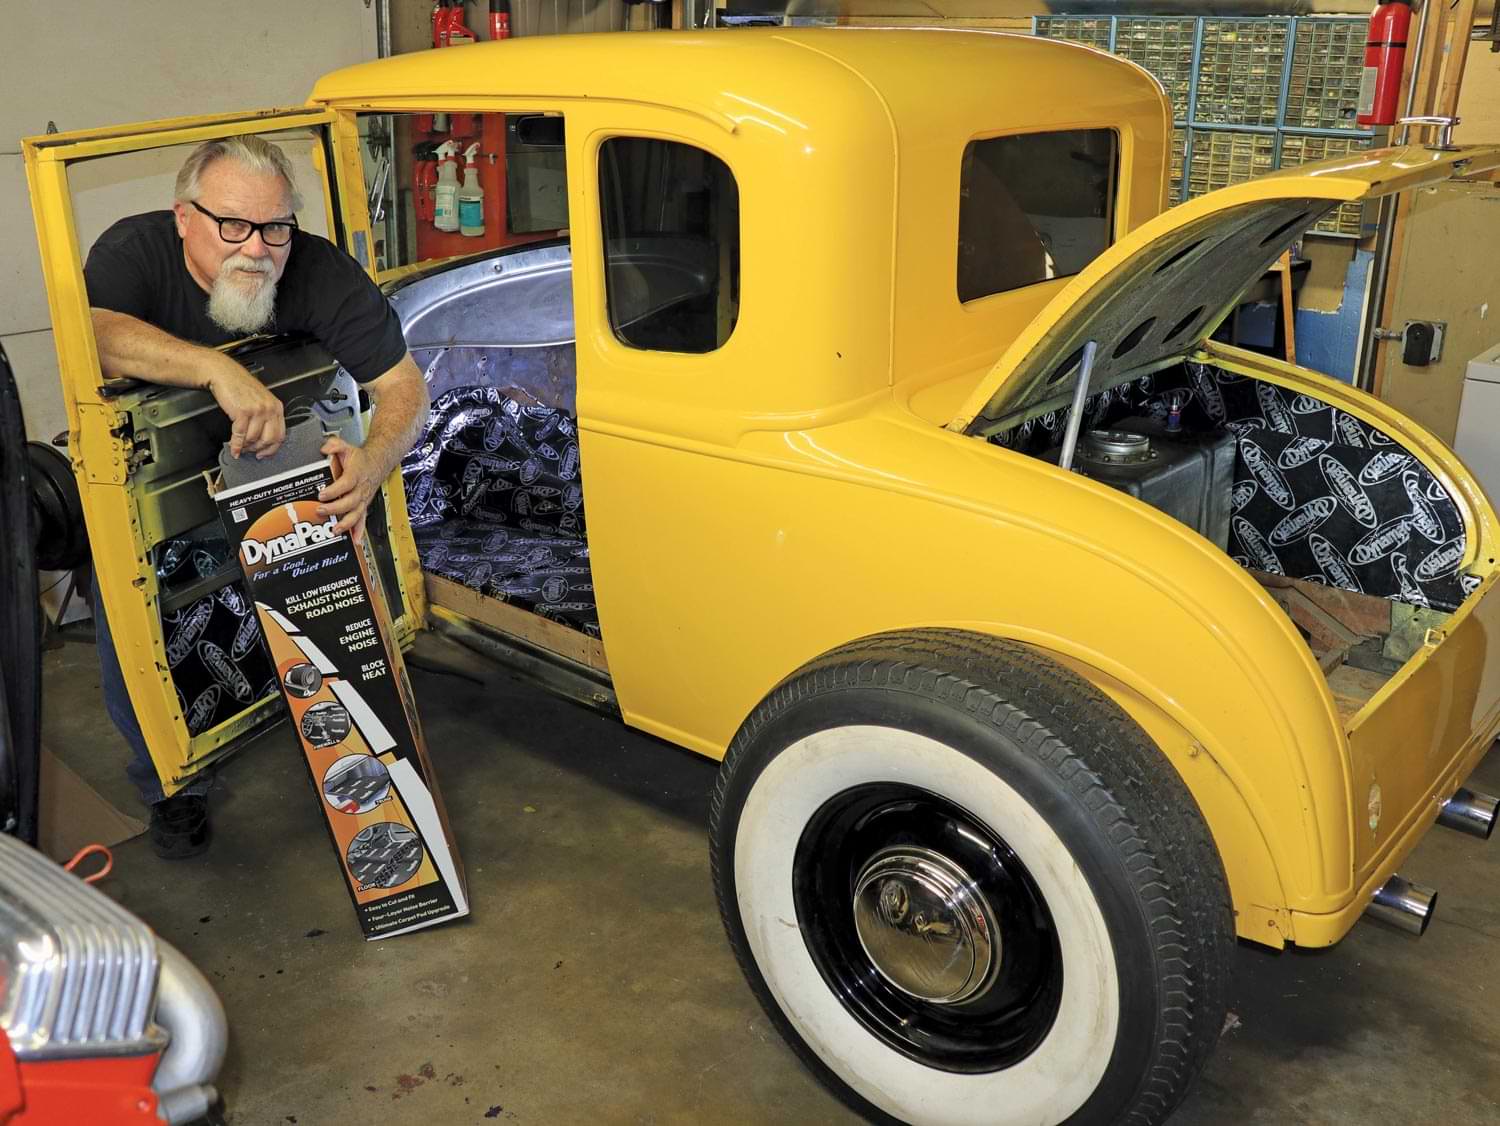
For those who missed reading about “East Coast Graffiti” in the Aug. ’21 edition of Modern Rodding, my Model A is the best example of a poorly constructed and butchered hot rod that I’ve ever seen. I bought the coupe to shorten the time I’d be without having a hot rod to drive while I’m building a ’32 Ford roadster—but then things went south. 

The plan now for East Coast Graffiti is to undertake the repairs necessary to make it a safe and dependable hot rod capable of driving from coast to coast comfortably without having to tear it down and start from scratch. To celebrate my upcoming 70th birthday I’m planning to have East Coast Graffiti readied for a coast-to-coast journey. 

The best builders use Dynamat in their trophy-winning cars. On the flip side of the scale I’m using Dynamat to seal up a jalopy with a lot of exhaust and wind leaks. The amazing part is my old beat-up Model A with Dynamat installed will stand equal in noise and heat suppression against the finest of high-tech hot rods.

Installing Dynamat Xtreme for the first-time can be completed with better than satisfactory results by keeping a few simple tips in mind. My tendency when I work on cars is to do the work as clean as possible and this includes areas that will not be seen when the car is completed. For me, a perfect Dynamat Xtreme installation means hardly any wrinkles in the aluminum constraining layer on top of the extremely sticky butyl layer. 

To get the feel for working with Dynamat Xtreme I began with the easiest areas to do first, which meant the flat-shaped floorboards. I admit I was intimidated by covering the transmission tunnel with Dynamat Xtreme but I discovered my installation skills improved rapidly, so when it was time to wrap the Speedway Motors fiberglass tunnel and toeboard I was ready. East Coast Graffiti with its endless problems to correct is a freelance tech editor’s dream. Modern Rodding’s readers can look forward to more tech articles on improving the coupe in the near future.

view of the tattered interior of the yellow Chadly Coupe
2. Not one thing about how this car was done right. Extremely dangerous and uncomfortable I drove it once and then ripped the interior completely apart to rebuild.
the removed carpeting reveals major problems in the floors, running from a hole-riddled plywood toeboard rearward to a water-damaged particle board trunk floor
3. Stripping out freshly laid carpeting revealed major problems in the floors, running from a hole-riddled plywood toeboard rearward to a water-damaged particle board trunk floor.
mechanic uses 1x2-inch pine runners to match floor height with the top of the framerails
4. The body was channeled 4 inches and then welded solid to the stock frame. I used 1×2-inch pine runners to match floor height with the top of the framerails.
view looking down at the doorsill confirms the pine runners are not located in a position that will not allow the doors to shut with the door panels installed
5. Looking down at the doorsill confirms the pine runners are not located in a position that will not allow the doors to shut with the door panels installed.
A Speedway Motors fiberglass ’32 Ford front floor section with trans tunnel is placed on the car floor
6. A Speedway Motors fiberglass ’32 Ford front floor section with trans tunnel saved fabrication time and required a minimum amount of trimming to fit the Model A.
knowing this car will need repairs and suspension upgrades in the future, the 1-inch marine plywood floors were designed to be completely removable by undoing five screws
7. Knowing this car will need repairs and suspension upgrades in the future, the 1-inch marine plywood floors were designed to be completely removable by undoing five screws.
mechanic makes a template for the 4x8 sheet of plywood
8. Not trusting my ability to whack a virgin 4×8 sheet of 1-inch marine plywood I traced cut lines onto a sheet of 1/4-inch plywood to make a template.
mechanic testfits the 4x8 template
9. A testfit of the template and I was ready to cut the pricey 4×8 sheet of marine plywood to fit. Built in three sections, the floor is fully removable.
view of faded Dynamat Xtreme, once applied to a separate car window to keep rain water from seeping in
10. Weatherproof: Ten years ago, Dynamat Xtreme was applied to prevent rain water from rusting out the doors and floor of this C10 stored outdoors. It faded but never leaked.
a table holds sheets of Dynamat Xtreme in preparation for installation
11. A portable table makes a good surface to work from. The sheet of Dynamat Xtreme was laid out in warm conditions and allowed to relax. Warmth makes it easily pliable.
a sheet of Dynamat Xtreme sits on a table with a portion of the brown wax paper backing peeled
12. Don’t touch. The adhesive surface of Dynamat Xtreme is extremely sticky. Finger hold or clamp the leading edge to peel back the brown wax paper protective wrapper.
a sheet of Dynamat Xtreme sits on a table with it brown wax paper backing completely removed, a removed piece of the car flooring sits beside it
13. To make Dynamat Xtreme easier to install and provide maximum results, parts of the car that can be removed should be. As skills increase, non-removable parts last.
mechanic places the removed car floor piece onto the sheet of Dynamat Xtreme for application
14. Dropping the floor on top of the sheet of Dynamat Xtreme worked much better than trying to lay the sheet of Dynamat on top of the floorboard.
mechanic uses a matte knife with a new blade to cut the access Dynamat
15. Use new blades. A sharp matte knife makes short work out of cutting Dynamat Xtreme to size. I pressed the edge of the Dynamat as I moved the matte knife.
a 2x4 wrapped in a terrycloth towel is used to ensure sheet adhesion

16. Provided the results are a sheet of Dynamat that lays perfectly flat without wrinkles, pressing a 2×4 wrapped in a terrycloth towel works to ensure adhesion.

a Dynamat Heavy-Duty roller tool and DynaTape sit on a table
17. Nothing works better than a Dynamat Heavy-Duty roller tool to mash out wrinkles and promote adhesion. DynaTape is extremely pliable and easy to use and bridges gaps.
a toolbox caster to is used in place of the Dynamat roller tool to roll out the wrinkles

18. I couldn’t find my Dynamat roller tool, it must have rolled away, so second best was to use a toolbox caster to roll out the wrinkles.

view of a slightly deteriorated pressed wood panel once exposed to water
19. It took only one time exposed to water for this pressed wood panel to begin to deteriorate. I used Bondo to seal up preexisting holes.
pressed wood panel with the Eastwood rubberized undercoating side upward
20. Spraying Eastwood rubberized undercoating did a great job of waterproofing the panel’s interior side. Applying Dynamat Xtreme to the exterior waterproofed the exterior side of the trunk panel.
a black sharpie marker sits on uncut pieces of wood
21. Using a Sharpie works great to mark cut lines created either by tracing the pattern around the perimeter of the part or measuring the outside dimensions of the part.
mechanic uses the matte knife to trim a Dynamat sheet around a part before placement

22. Another way to fit Dynamat Xtreme to a part is to cut out an oversized piece of Dynamat and then trim to fit. Scraps of Dynamat work great to plug holes.

the shaft of a screwdriver is used to push the Dynamat sheet into a part corner
23. Using the round or square shaft of a screwdriver makes a good tool to push or mash Dynamat Xtreme into crevices and gaps.
a scratch awl is used to punch out the mounting holes beneath the Dynamat sheet

24. Mounting holes can be located with a scratch awl and punched out from behind, or holes no longer visible located by feeling for indentations on the front side.

Dynamat sheets rest on the driver side floor and tunnel in preparation for application
25. Starting with the easy-to-do parts first, Dynamat Xtreme was applied to the driver side floor followed with a strip of Dynamat to the center of the tunnel.
the car floor covered in Dynamat Xtreme
26. For the passenger side of the tunnel I used smaller scrap pieces of Dynamat Xtreme. Beware, once Dynamat Xtreme is applied it is extremely difficult to peel off.
mechanic cuts a scrap of Dynamat liner
27. Using leftover scraps fell short, leaving voids in the coverage. Scissors worked great to cut additional pieces of Dynamat to fit and use the roller to mash into place.
close view of the car floor covered with Dynamat Xtreme
28. DynaTape worked great spread across long seams to join gaps in the tunnel and floor. Business cards were cut out to make templates for small Dynamat patches.
view of the area holding the gas tank and battery with walls lined with Dynamat Xtreme
29. Gas tank and battery moved forward to a safer mounting position and Marine plywood covered front and back used to create a barrier away from gas fumes and to block heat and noise.
 SOURCES
Dynamat
(513) 860-5094
dynamat.com
Speedway Motors
(855) 313-9173
speedwaymotors.com/modernrodding
Eastwood
(800) 343-9353
eastwood.com
Modern Rodding

VOLUME 3 • ISSUE 17 • 2022