Modern Rodding Tech
InTheGarageMedia.com
Fully restored dashboard of a 1930s Ford Roadster with original-style gauges and classic steering wheel
1. Finished and earning its keep, the new dash in the 1936 Ford phaeton is on the road, working well.
A DASH OF 1936
Our Final Custom Fabrication Includes the Class of 1947
By GERRY BURGER Photography by THE AUTHOR
O

ur project 1936 phaeton is making steady progress. Like most things in hot rodding, the dashboard project has taken on a life of its own. We could have installed gauges in the existing factory holes, but that would have been way too easy, or as one hot rod sage once told me, “Anything worth doing is worth overdoing.” So, the dashboard modification involved shortening the glovebox (Modern Rodding Aug. ’22), modifying the 1935 Ford hood trim, and, finally, building an entirely new center panel.

We bought an N.O.S. 1947 Ford speedometer and clock at a swap meet. From there we hit speedwaymotors.com to order some traditional-style, black S-W gauges to go with our non-winged 1961 S-W tachometer. We had the clock converted to a 12V and serviced by The Clock Works (clockwks.com).

We enlarged the original speedometer opening and added 3/8 inch to the bottom of the dash to facilitate the larger 1947 speedo. That extra depth was added using a piece of 1×3/16-inch flat stock to form a new bottom profile on the dashboard. This process eliminated the original lower notch in the dashboard. This piece of flat stock defined the new bottom profile and connected the two ends of the dash, allowing us to remove the original center sheetmetal from the dash.

The original gauge opening on the left side of the speedometer was partially filled and then recut to hold the tachometer. The left gauge in a 1936 phaeton dash always seemed too high, so we brought it down to our new centerline.

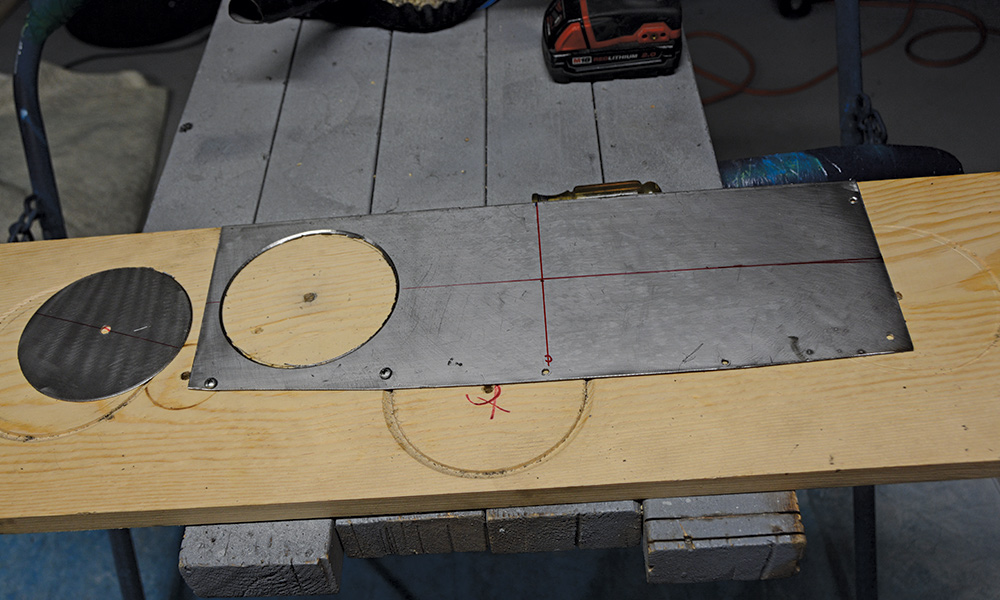
Next, we cut a piece of 18-gauge steel to fit between the speedometer and the shortened glovebox. A metal brake put the desired 90-degree bend on the bottom while the panel’s top extended up to the top of the dashboard. This new panel was held in place with sheetmetal screws while we laid out the design for the dash. We wanted the dashboard to look “old-school complicated” with multiple switches, lights, trim, and gauges. We knew the clock’s position would be on the opposite end from the speedometer, next to the glovebox. After spending considerable time finding the horizontal center of the dash, we marked the clock’s location, removed the panel, and cut the hole for the clock using a fly-cutter in our less-than-precise drill press we purchased 53 years ago. Most gauges utilize a flange and mount from the front of the panel; 1947 Ford gauges mount from behind, protruding through the holes, so the holes must be precise. Filing the new openings gave us an excellent fit.

With the two big gauges mounted, we now knew how much space was between them for our four S-W gauges. Careful measuring kept things evenly spaced and on the centerline. For purely aesthetic reasons, we left slightly more space between the two end gauges and the large gauges, with an equal distance between the four small gauges.

Next, we positioned the three jeweled indicator lights we removed from an ancient dash insert hanging from our shop wall. Finally, we marked the location for the five switches and drilled the proper size hole for each switch, and no two were the same size. We had a pull button starter, headlight switch, horn, power port (formally known as a cigarette lighter), and the choke rod. Vintage-style knobs from SO-CAL Speed Shop keep the vintage theme.

Once again, the panel was removed, and the same sheetmetal screws now held the panel in place on a piece of wood while we cut the holes. The S-W gauge holes were cut with a hole saw, while the light and switch holes had their respective drill sizes. We cannot overemphasize how important measuring and alignment are on the dashboard. Remember, you will look at this whenever you sit in the car. Confident that all spacing was correct, we screwed the new panel back in place and TIG welded the centersection to the two ends.

We formed the 1935 Ford hood side trim to fit between the gauges and along the bottom of the dashboard, and then it was time for typical bodywork and paint. We picked a non-metallic, gray/blue color from the PPG fleet color palette and used their Delfleet Essential paint (our new favorite, go-to paint). The paint flowed out perfectly and required no buffing. We also painted our genuine Stewart-Warner Southwind heater to match, with a gold accent on the bottom. A Vintage Air heater supplies the hot air to our unit.

Next, we installed all components and turned the dash over to complete the wiring, forming a harness long enough to merge with the existing wiring from the fuse panel. A piece of fender welting was used between the top of the dash and the cowl, and the dashboard was in place for the last time.

However, we were unsatisfied with the minute gap around the speedometer and the clock required for the rear-mounted gauges. We came up with a unique solution. We went online (All World Machinery Supply) and located an O-ring that was slightly smaller than 1/16-inch (1.78mm) thick by just under 4-3/4 inches (120.37mm) in diameter. This stretched nicely over the large gauge bezels and provided the perfect seal around the gauges. Our trim pieces hold the rubber O-rings in place, but a simple drop of super glue could be used if needed. With that little trick, we had perfect fitting gauges.

We are very pleased with the final look of the dashboard. It combines vintage, art deco–style gauges with traditional hot rod bits. We like to think these same parts could have been combined in the late 1950s by any enterprising hot rodder or customizer seeking to modernize with “almost-factory”-appearing gauges combined with hot rod gauges.

Was forming this dash a lot of work? Absolutely. But one thing is sure: The effort will pay off every time we slide behind the wheel. Now we are one step closer to finally seeing that speedometer needle move.

Dashboard of a 1930s Ford Roadster during restoration, featuring iconic round gauges and Art Deco design
2. Often, if a modification appears difficult, it may have been done wrong; if it appears simple, you probably got it right. We’d like to think this looks simple … but it wasn’t.
Restored classic speedometer, tachometer, and clock set for a 1930s Ford Roadster with Stewart-Warner tach
3. It all began with swap meet treasure, some N.O.S. 1947 Ford instruments, and a converted-sender 1961 S-W tach. Things like this get us in trouble every time.
Set of Stewart-Warner oil, water temperature, battery, and fuel gauges for a classic car restoration project
4. Armed with vintage parts, we hit speedwaymotors.com and bought some simple yet stylish black S-W gauges, complete with senders.
Fabricated glove box door panel in raw metal finish, undergoing shaping for fitment
5. One of the non-simple but enjoyable modifications was shortening the original glovebox to facilitate the new gauge lineup. Vintage knob is a Lokar item.
Craftsman cutting sheet metal using a large manual shear for custom panel fabrication
6. What could be better than a day in the shop cutting, bending, and welding real steel? Our shear quickly cut out the new blank for the dash.
Marked and prepped sheet metal panel for custom body work or patching
7. After cutting the blank, we marked the lines for the metal brake and drilled a series of holes. Some will be used for bolts, others will be filled with tack welds.
Bending a sheet metal panel on a manual brake for precise shaping during the restoration process
8. The metal brake made short work of forming the required 90-degree bend. This forms the lower profile of our new dashboard and eliminates the factory “notch” from the lower profile.
Welded and ground smooth metal panel, ready for final fitment or further modifications
9. On the lower left you see the 1×3/16 piece of flat stock welded in place to form the lower profile. You will also notice that the factory dash is not flat; it contains a gentle left-to-right curve.
Close-up of a custom-fabricated patch panel for a classic car, in-progress with clamps and tools visible
10. A cut-off wheel made quick work for forming three relief cuts that allow the sheetmetal to conform to the subtle dashboard curve. You must cut just past the formed 90 to prevent buckling the sheetmetal.
Metal dashboard being clamped and welded for a custom restoration project
11. You’ll need plenty of clamps to form the curve. Clamp from the center outward, forming the proper profile. We left the top flange of the dashboard intact to ensure the shape of the dashboard didn’t change.
Finished metal dashboard panel installed on the frame with a smooth fit and finish
12. Our new center panel was then drilled, and a series of sheetmetal screws held it in place. Before removing the panel, we marked the top to be trimmed to the upper flange profile.
Dashboard in a classic car with cutouts marked for gauges and switches during restoration
13. Next, we reinstalled the dashboard to ensure we liked the layout. Paper gauges provide the look, and we slipped the steering wheel back on to check the line-of-sight to the gauges.
Hole-saw drilling on a metal panel to create precise gauge openings for a custom dashboard
14. Satisfied with the layout, we used those same screws to hold the panel to a scrap piece of pine. The panel must be held firmly in place when using an old-style fly cutter such as this.
Metal panel with cut gauge holes, ready for installation in a custom dashboard
15. Here is the clock opening. Note the fly cutter leaves a bit of an angle on the cut. We carefully removed this with a half-round file. We didn’t dare take a power tool to this opening.
Custom bracket for securing dashboard components, fabricated and drilled for mounting
16. After forming the opening, we made brackets to weld to the dash. These will hold the clock and speedometer in place. Remember, the gauges’ flanges rest on these brackets from behind. Weld-in studs make it a simple installation.
Backside view of the dashboard showing a partially installed clock in progress
17. Here is the clock installed. The upper bracket has a step formed in it, while the clock adjuster chrome knob protrudes through the bottom of the dash.
Rear view of the dashboard showcasing a gauge installation for a classic car restoration
18. The speedometer mounts were similar but more straightforward to form. Covering the light socket holes keeps that nice N.O.S. face clean.
Restored dashboard with an installed clock in a custom-fabricated metal panel
19. The clock is mounted from behind on our new brackets. We like the proportions between the undersized glovebox door and the clock, not to mention the cool art deco styling.
Restored speedometer fitted into a custom-fabricated dashboard panel for a classic car
20. The speedometer opening was a bit more complicated because it involved expanding the existing hole with a file. Note the 3/8-inch lower extension to the dashboard so the speedo is centered.
Completed dashboard with speedometer and clock installed in the custom metal panel
21. Now the two dominant players are in place, the trick is centering everything perfectly between the two big gauges. Finding the center line between two lines is tricky.
Hole-saw drill cutting precise openings for gauges in a metal dashboard panel
22. We carefully laid out the small gauge center points before cutting the openings with a hole saw. Once again, the sheetmetal was secured to the board for stability.
Oil and fuel gauges fitted into the custom-fabricated dashboard panel
23. After cutting two holes, we installed gauges and double-checked the spacing. The masking tape set the larger gap next to the big gauges. Using tape as a gauge is an easy, accurate way to space.
Metal dashboard panel with all gauge openings cut and ready for installation
24. We cut the last two gauge holes, certain our center lines were good. Note that the spacing between the small gauges is slightly less than the spacing between the last small gauge and the larger gauges.
Craftsman hammering a metal dashboard panel to ensure a smooth fit for gauge holes
25. We TIG-welded the new centerpiece in place and finished the welds. The heat caused just a bit of stretching in one area, but just a couple of minutes with the body hammer and shot bag had things back in shape.
Restored dashboard with full gauge assembly, including clock, speedometer, and indicator lights
26. We formed the hole for the tach, drilled the indicator light and switch holes on perfect centerlines, and then installed everything for a test-fit before standard bodywork. So that you know, each switch required a different hole size.
Close-up of water temperature and fuel gauges alongside the restored clock in the dashboard
27. We fabricated the stainless steel trim using the 1935 Ford hood side trim. Patience and precision provide great satisfaction. This trim visually connects all the gauges.
Rear wiring view of the dashboard showing the intricate setup for the gauges and electrical components
28. After standard bodywork using PPG epoxy primer and PPG Delfleet Essence single-stage urethane topcoat, we had a great finish. Gauges and switches were installed and we spent time doing a tidy wiring job.
Finished blue-painted dashboard with clock and fuel gauge, ready for final installation
29. We thought we had excellent clearance around the rear-mounted gauges, but the tiny gap was bugging us. Our solution was to get a thin O-ring (less than 1/16 inch) and slip it over the front of the gauge. The instant gap is gone with a neat factory look.
Fully restored and installed dashboard in a classic car, featuring Stewart-Warner gauges and vintage clock
30. Finally, the dash is complete, wired, and installed for the final time. Factory-style fender welting goes between the top of the dash and the body. We painted the S-W South Wind heater to match, complete with gold accents.
Restored maroon interior dashboard of a 1930s classic car, featuring original steering wheel and central speedometer
31. We offer this earlier photo for contrast. We want to think we have improved the look considerably with our “modern” 1947 Ford instruments and S-W gauges.
SOURCES
Modern Rodding
VOLUME 5 • ISSUE 51 • 2024