Modern Rodding Tech
InTheGarageMedia.com
1963 Ford Galaxie two-door hardtop original black paint classic muscle car project
1. This is the car the project began with. Although it appears clean and sturdy, extensive rust damage lies just beneath the surface, necessitating many patch panels to restore it to better-than-new condition.
Ford Rear Quarter-Panel Replacement
Bringing Our 1963-1/2 Ford Galaxie Back to Life
By Ron Covell Photography by Anton Lanesky
A

nton’s Hot Rod Shop in Hiram, Ohio, has created an impressive series of exceptional builds. In this article, we will closely examine how aftermarket patch panels can help restore one in poor condition) to modern-day standards and offer a solid foundation for future modifications.

This 1963-1/2 Ford Galaxie project serves as a good example. Although the car they started with appeared decent, it didn’t require much investigation to realize that replacing the floors, quarter-panels, and several other panels with high-quality reproductions was wise. This car will include a Roadster Shop RideLine chassis with fully independent suspension designed for a supercharged Coyote engine prepared by Roush Performance.

The first step in the build was to remove the body from the original frame and test the fit against the new chassis. This chassis is designed to fit the Galaxy without modifications, but it’s always wise to conduct a test-fitting before any serious work begins. As expected, the body fit perfectly, so the next step was to send the body off to be chemically stripped and e-coated, protecting the metal from any future rust or corrosion.

The floor and trunk panels were replaced first, while the outer body skin remained untouched. The quarter-panels were removed following the reinforcement of the bottom of the body with the new panels. All replacement panels were sourced from Auto Metal Direct (AMD), and as you’ll see, they feature factory-style flanges, ensuring a hassle-free fit.

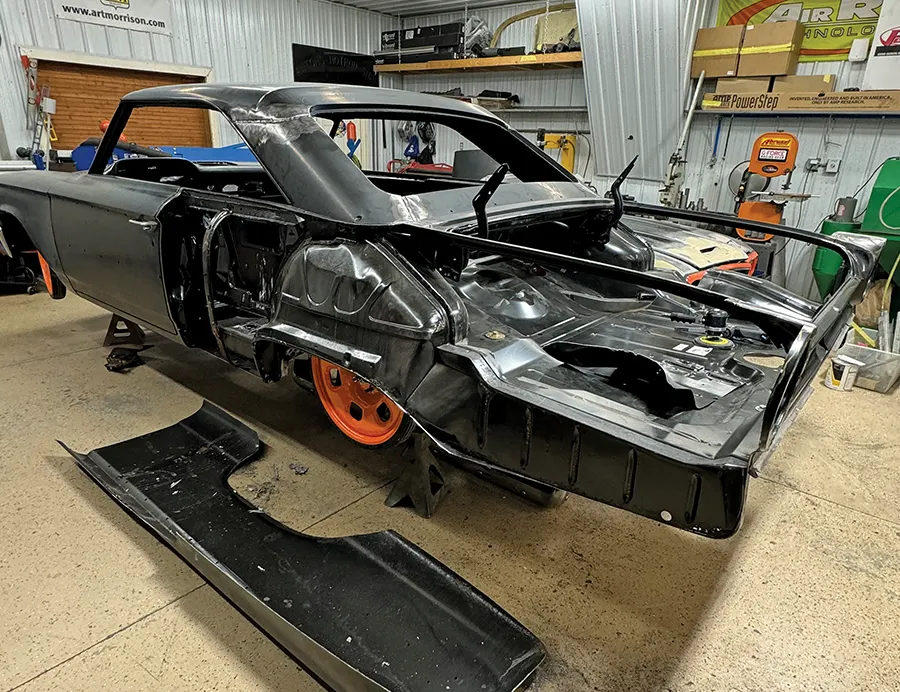
While the quarter-panels were removed, the wheelhouses were widened to fit the large wheels and tires intended for this build. Fortunately, the inner edges of the original wheelhouses provided the necessary clearance, so only the outer wall needed adjustment. This eliminated the need to modify the floorpans.

The main task was to correctly align the large quarter-panels before clamping and tack-welding them into place. Achieving the right fit is crucial; otherwise, alignment issues will persist. After the quarters were tack-welded in position, the fit of the doors and decklid were double-checked to ensure no problems arose. Once the fit was confirmed, all the joints were TIG welded together.

On the original Galaxie bodies, the sail panels (adjacent to the rear window) were attached to the roof with an overlapped joint smoothed with lead at the factory. Anton cut out this problematic joint and replaced it with a strip of body-thickness sheetmetal. This change will eliminate the need for lead filler and help prevent potential problems in the future. Overlapped joints can cause various issues, including trapping moisture (which can lead to rust), and sometimes the joints may show through the paint as the panels expand and contract with weather-induced heat cycles.

Now that the car’s basic body structure is restored, Anton has many exciting ideas to make this build unique, featuring a variety of custom-fabricated details. Stay tuned!

1963 Galaxie body lift revealing original chassis with V8 drivetrain and rust patina
2. One of the first steps was removing the body from the chassis, and a two-post lift is a great tool for this job.
Art Morrison custom chassis upgrade for 1963 Ford Galaxie with coilovers and rack steering
3. The car will be built over a Roadster Shop RideLine chassis. This is made as a direct bolt-on assembly for the 1963 Galaxie, with IRS both front and rear.
1963 Galaxie underbody with installed Art Morrison frame and 9-inch Ford rearend
4. Before any significant work is undertaken, the body is fitted to the new chassis to check the fit and determine if any adjustments are needed. The fit was perfect, as expected.
Bare metal 1963 Ford Galaxie shell stripped and mounted for bodywork and restoration
5. Anton always has the sheetmetal for their project cars chemically stripped and then e-coated to ensure that the bare metal is completely clean and protected inside and out.
Epoxy primed 1963 Galaxie body shell on stands ready for assembly and paint prep
6. The rusty floor areas are removed with the body back from stripping and coating.
New reproduction trunk floor pan installed on 1963 Galaxie body restoration
7. AMD makes top-quality replacement panels for the most popular cars. These floor panels fit nicely.
Rear quarter panel replacement in progress on 1963 Ford Galaxie project car
8. With the floor panels replaced, the quarter-panels are removed. Note how clean all the interior panels are after the stripping and e-coating.
Body line alignment using tape reference on 1963 Galaxie during sheet metal fitting
9. The wheelhouses need to be widened to accommodate the wheels and tires being used for this build. Masking tape is used to quickly show the location of the quarter-panel sheetmetal, revealing how much clearance there is.
Inner quarter view showing body filler and contour alignment on 1963 Ford Galaxie
10. Fortunately, there is ample room available for expanding the wheelhouse.
1963 Galaxie quarter panel edge trimmed and prepped for welding with visible replacement arch
11. The outer portion of the wheelhouse is removed in preparation for reattachment in its new location.
Inner wheelhouse and trunk area sanded bare on 1963 Ford Galaxie during panel fitting
12. The wheelhouse has been re-welded after attaching a metal strip as a spacer.
Rear corner bracing and weld seam prep on 1963 Galaxie with black epoxy frame rail
13. The bare metal is coated with epoxy paint to seal it.
New reproduction quarter panel skin for 1963 Ford Galaxie coupe, black EDP coated
14. This is an AMD quarter-panel for the Galaxie.
1963 Galaxie full trunk floor pan with inner fender stampings, ready for restoration install
15. The edges of the quarter-panel are appropriately flanged, making it significantly easier to fit these panels in place.
Test-fit quarter panel with cleco pins on 1963 Galaxie showing tight body line fit
16. Clamps and clecos are used to hold the quarter-panel in its proper location.
Rear tail section alignment on 1963 Galaxie with cleco clamped quarter and trunk rail
17. The rear corner requires some careful finessing.
Tape measuring fitment on new 1963 Ford Galaxie quarter panel during mock-up
18. After fitting the quarter-panel, all critical dimensions are double-checked.
Seam weld and grind work along sail panel into quarter on 1963 Galaxie coupe
19. The joint at the sail panel is fitted, tacked, and TIG welded together.
Roof seam and sail panel welds on 1963 Galaxie showing TIG finish and heat marks
20. The original Galaxie utilized an overlapped, leaded joint to connect the sail panel to the roof. This double-thickness joint was removed and replaced with a strip of metal that is butt-welded into place. This maintains a uniform thickness, which helps prevent issues that can arise with overlapped joints.
1963 Galaxie quarter seam TIG welded and ground smooth on fresh panel install
21. The front edges of the new quarter-panels are adjusted as needed to ensure uniform door gaps.
Full body skim coat applied to 1963 Galaxie with blocking underway on new sheet metal
22. With the patch panel work completed, the car is prepared for sealing with epoxy primer before the final modifications are done.
SOURCES
Modern Rodding
VOLUME 6 • ISSUE 59 • 2025